Avi Deployment Guide for Microsoft Azure
Introduction
About Microsoft Azure
Microsoft Azure is a cloud computing service that offers hosting and related public cloud services, as well as developer products to build a range of programs from simple websites to complex applications.
Azure provides a set of modular cloud-based services with a host of development tools, including hosting and computing, cloud storage, data storage, translation APIs and prediction APIs. Figure 1 depicts a sample Azure deployment.
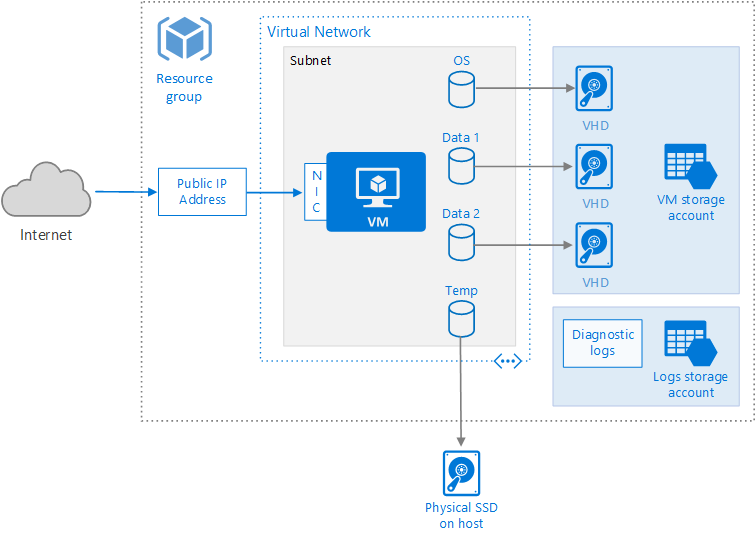
Figure 1. Azure deployment
About Avi Vantage
The Avi Vantage Platform provides enterprise-grade distributed ADC solutions for on-premises as well as public-cloud infrastructure. Avi Vantage also provides built-in analytics to diagnose and improve the end-user application experience, while making operationalizing easier for network administrators.
Avi Vantage is a complete software solution which runs on commodity x86 servers or as a virtual machine and is entirely enabled by its REST API.
Purpose of This Guide
This document describes the process of provisioning and configuring Avi Vantage as an application delivery controller for application workloads running inside Azure.
Intended Audience
The document is intended for
- Network administrators: To configure and operationalize the Avi Vantage solution.
- Azure system administrators: To provision the Avi Vantage solution.
We assume familiarity with
- The basics of load balancing and application delivery.
- Basic Azure functionality. For detailed information refer to the Microsoft Azure Documentation.
Overview
Use of Avi Vantage with Azure provides the following functionality:
- The Avi Vantage Controller is available as an Azure appliance (VHD).
- Once the Avi Controller is deployed, Azure account details and credentials are provided to it. It then connects to the Azure infrastructure and automatically provisions Service Engines as required.
- A single interface is available on the SE for control and data traffic (in-band management).
- VIP addresses are allocated from Azure IPAM.
- An optional, public VIP can be allocated automatically to a virtual service, along with a private VIP address.
Installation Procedure
Prerequisites and Assumptions
Both Microsoft Azure and Avi Vantage provide a variety of configuration and deployment options, based on individual requirements. This guide makes the following assumptions regarding the infrastructure:
Privileges
- For resource group where the Avi Controller is spawned, a role of contributor or higher is required.
- For virtual network where the Avi Service Engine instances are to be deployed, a role of AviController or higher is required. For more details on creating the AviController role, refer to the Role Setup for Installation into Microsoft Azure KB article.
- Specific ports need to be allowed on the Service Engine and Controller management subnets to enable Controller-to-Service Engine communication. For details, refer to the Protocol Ports Used by Avi Vantage for Management Communication KB article.
- The Service Engine subnet should allow incoming TCP connections on port 7 from the IP address 168.63.129.16. This is used by Azure to probe the Service Engine health. For more details on this requirement, refer to Microsoft’s Understand load balancer probes article.
- Starting with 18.1.4, Avi Vantage supports Azure Pay-as-you-go (Azure PAYG) license. Currently, Avi Vantage 18.1.4 has only beta support for Azure PAYG license. This version should be used in non-production environments only.
You must choose the license type during the cloud creation, and it cannot be changed later.
For more information on the different type of licenses available for Azure deployment, refer to Azure Marketplace Licensing.
Networking
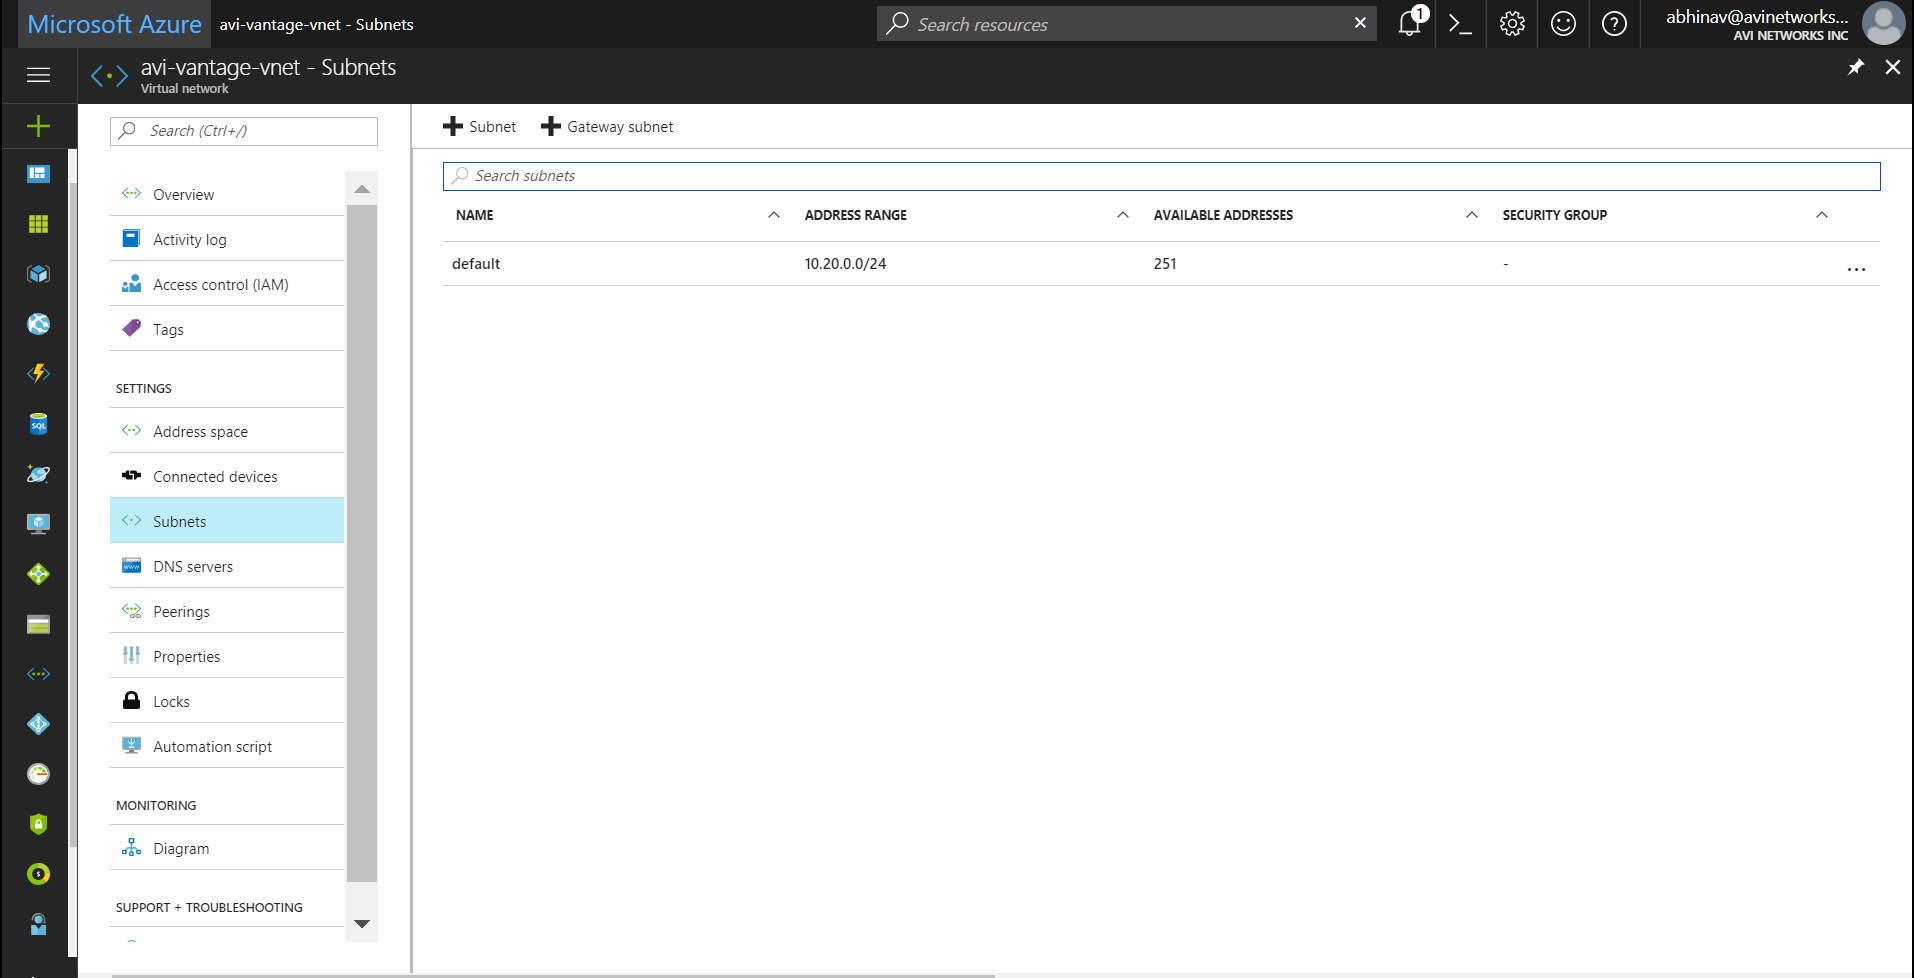
The resource group must have an Azure Virtual Network (VNet) configured with a subnet.
For the purpose of this document, the resource group avi-vantage will be used to deploy the Avi solution. As displayed in the screenshot below, this group has avi-vantage-vnet VNet, with an available address space of 10.20.0.0/16 and a subnet of 10.20.0.0/24.
Microsoft Azure Resource Limits
Microsoft Azure objects have predefined limits to the number of instances that can be instantiated.
These limits are based on the location of a given subscription. For instance, the total number of cores that can be used by the subscription in a particular location defines these limits.
The following limits must be increased appropriately, to allow scaling Avi virtual service and object creation in Microsoft Azure:
Networking Limits
- Public IP addresses - Static
The default value is 20. This value should be increased if the deployment is expected to have more 20 public IPs.
Load Balancer Limits
-
Frontend IP configuration - Basic
The default value is 10. It is recommended to set this to a higher value. Each virtual service IP and port combination consumes one frontend IP configuration.
-
Rules per resource - Basic
The default value is 150. It is recommended to increase this to a higher value. Each virtual service IP and port combination consumes one rule.
-
Load Balancers
The default value is 100. This limit should be raised as required, if more than 100 Service Engine groups are expected.
Additional Information
The above limits can be increased by submitting a request to Microsoft Azure via a support case. For more details, please refer to Azure subscription and service limits, quotas, and constraints.
Avi Controller Instantiation
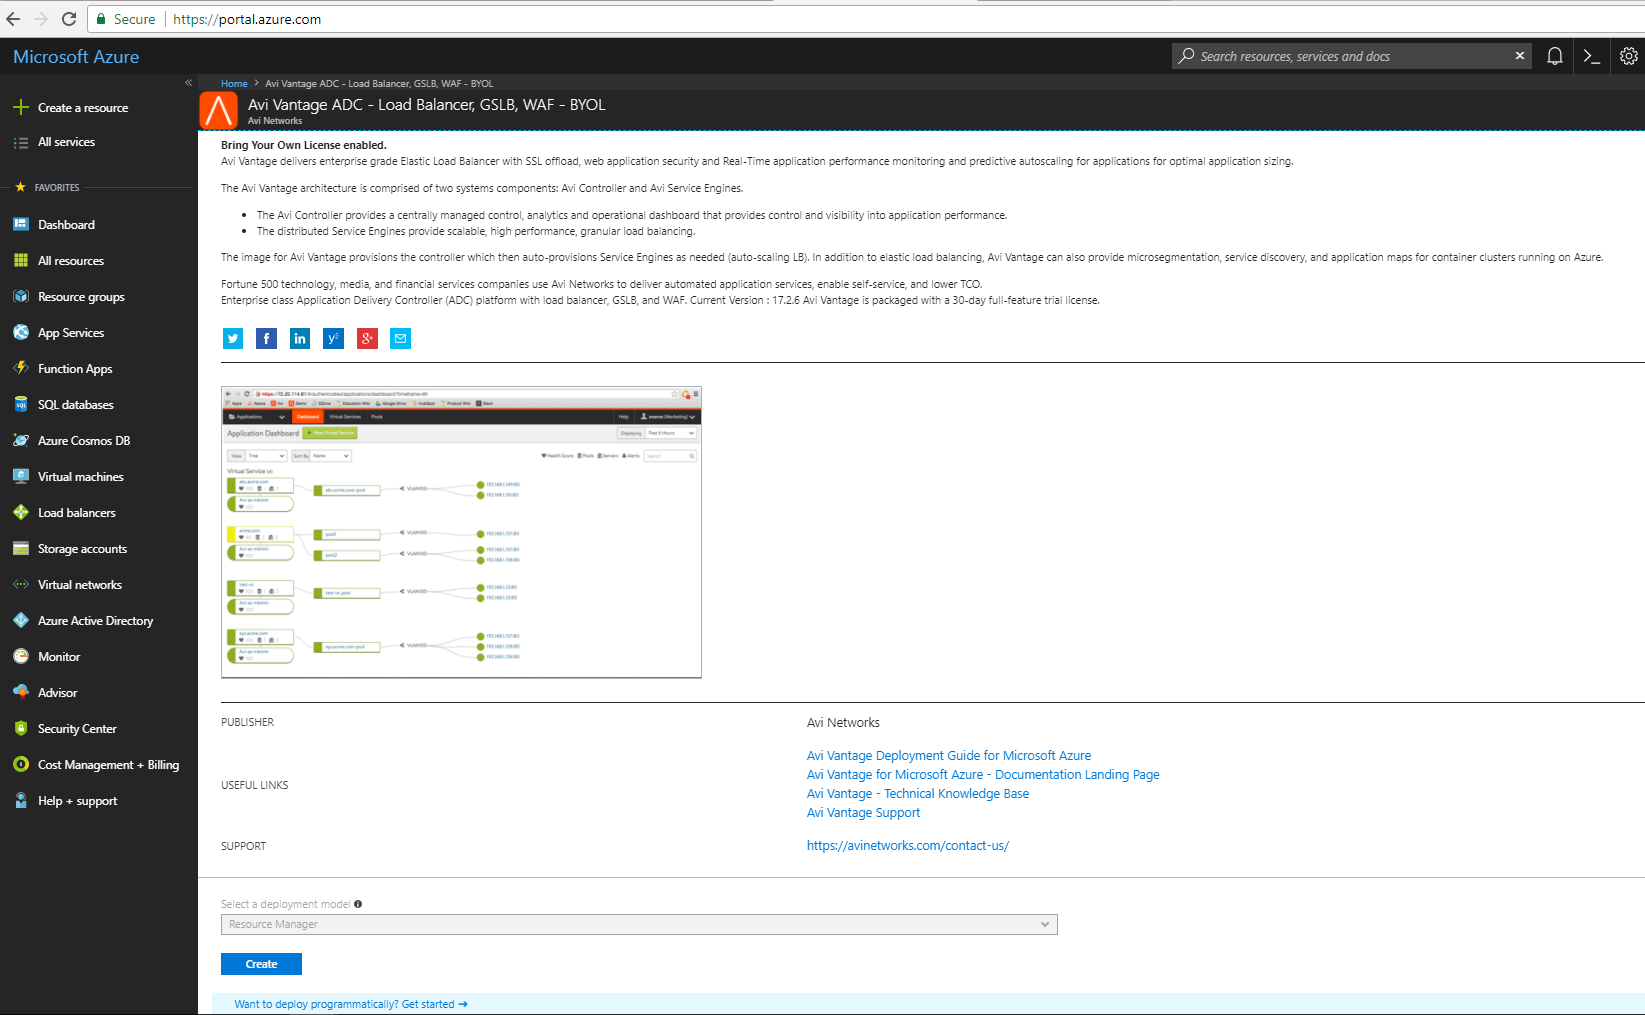
Avi Vantage is available in Azure Marketplace as a Bring Your Own License (BYOL) offering.
-
Access Azure Marketplace at https://azuremarketplace.microsoft.com/ and log in using your Azure credentials. Alternately, you can log in using your Azure credentials at https://portal.azure.com.
-
Marketplace Link : Navigate to the Avi Vantage page on Azure Marketplace.

-
Click on Get it Now to start the deployment process. If the deployment is via the Azure portal then create a new VM and search for Avi Networks. The Avi Vantage VM will show up in the search results.
Follow the given steps to initiate the deployment:
-
Provide the information requested under the Basics tab.
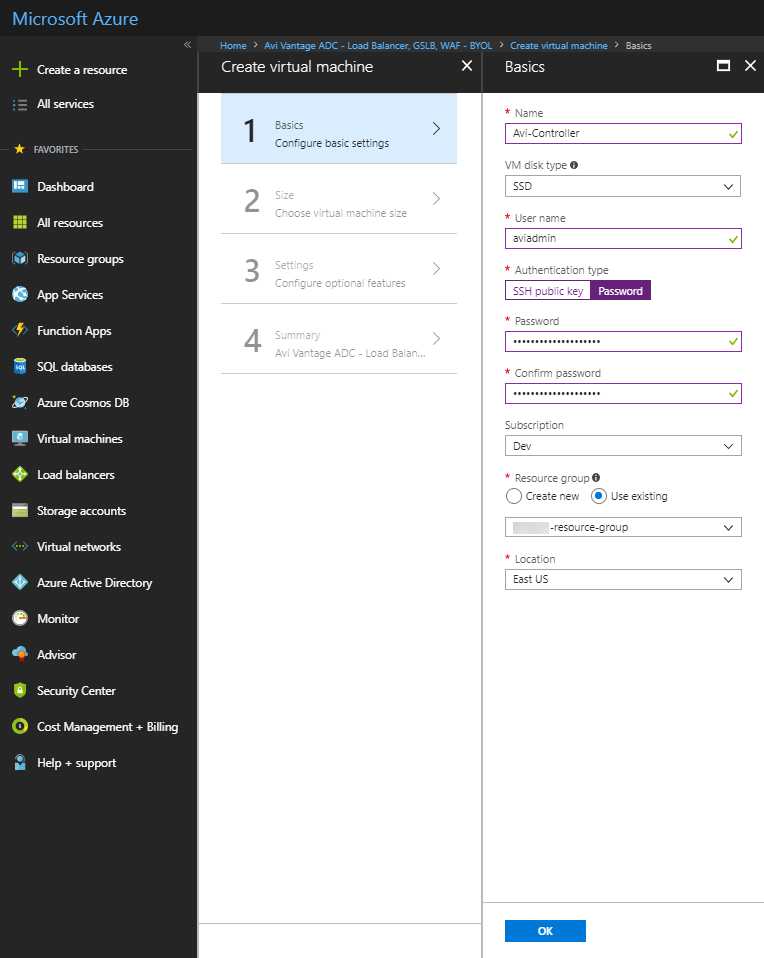
Click on OK to continue to the next tab.
Note: This public key option provided in this step does not allow you to ssh into the machine once launched. After the VM is up and running, it prompts us to setup the Avi Controller. It uses that username and password to ssh into the Avi Controller.
- Based on deployment scale considerations, choose an appropriate VM size. The following table lists the minimum requirements for the VMs on which the Avi Controller and Avi SEs are installed.
Component Memory vCPUs Disk Avi Controller 24 GB 8 64 GB Service Engine 2 GB 2 15 GB For Avi Controller, we recommend the following instance types:
Deployment Size Virtual Service Scale Instance Type Memory vCPUs Disk (Minimum) Small 100 DS4_V2 28 GB 8 64 GB Medium 1000 DS5_V2 56 GB 16 64 GB Large 5000 F32S_V2 64 GB 32 64 GB Refer to the Disk Capacity Allocation section in the Avi Controller Sizing KB for recommended hard disk size. The below example shows a choice of eight CPUs and 28 GB memory. (Instance: DS4_V2)

-
In the Settings tab, select the following options:

- Availability set: It is recommended to use an availability set for Avi Controllers.
- Storage : Select Yes for managed disks.
- Virtual network: Create a new VNet, or use an existing VNet.
- Subnet: Select a subnet for Avi controller management IP address to be allocated from.
- (Optional) Public IP address: Allocate an existing or new public IP address to the controller VM.
- Network security group (firewall): Apply an existing or new network security group to restrict traffic to the controller. Note: For security group rules on the subnet for the external IP to be accessible, the rule should have a destination set as the floating IP address for the virtual service and a source as any and port as any.
-
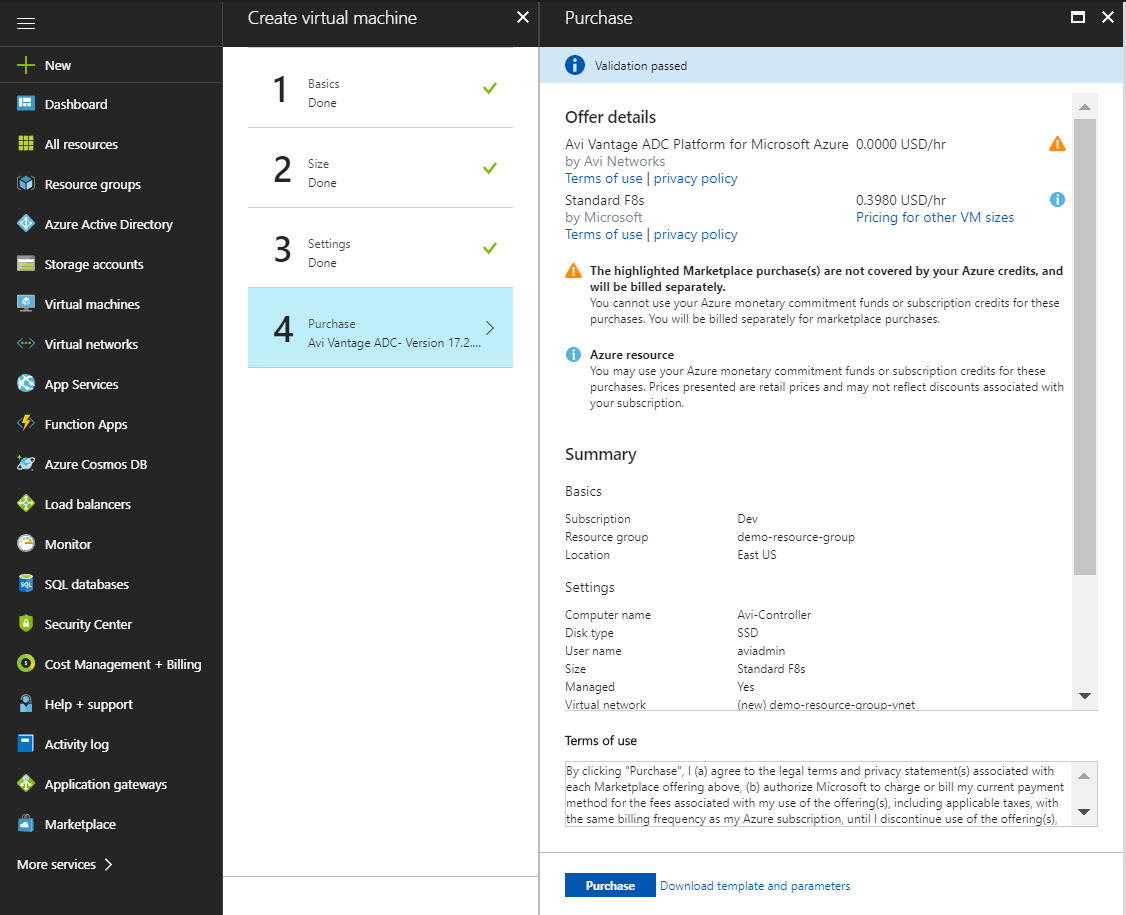
Click on OK followed by Purchase to run final validations and initiate the deployment.
-
(Optional) Create a Controller cluster
To ensure complete redundancy, two additional Avi Controller nodes can be added to create a 3-node Avi Controller cluster.To create a Controller cluster,
- If deploying from the Microsoft Azure Marketplace, use the JSON template found here.
- If deploying from a downloaded version of VHD, use the JSON template found here.
Once the Controller is up, it can be configured via a web browser. The FQDN will be mentioned as an output of the template execution, as in this case, avicontrollerpubip.westus.cloudapp.azure.com.
Avi Vantage Configuration
Initial Configuration
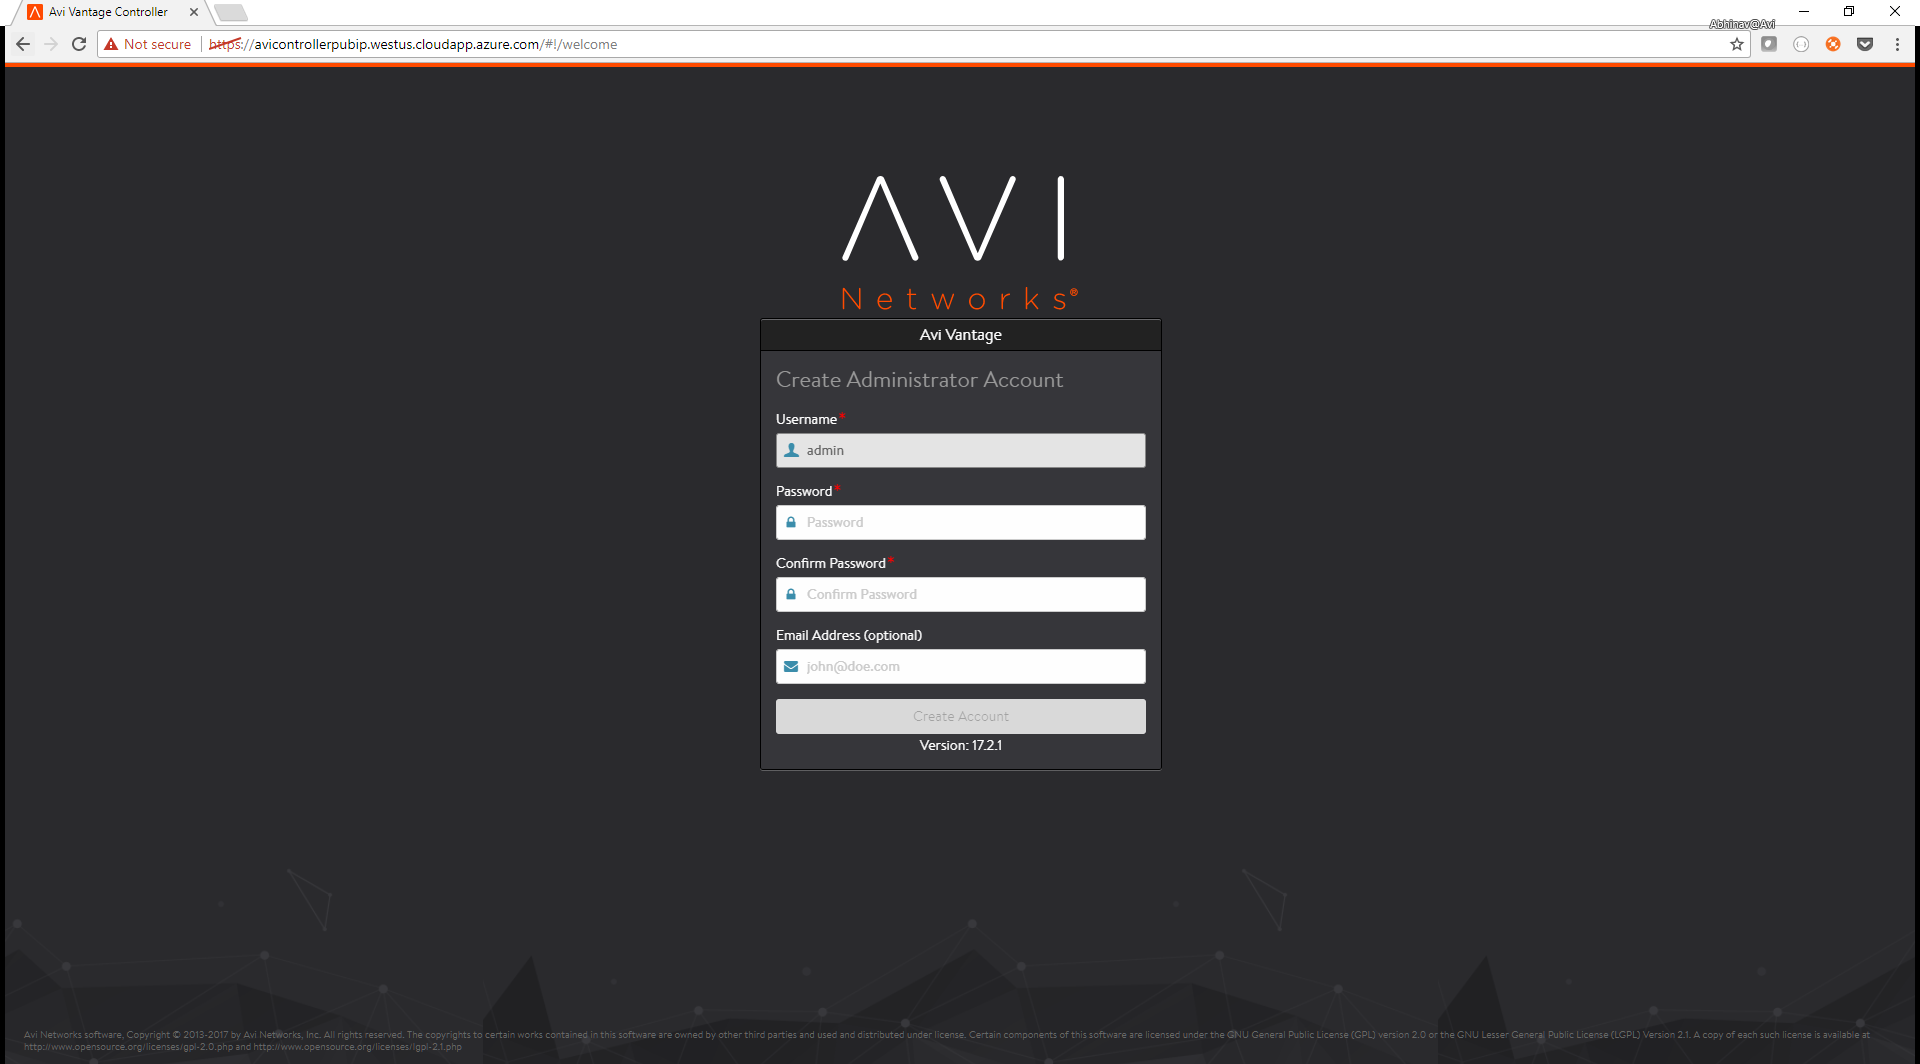
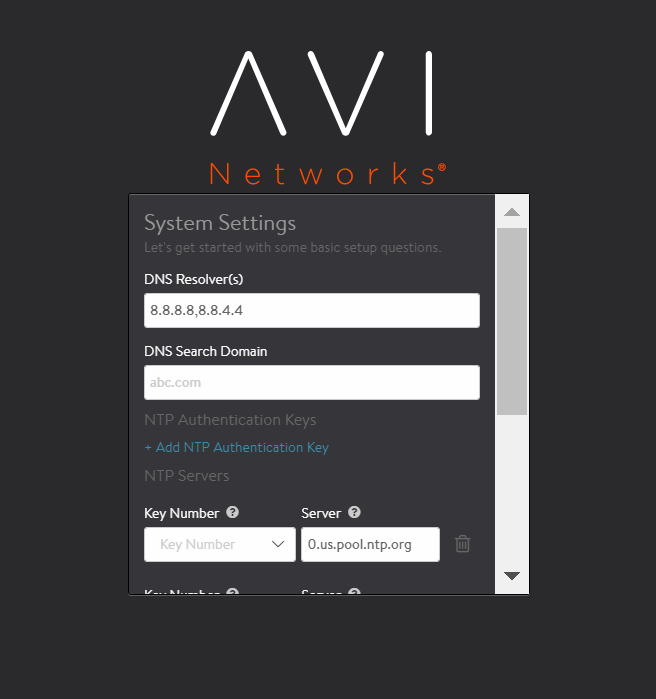
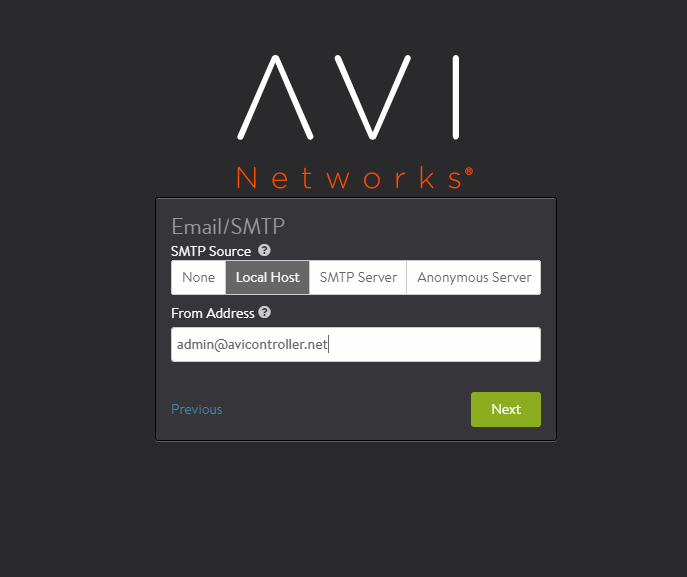
Follow the given steps to complete the initial configuration. Each step is provided with an associated screenshot.
-
Provide credentials for the administrator account (Username:
admin).
-
Provide DNS and NTP Settings (Can be edited later).
-
Provide an email address to be used for alerts from the controller (Can be set up at a later stage).
-
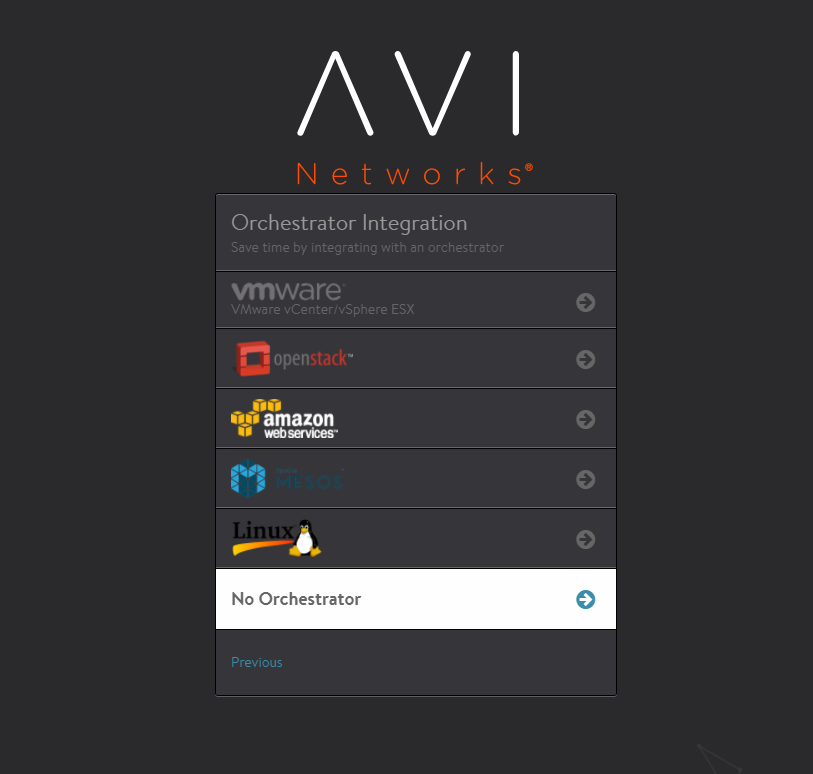
Select No Orchestrator to complete the initial configuration.
-
Continue by clicking on No for Support multiple Tenants (Multi tenancy can be enabled later).

-
Once the setup is completed, the browser will automatically refresh to the Avi Controller dashboard.

Configuring Azure Cloud
At this point, the Avi Controller is provisioned but not connected to any ecosystem. The next step is to create a cloud configuration of type Azure, so that Avi Vantage can spin up Service Engines in the Azure VNet, and the load balance workloads present there.
Note: Before proceeding with the steps to configure Azure cloud, it is recommended to finalize the license model as per the requirement. Avi UI has the following two options for the license model:
- Azure Pay-as-you-go – The licensing and usage is calculated based on the Service Engines instantiated in Azure.
- Bring your own license – The license type can be selected either based on the vCPU, or the SE Bandwidth.
Follow the given steps to complete the cloud configuration. Each step is provided with an associated screenshot.
-
Click on the Applications tab and navigate to Infrastructure -> Clouds

-
Click on the Create button to add a new cloud. Provide a name, and select Microsoft Azure as the Cloud infrastructure type.
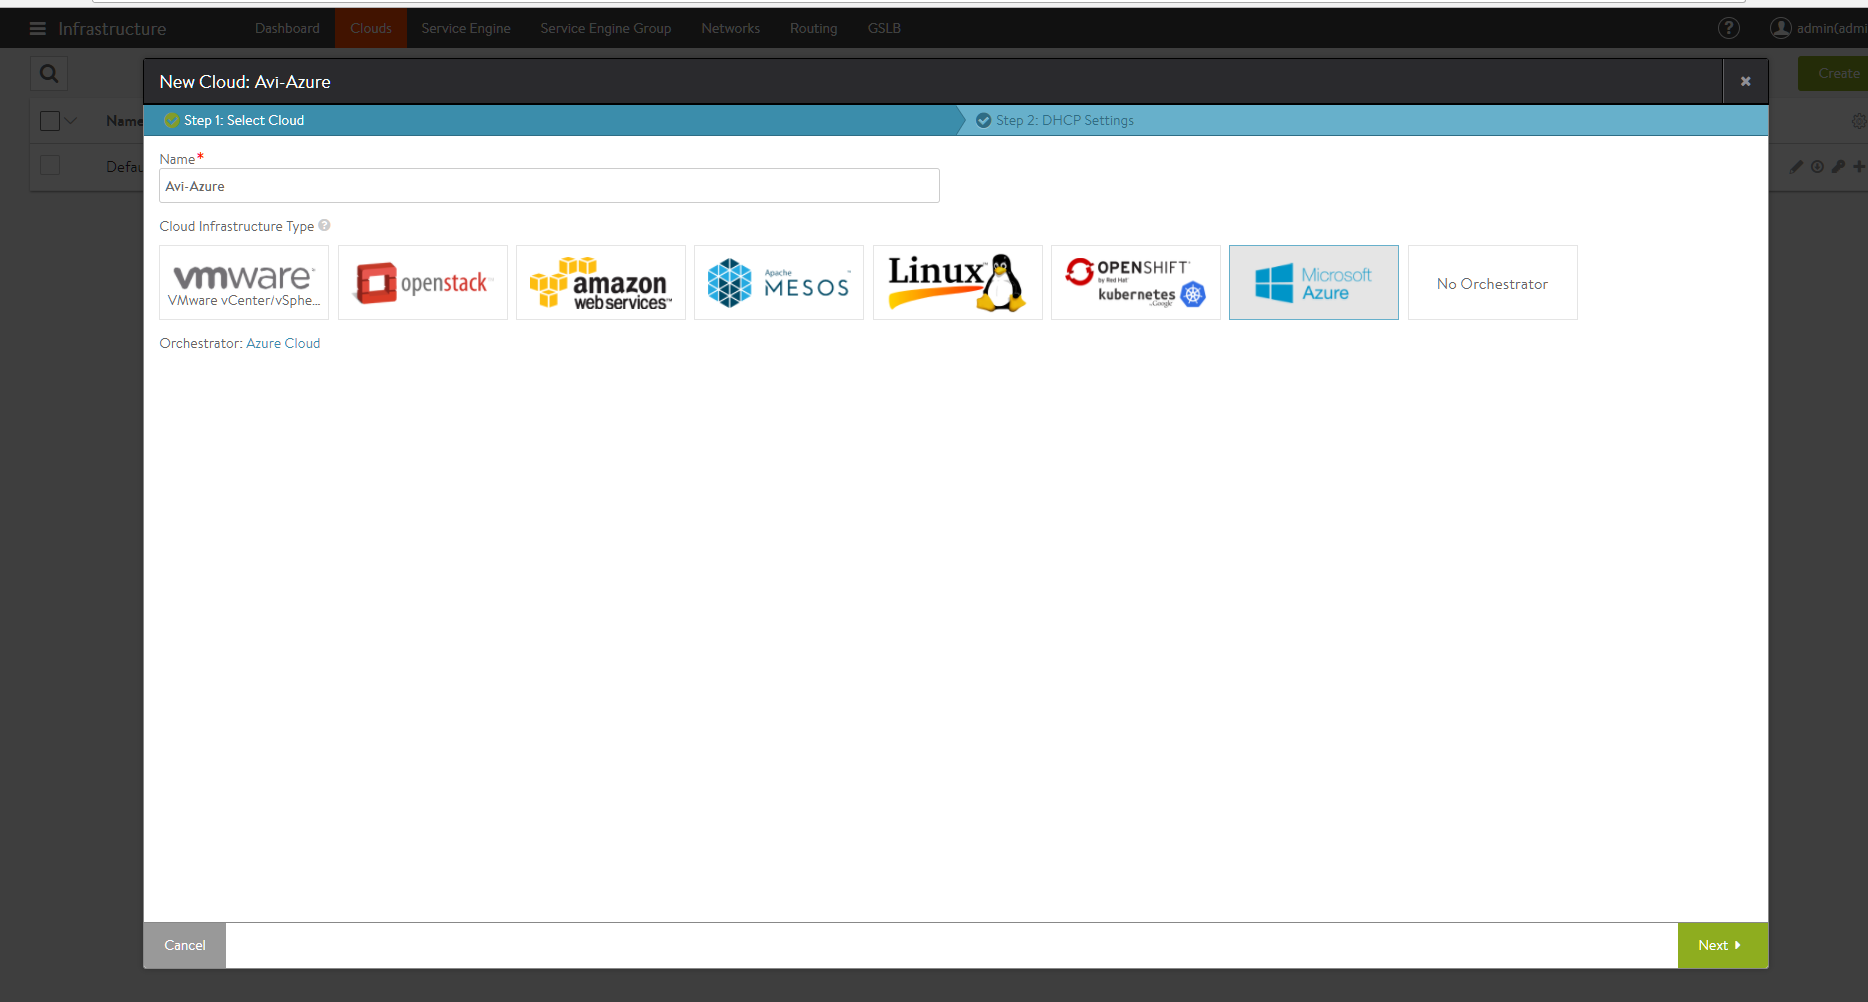
-
On the next tab, provide information related to the Azure account.

Starting with 18.1.4, Avi UI has the option to select the desired License Model.
-
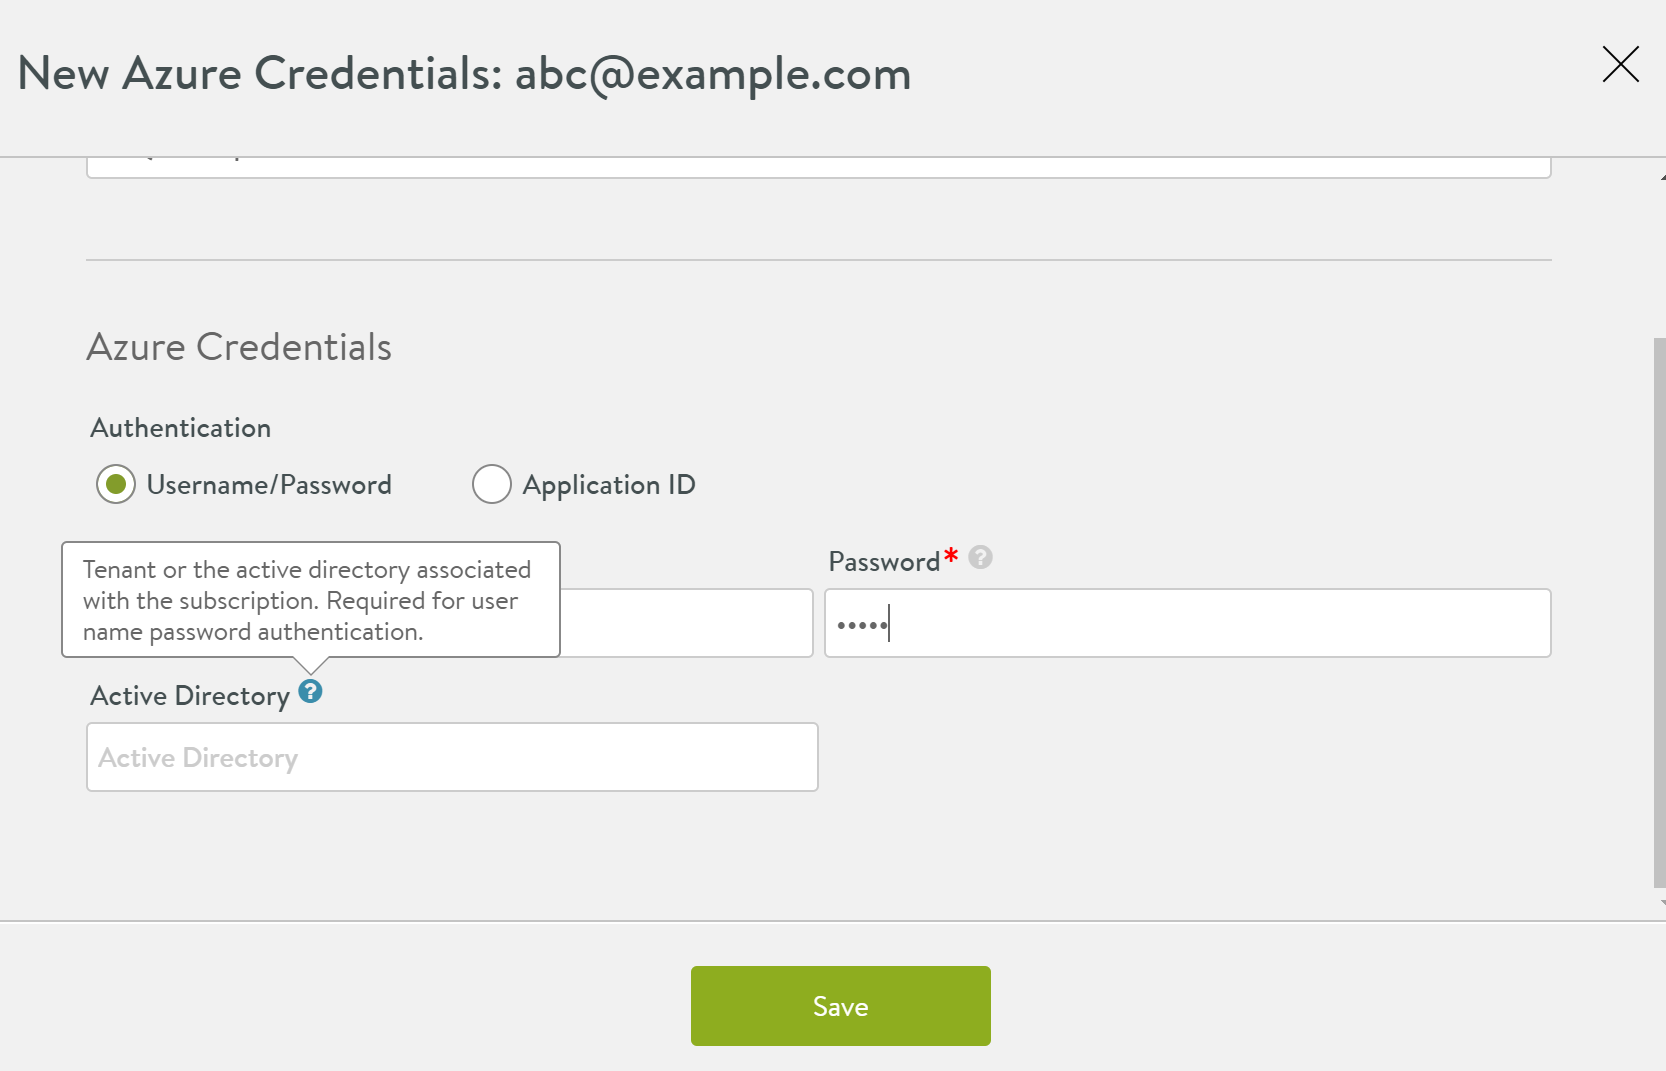
Start by clicking on Create Credentials tab and provide Azure credentials.
You can either choose an Azure account username/password, or an Application ID. In the screenshot below, the username method is used.
-
Select the license model that you want to use. You can either choose the Pay-as-you-go, or the Bring your own license option. The below screenshot exhibits the option for the Pay-as-you-go license model. For the PAYG licence model, the license type is set to SE Bandwidth automatically.
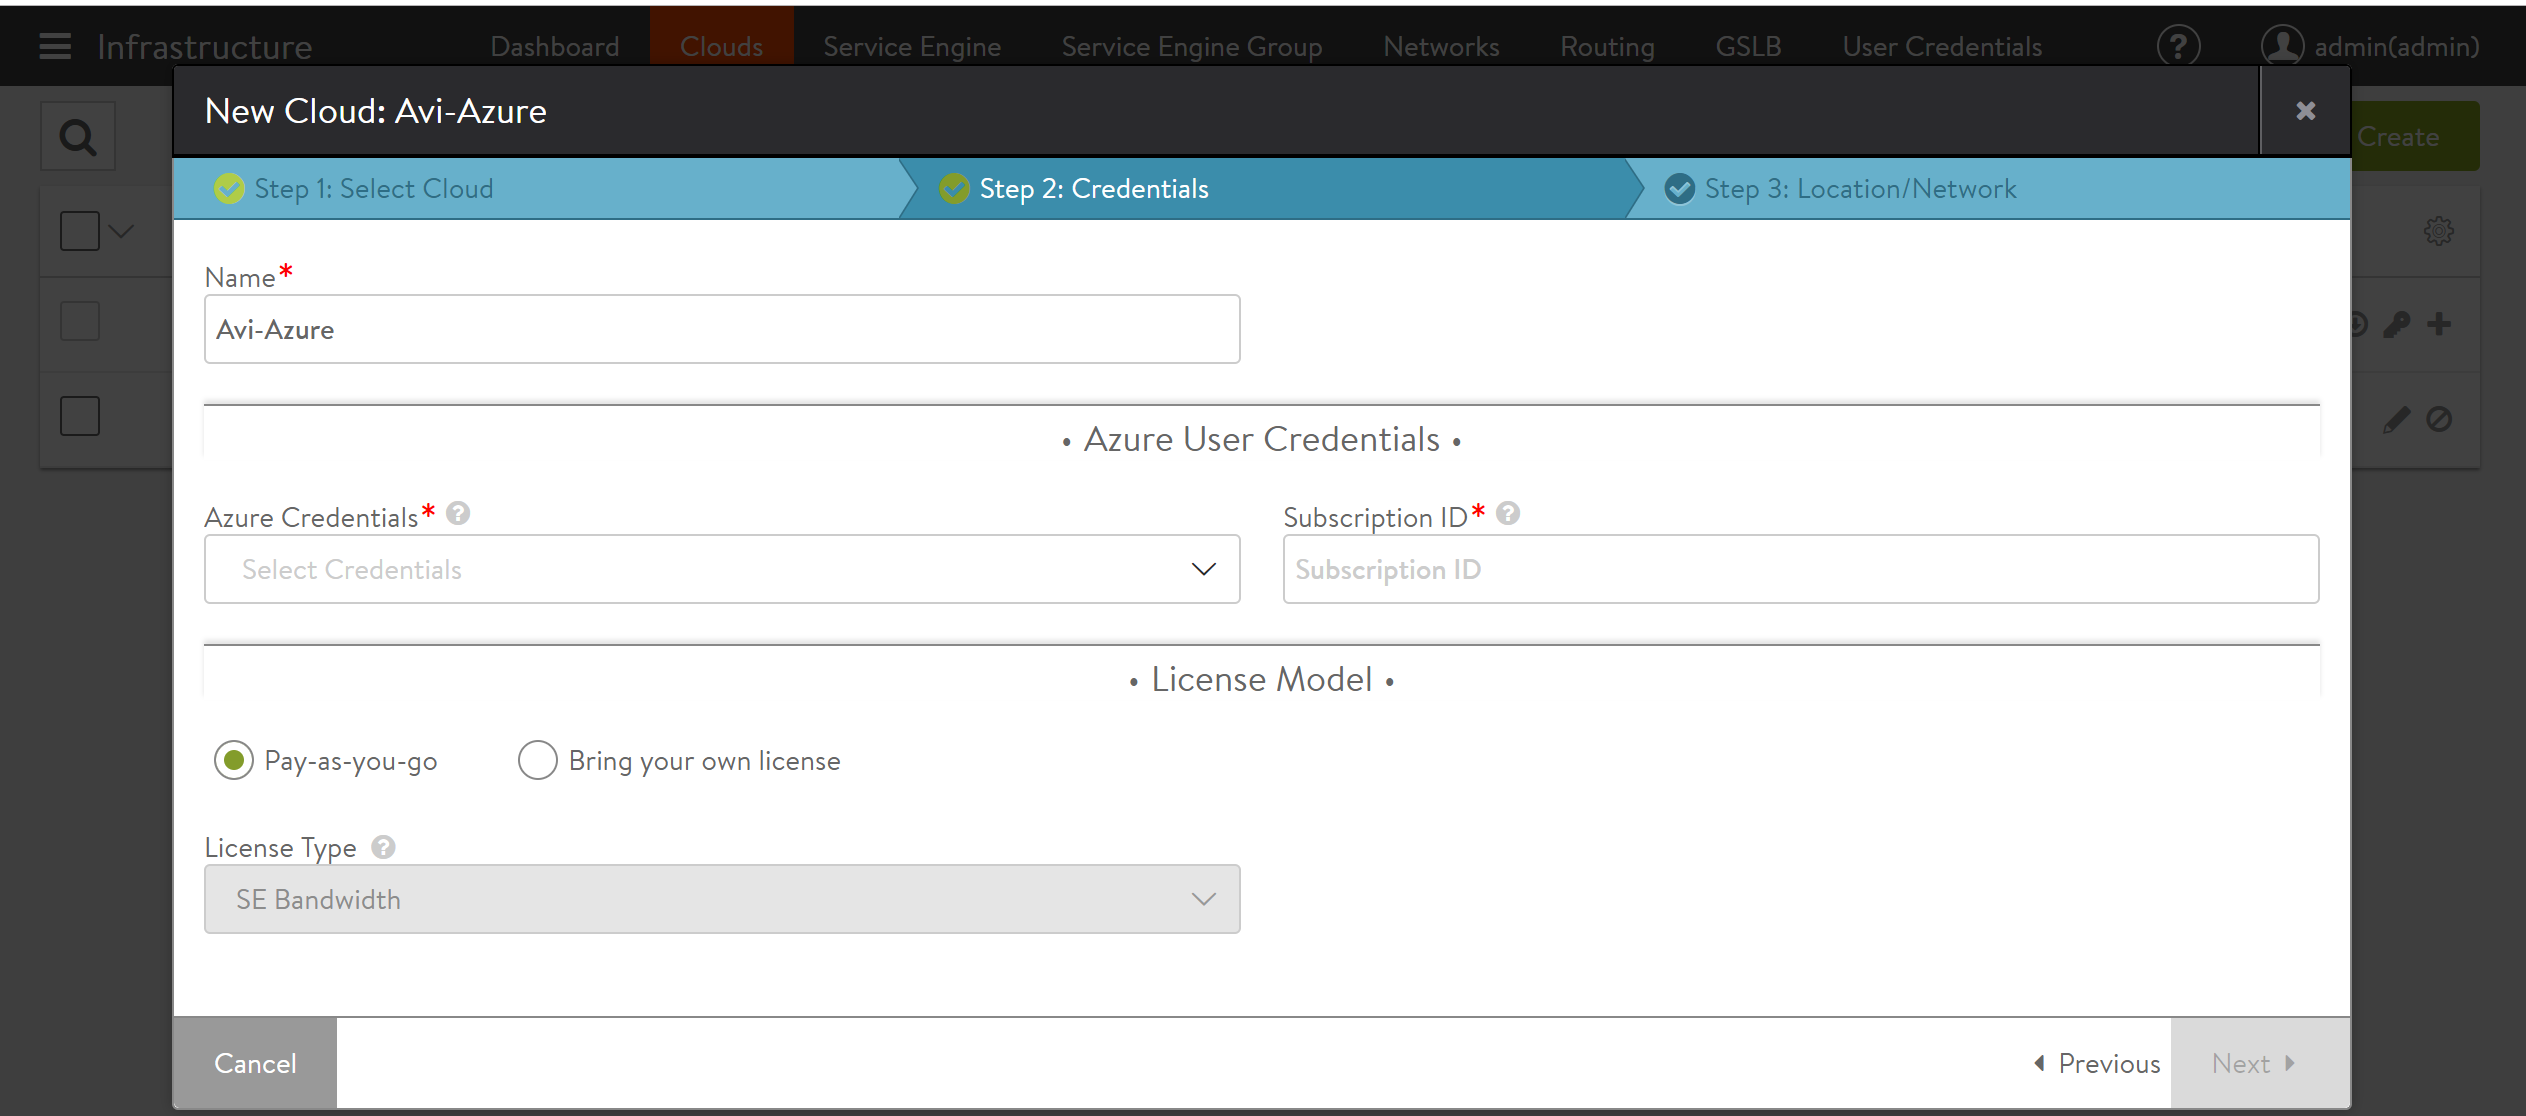
For the Bring your own license model, you can use the drop-down option to use the following licence types:
- Cores
- SE Bandwidth
For more information on the new license model, refer to Azure Marketplace Licensing.
-
Save and select these newly created credentials and provide the Azure subscription ID. Click Next.
-
Provide the Azure location details. These details are associated with the location of resource group, the resource group and VNet that can be used, and the subnet for Service Engine management network.
Optionally, a DNS provider can be selected as well. Instead of Azure DNS, AWS Route 53 can also be used by selecting Other.
Select Template Service Engine Group from the drop-down list from Service Engine section.

-
Click on Complete, to provision the Azure cloud. At this time, the Controller will upload the Service Engine VHD into an Azure storage account, so that SEs can be deployed as required by the applications.
-
Save the settings. The system is now ready for virtual service creation.
Virtual Service Configuration
To create a virtual service to load balance an application workload, perform the following steps:
- Create a pool containing application servers that need to be load balanced.
- Create a virtual service with a front-end virtual IP.
Pool Creation
-
Navigate to Application -> Pools and click Create Pool.
-
Provide a pool name. The other fields are optional and the defaults are sufficient. Click Next.
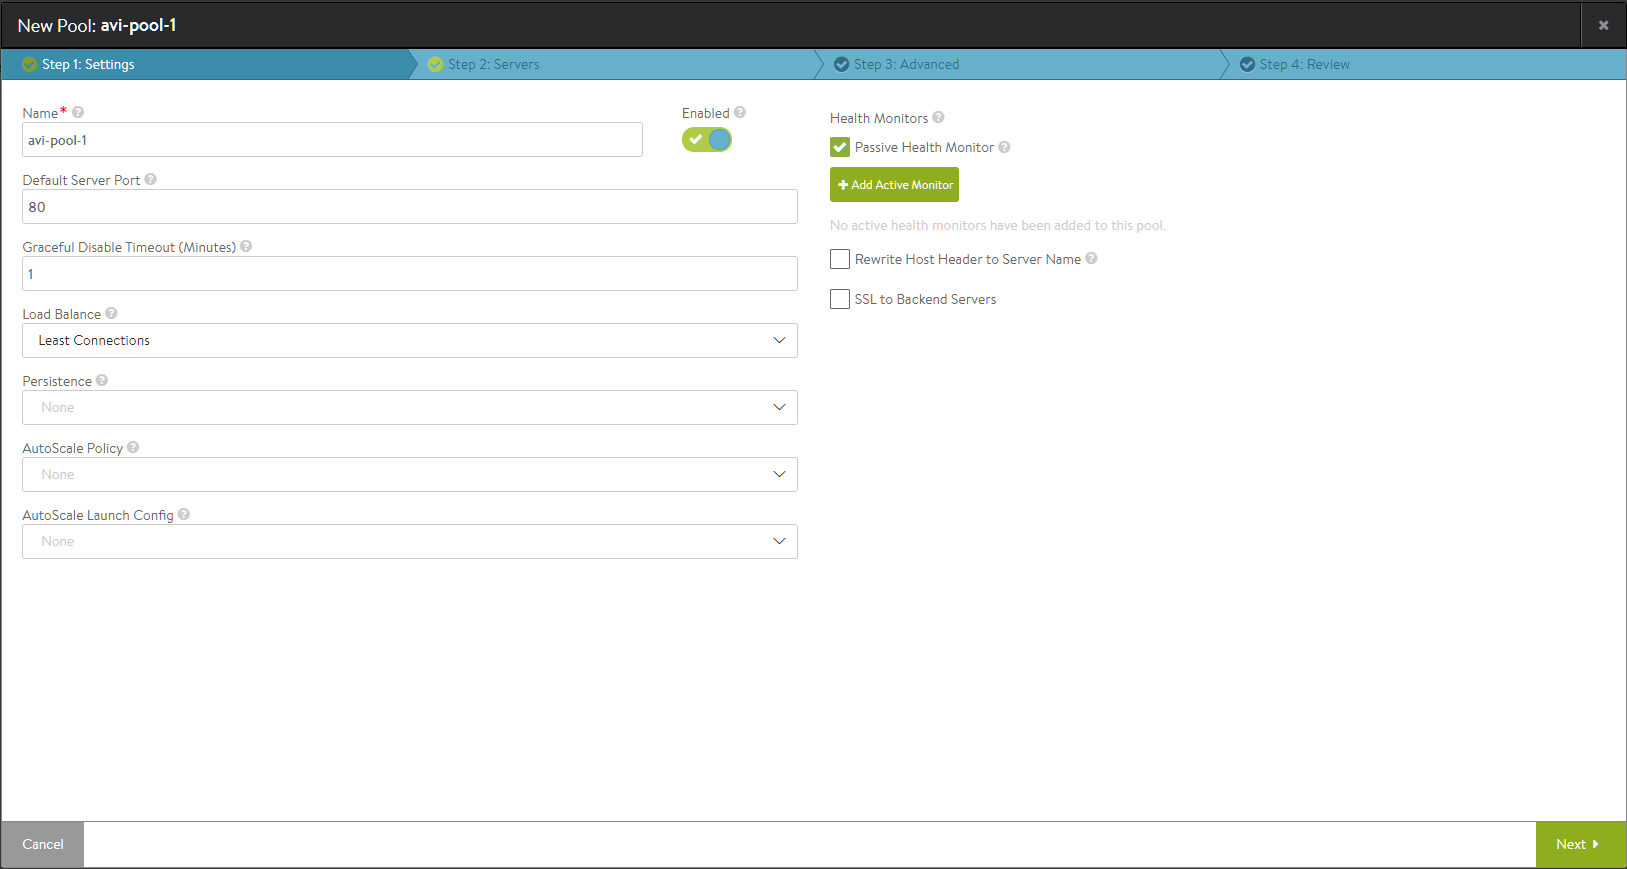
-
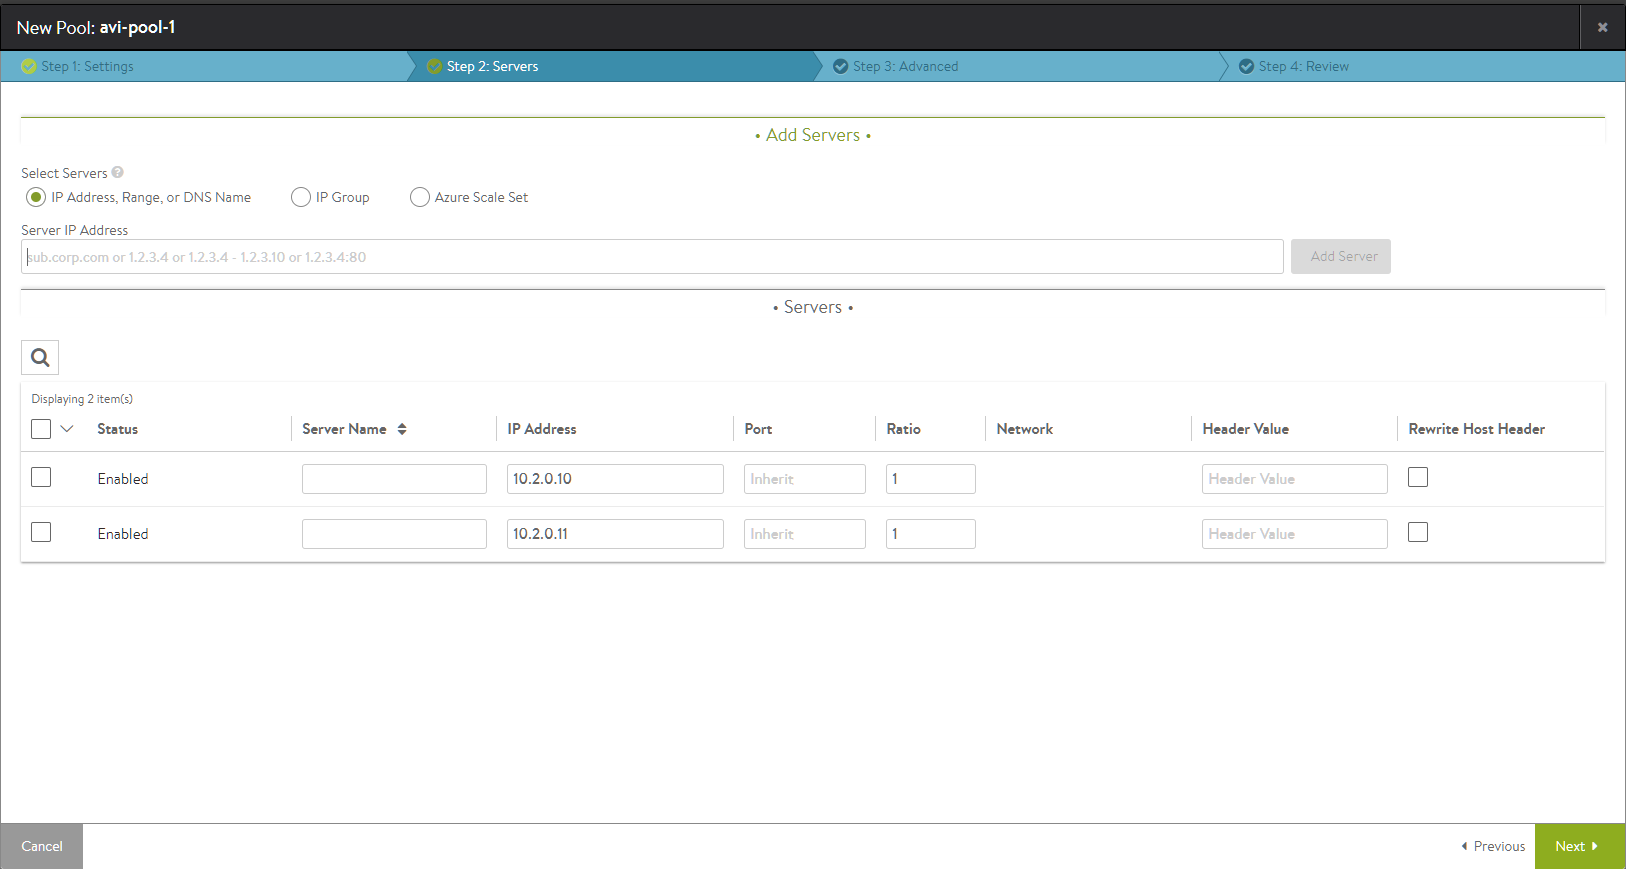
Add one or more application (back-end) servers. If the applications are part of an Azure scale set, the scale set option can be selected. If not, just provide the IP addresses of the servers and click Next.
-
Click through the remaining steps, by retaining the defaults to complete the pool creation process.

Creating the Virtual Service
-
Navigate to Application -> Virtual Services and click Create Virtual Service. Select Advanced Setup.
-
Provide a VS name.
-
Select a network from which the front-end VIP should be allocated. The VIP will be allocated by Azure.
-
If the virtual service needs to be accessible via the Internet, select the option Assign Public IP for External Client Access.
-
Select the service ports. Port 80 is configured by default. Add port 443 as an SSL port as well.
In the Pool section, select the previously created pool from the dropdown menu.
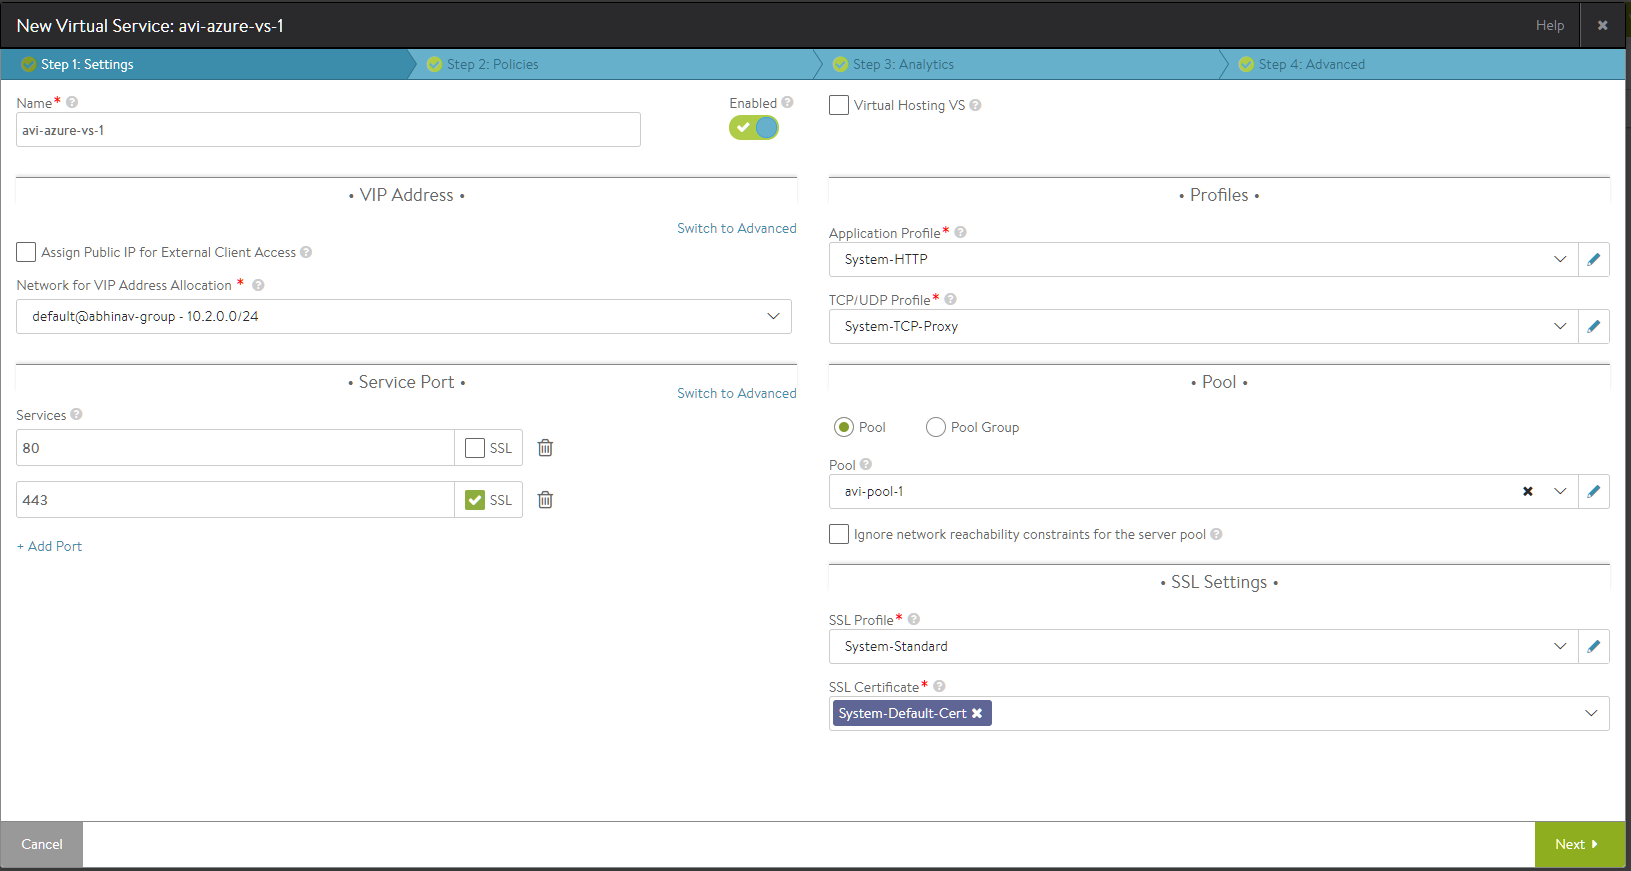
-
Click Next through the remaining screens. Click Save at the last screen to complete the provisioning.
-
At this point, the UI will refresh to the VS dashboard.
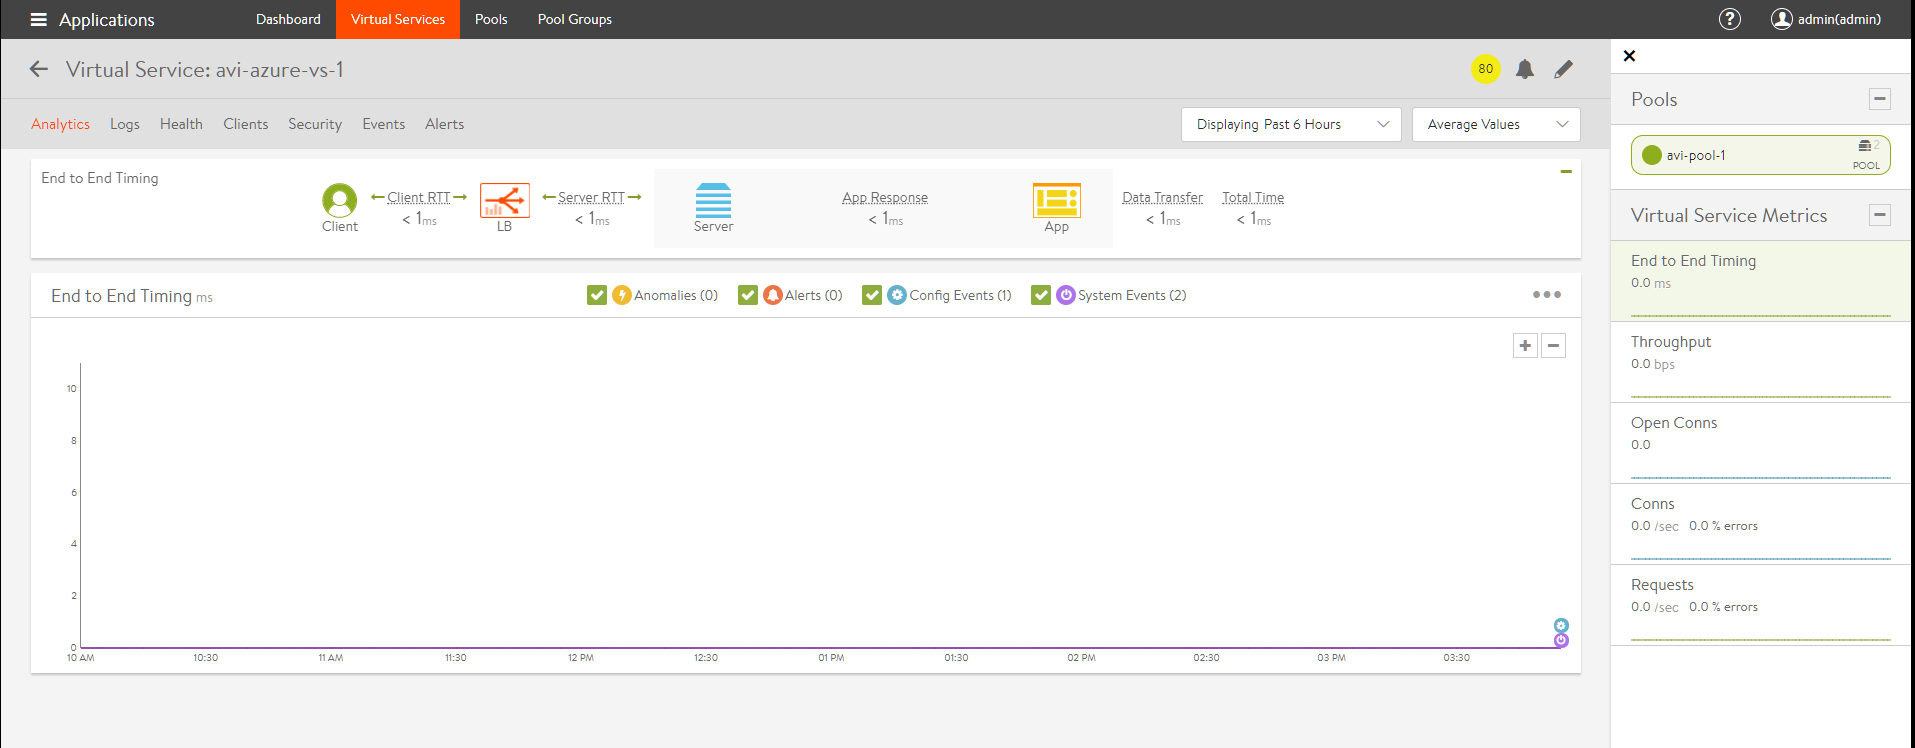
The Avi deployment and virtual service configuration is now complete. Wait for 2-3 minutes for the internal Azure network configurations to be completed, before sending traffic for verification. Send some traffic from a client to the virtual service IP to verify if the virtual service is functioning.
Azure VM Sizes for the Avi Service Engines
Avi Service Engines are automatically deployed on Azure by the Avi Controller, based on the virtual services that have been configured.
Avi SEs can be deployed on VMs with various sizes. This can be configured under Service Engine Group -> Advanced setting.
The table below shows the maximum SSL TPS performance observed on some Azure VM sizes.
| Azure VM Size | SSL TPS Performance |
|---|---|
| F1s | 1900 |
| F2s | 3850 |
| F4s | 6300 |
| F8s | 11000 |
Notes:
- The performance results provided above are indicative numbers for a subset of instance types. There are other VM sizes available under the Service Engine group settings that can be used.
- SSL performance (TPS - transactions per second) has been measured considering one configured virtual service (HTTPS, ECDHE-ECDSA-AES256-SHA cipher) and GET requests for a 128-byte payload without session reuse. More details regarding Service Engine performance can be found here.
Azure Dedicated Management Interface
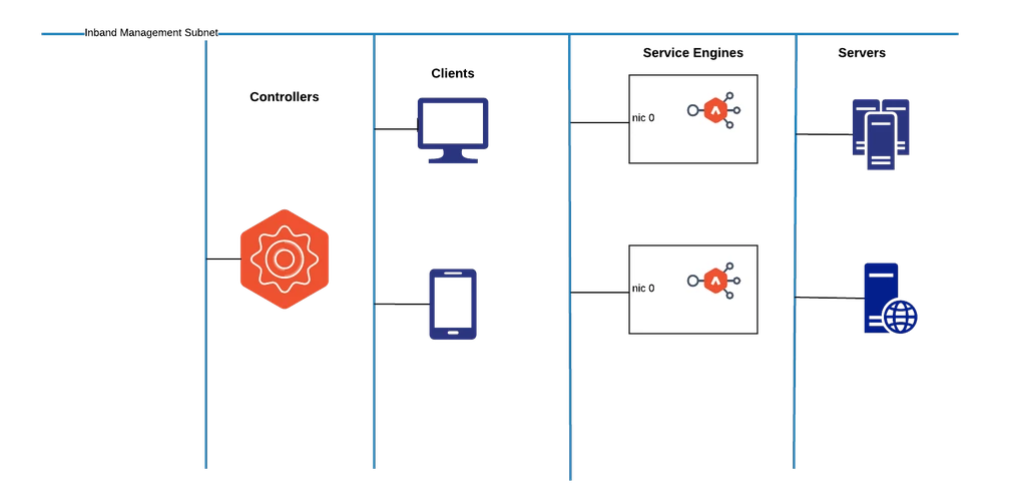
Avi Vantage on Microsoft Azure runs Service Engines in any of the following modes:
In-band Management– In this mode Service Engine has only one NIC.
Dedicated Management– In this mode Service Engine has two NICs, one for the management traffic and other for the data traffic in the same virtual network. This configuration will be at the cloud level, SE group level override is not allowed at present.
Dedicated Management SEs are supported with basic ALB, standard ALB and multi-AZ mode of the Azure cloud.
SEs are created with one NIC which is used as the management interface as well as the data interface.
In-band Management
This set-up is simple to configure and manage. But, all servers, SEs, and management interface need to be connected.
Dedicated Management
SEs are created with two NICs, one for the management traffic and the other for the data traffic.
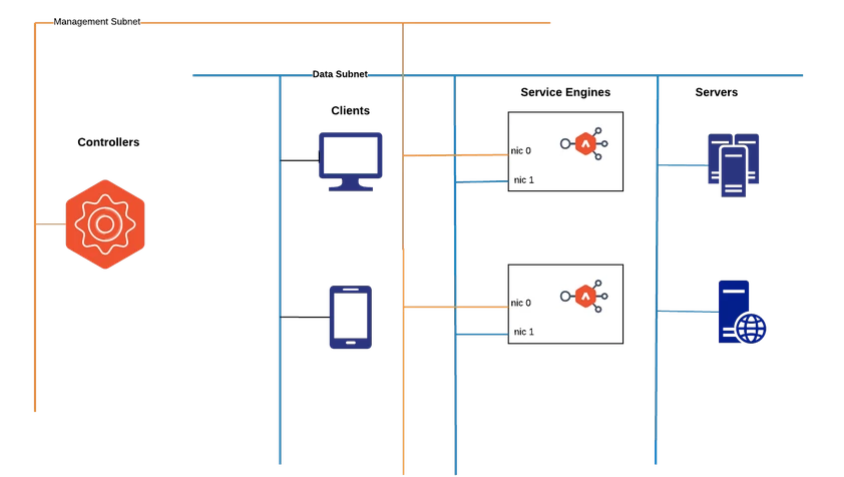
Cloud takes input for the management network and the data network for the SE.
- NIC0 is the management network.
- NIC1 is the data network.
Both the NICs should be in the same virtual network. This mode provides better isolation for the management and data traffic.
Configuring Dedicated Management for New Cloud Deployment
- Define the required network topology. Refer to Deployment Topology for Microsoft Azure with Avi Vantage for more details.
- Install Avi Controller in Azure cloud. Refer to Installing Avi Controller in Microsoft Azure.
- Configure Azure cloud.
The following are the necessary attributes for configuring an Azure cloud.
- Cloud credentials
- Details about region, zones, etc. where the Service Engines need to be deployed
- For the dedicated management, configure the data and the management subnet. Data and the management subnet should be in the same virtual network.

Configuring Dedicated Management for Existing Cloud Deployments
- Navigate to Infrastructure > Cloud. Select the desired cloud and click on the edit option and enable dedicated management.
- Choose a management subnet which is in the same VNET.
- Configure a virtual service
For existing deployments, the change will apply only to the newer SEs created. The existing SEs will keep functioning in the in-band mode.
DPDK Support for Service Engines in Azure
Starting with Avi Vantage version 21.1.3, Service Engines in Azure support DPDK mode of operation.
Applicability of DPDK Mode
For a new deployment,
-
DPDK mode will be enabled for all Service Engine Groups.
-
DPDK can be disabled at a per Service Engine Group level.
For an existing (pre-21.1.3) deployment which is upgraded to 21.1.3 or later:
-
DPDK mode will remain disabled for existing Service Engine Groups.
-
DPDK mode will be enabled for new Service Engine Groups.
For a Service Engine Group with dedicated interfaces enabled, DPDK mode will be enabled only on the data interface.
Enabling DPDK Mode
DPDK mode can be enabled/ disabled using the Service Engine Group setting, se_dpdk_pmd. The parameter takes the following values:
-
0: Automatic — Each Service Engine will attempt to use DPDK mode, and fall back to PCAP mode if all requirements are not met.
-
1: DPDK — Each Service Engine will attempt to use DPDK mode only. There is no fallback to PCAP mode. This setting is not recommended.
-
2: PCAP — Each Service Engine will use PCAP mode only. This setting can be used to force all SEs in an SE Group to PCAP. In addition, on upgrade from a previous release,
se_dpdk_pmdwill be set to this value for all existing Service Engine Groups.
Note: If the mode is changed for an Service Engine Group containing SEs, the SEs should be rebooted for the new behavior to be active.
Example:
The following configuration snippet enables PCAP mode:
[admin:ctrl]: > configure serviceenginegroup Default-Group

[admin:ctrl]: serviceenginegroup> se_dpdk_pmd 2

[admin:ctrl]: serviceenginegroup> save
The following configuration snippet enables auto mode, which prefers DPDK:
[admin:ctrl]: > configure serviceenginegroup Default-Group

[admin:ctrl]: serviceenginegroup> se_dpdk_pmd 2

[admin:ctrl]: serviceenginegroup> save
Conditions for DPDK mode to be active on a Service Engine
When DPDK mode has been enabled for a Service Engine Group, the individual Service Engine virtual machines still need to comply with following requirements to be able to run in this mode:
-
Only instances with Accelerated Networking Enabled are supported.
-
In addition, the NIC needs to be of the following types:
-
Mellanox ConnectX-4
-
Mellanox ConnectX-5
-
-
Mellanox ConnectX-3, also available in some virtual machine instances in Azure, is not supported.
The NIC attached to the instance is controlled by Azure. Hence, the mode of the SE virtual machine will be determined only after the SE has been provisioned.
Based on internal tests, the FS_v2 family, with FS4_v2 and higher, are typically available in DPDK mode. This may vary with geography.
Checking for Service Engine Status
The show serviceengine interface command can be used to check the status of SEs.
[admin:controller]: > show serviceengine Avi-se-bjvvj interface | grep se_dpdk se_dpdk_mode |True