Configuring iWAF
This document discusses intelligent web application firewall (iWAF) configuration on Avi Vantage and covers the following sections:
- WAF Policy
- WAF Profile
- Enabling WAF on Virtual Server
- WAF Mode
- Paranoia Mode
- WAF Administrator Role
Note: IPv6 is not supported for iWAF as yet in Avi Vantage.
WAF Policy
WAF policy is a specific set of rules that protects the application. This policy is enabled by associating it with a virtual service.
Navigate to Templates > WAF > WAF Policy to locate the default policy. System-WAF-Policy is the default policy in Avi Vantage that contains OWASP CRS 3.0 rules.
Note: For customizing a policy, it is highly recommended to create a new policy instead of editing the default policy (System-WAF-Policy).
Configuring WAF Policy
To create a new policy, navigate to Templates > WAF > WAF Policy and click on Create.
Settings Tab
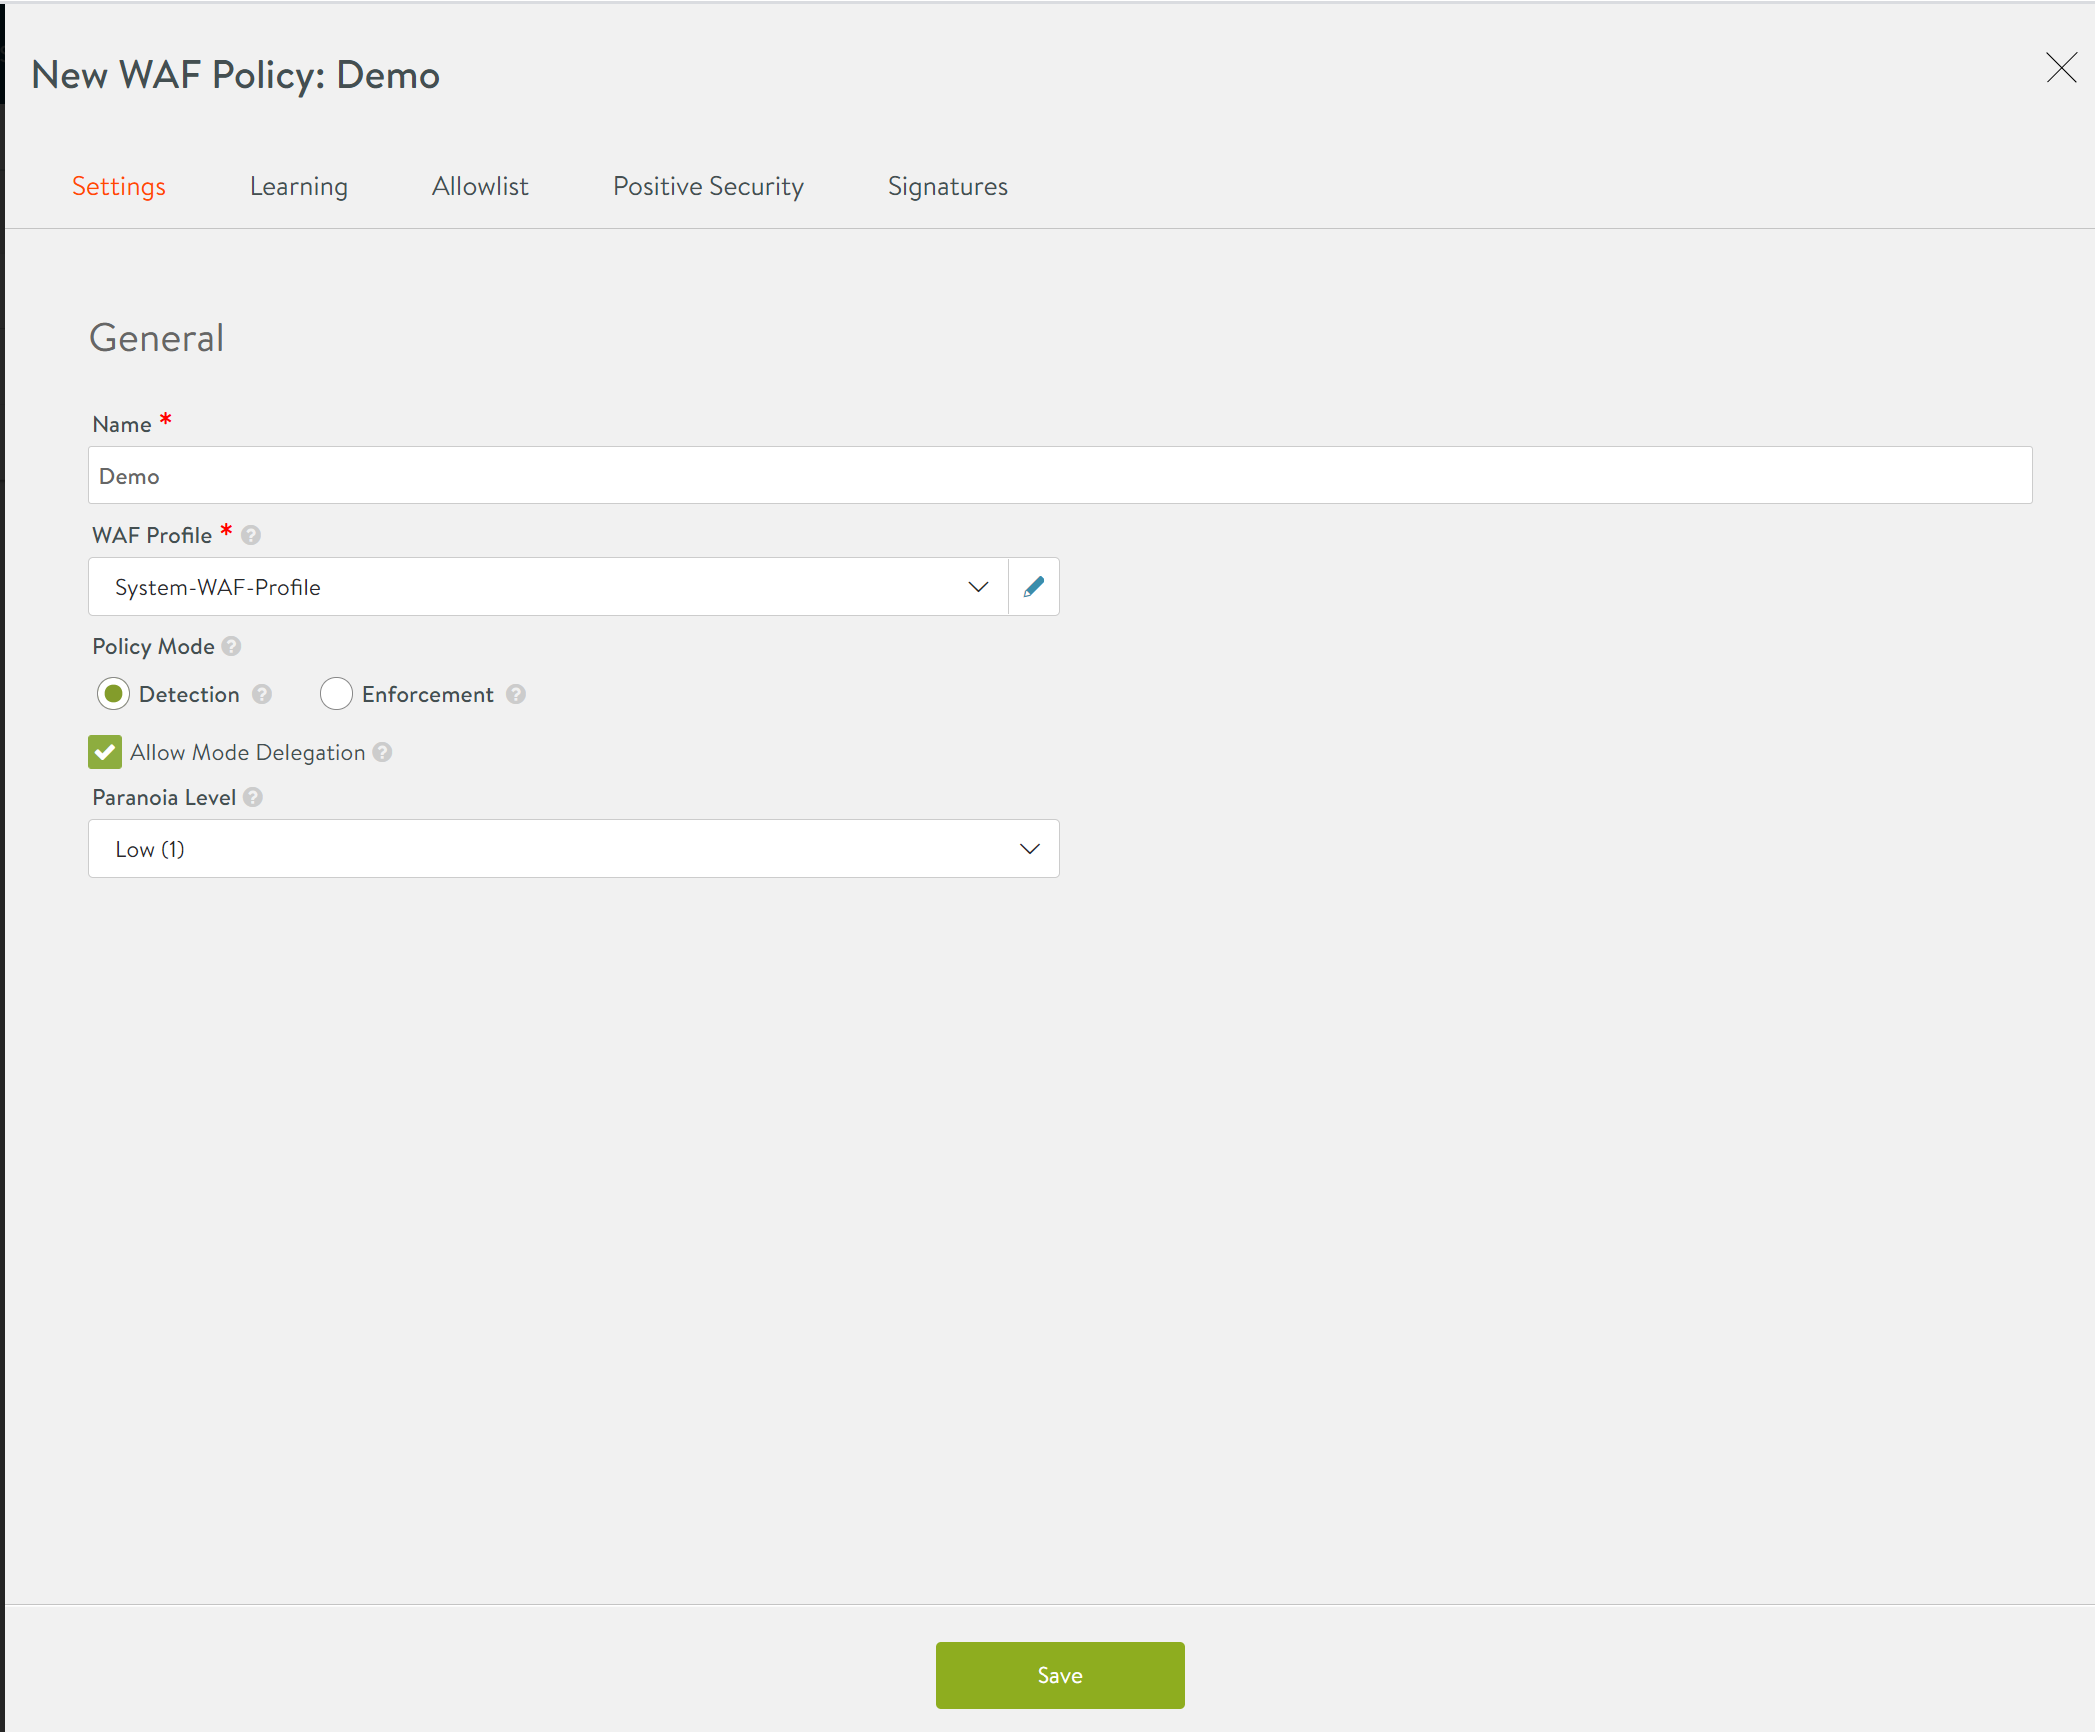
Provide the following details to configure the WAF policy:
| |
|
|
|---|---|---|
| Name | Enter a relevant name for the policy. | |
| WAF Profile | Enter the WAF profile that should be attached to this policy. The profile contains common reusable settings that complement the WAF policy. | WAF Profile |
| Mode | Click on the required mode. The supported modes are:
|
It is recommended to use detection only mode in the beginning. For more details, refer to WAF Mode. For more information on Mode delegation, refer to Mixed Mode for WAF Policy. |
| Paranoia Level | Set the paranoia level for the WAF policy. This is used to determine the rigidity of the policy and has a direct impact on potential false positive rate. | Paranoia Mode |
The following screenshot displays a sample configuration:
Settings
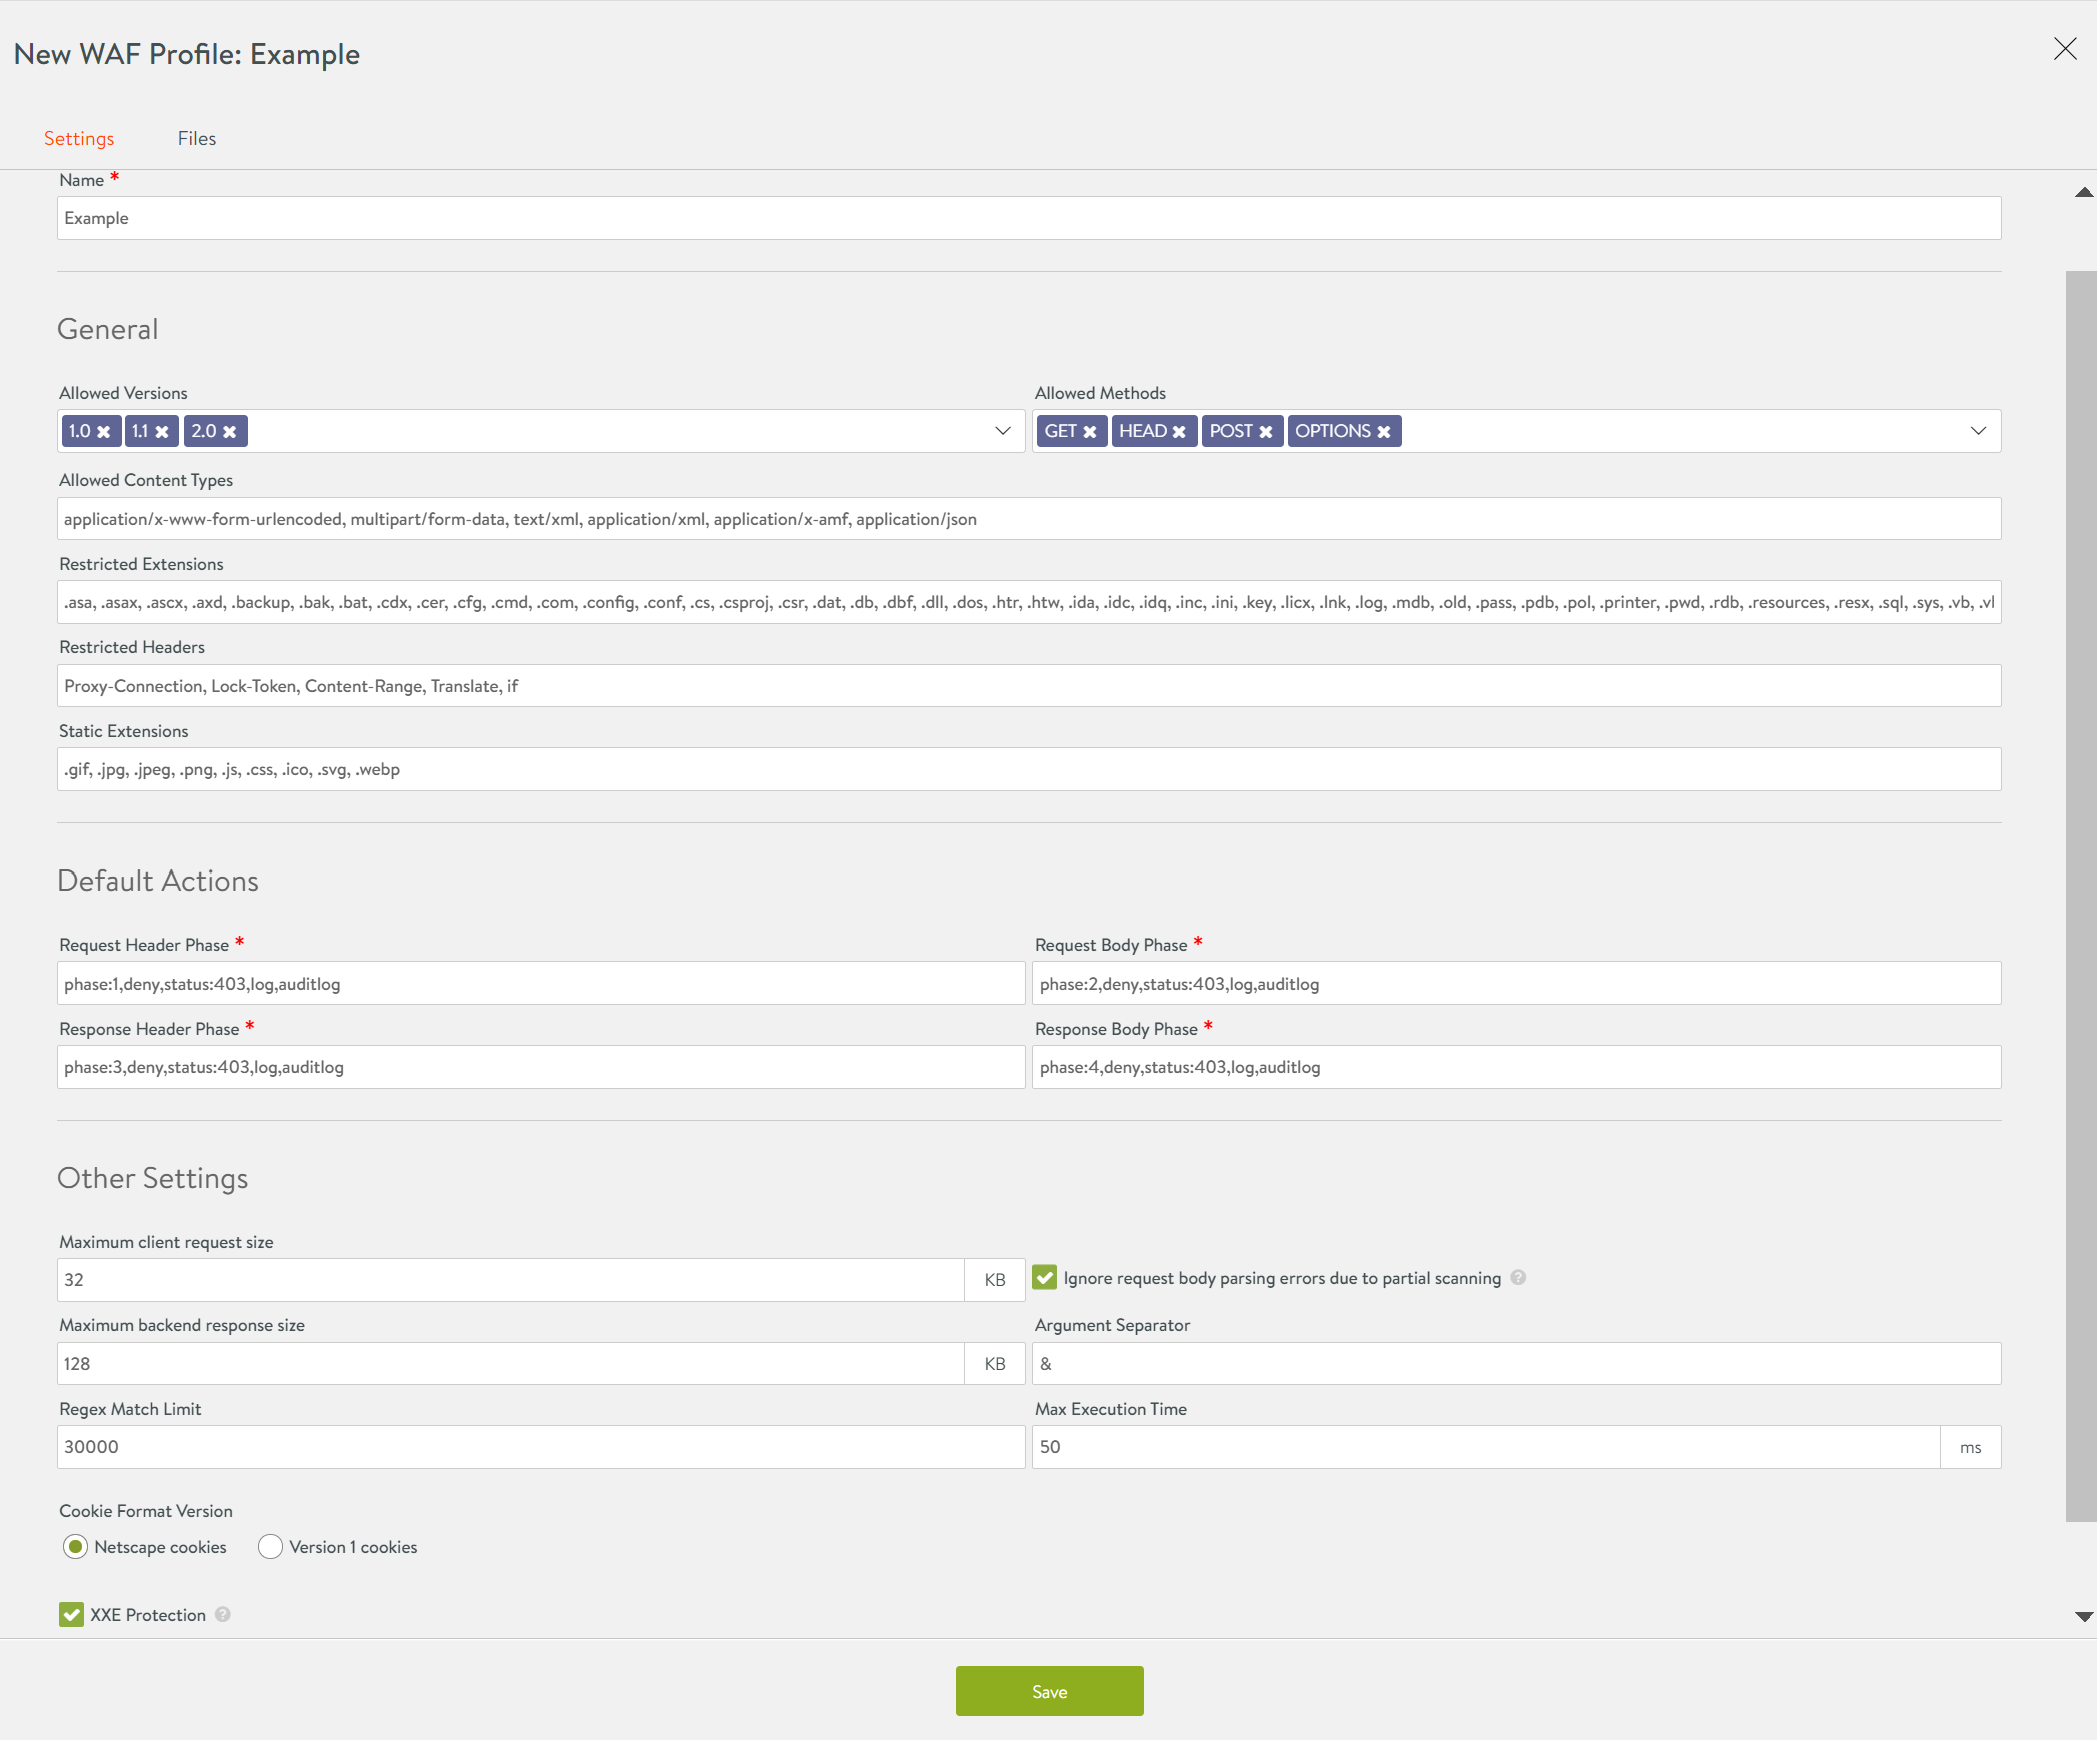
Configure the general settings as below:
- Select the WAF allowed HTTP versions in the field Allowed Versions. By default, 1.0, 1.1, 2.0 are selected.
- Select the WAF allowed HTTP methods, as required. By default
GET,HEAD,Post,OPTIONSare selected. - Select the WAF allowed content types to restrict the content types that are accepted. By default, all standard content types are covered.
- Under Restricted Extensions enter WAF restricted file extensions to restrict access by blocking them.
- Under Restricted Headers enter WAF restricted headers to be blocked by WAF.
- Enter the list of static file extensions that should bypass the WAF check in the field Static Extensions.
The General section in the New WAF Profile screen is as shown below:

Learning
Manually creating positive security rules is tedious. Therefore, through the application learning feature in Avi iWAF, the system collects statistical information about normal usage of the application which can then be used to generate Positive Security rules.
In a virtual service that has learning enabled, a learning group is automatically created and the rules are auto populated. Enabling WAF learning and the setting up application learning parameters results in the positive security group which is auto populated with positive security rules.
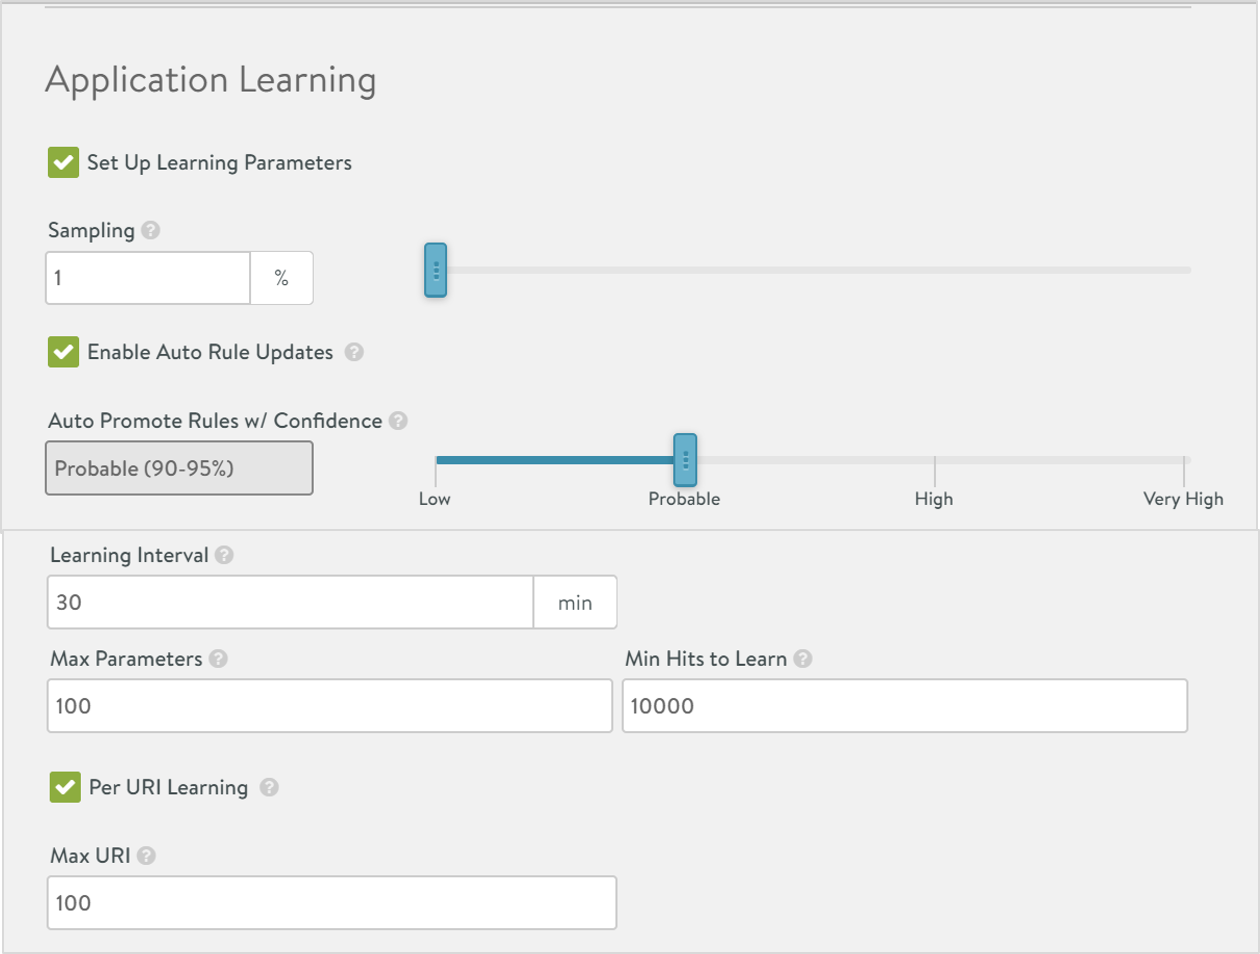
To set up application learning,
- Click on Set Up Learning Parameters.
- Enter the percentage of the requests to be analyzed by the Service Engine in the Sampling field. For example, on entering 50%, every second request will be analysed.
- Click on Enable Application Learning Rule Updates to program rules in a dedicated WAF learning group.
- Set the Auto Promote rules w/ Confidence on the scale between the range Low to Very High. This is the minimum confidence label required for auto rule updates.
- Enter the Learning Interval. This is the frequency (in min) with which the service engine publishes the application learning data to the Controller. The learning interval is set to 30 min by default.
- Enter a value between 10 to 1000 as the Max Parameters. This is the maximum number of parameters to learn for an application. Setting max parameters prevents attach on the system by random data, which results in using up all the memory. Once the defined upper limit is reached, the application stops learning. The rest will be handled by CRS.
- Enter the minimum number of occurrences required for a parameter to qualify for learning as the Minimum Hits to Learn.
- Enable Per URI Learning to learn the params per URI path.
- Enter a value between 10 to 1000 as the Max URI. This is the maximum number of URI paths to learn for an application.
The Application Learning section of the New WAF Profile screen is as shown below:
Allowlist
Positive Security
Consolidation of Learning Data
Prior to Avi Vantage release 20.1.4, Avi Vantage evaluates the full URI name for the PSM location. For example, if the URI is /product/view, the location name will be /product/view. But, if there are a lot of similar URIs, the number of locations increases significantly. Starting with Avi Vantage release 20.1.4, the prefix evaluation for the similar URIs are supported for the PSM learning location.
Evaluating the common part of the similar URIs reduces the programmed PSM location number.
The following image shows the behaviour prior to Avi Vantage release 20.1.4. As shown below, many similar URIs are programmed as Locations (category/view_detail/item1-4) and the prefix is not selected for the similar URIs.
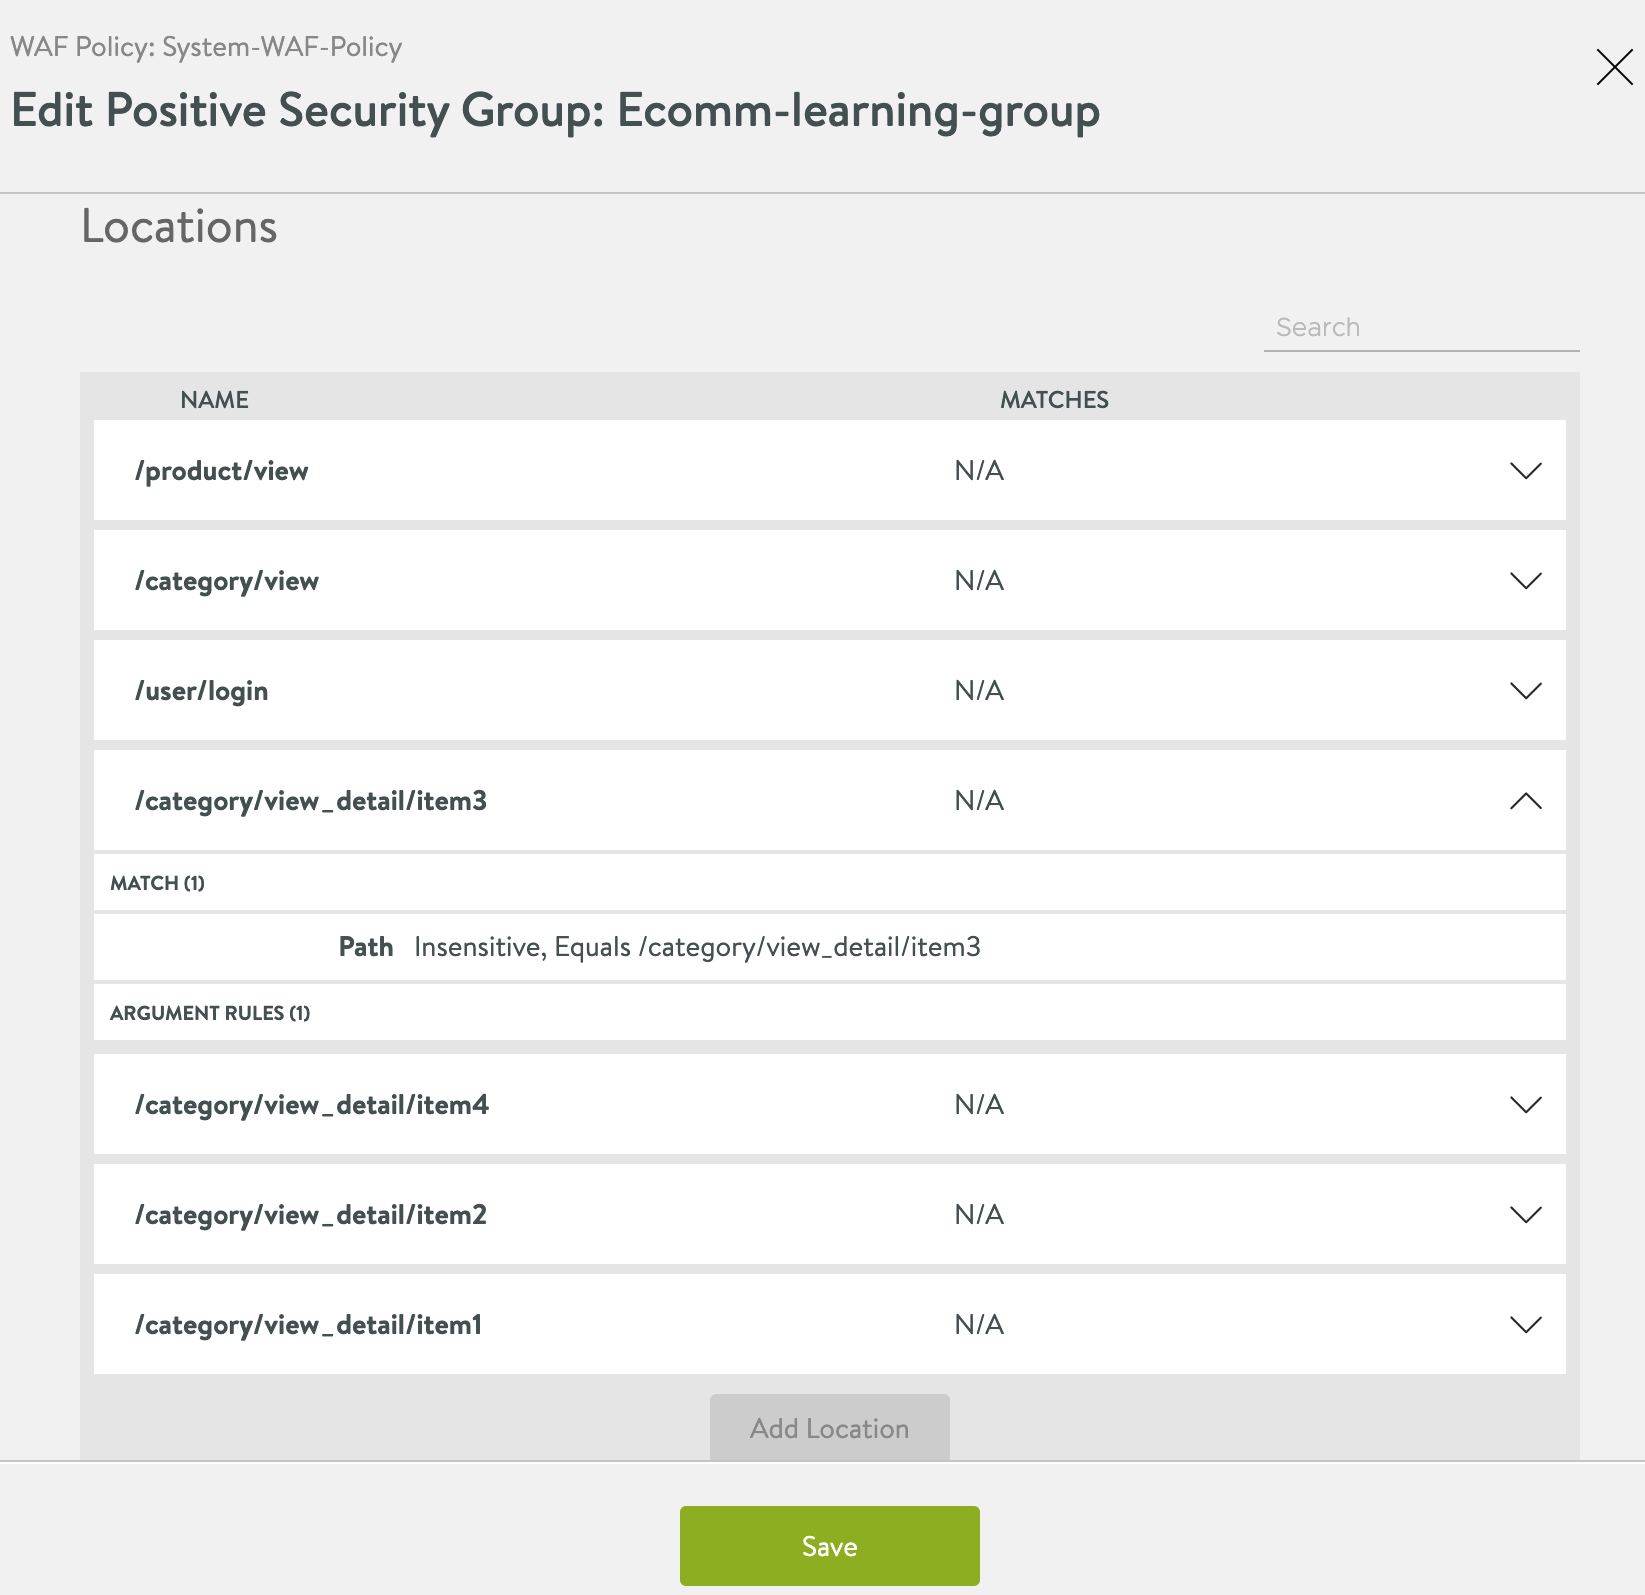
As seen above, each of them have a strict match of Location (as path is considered equivalent to equals).
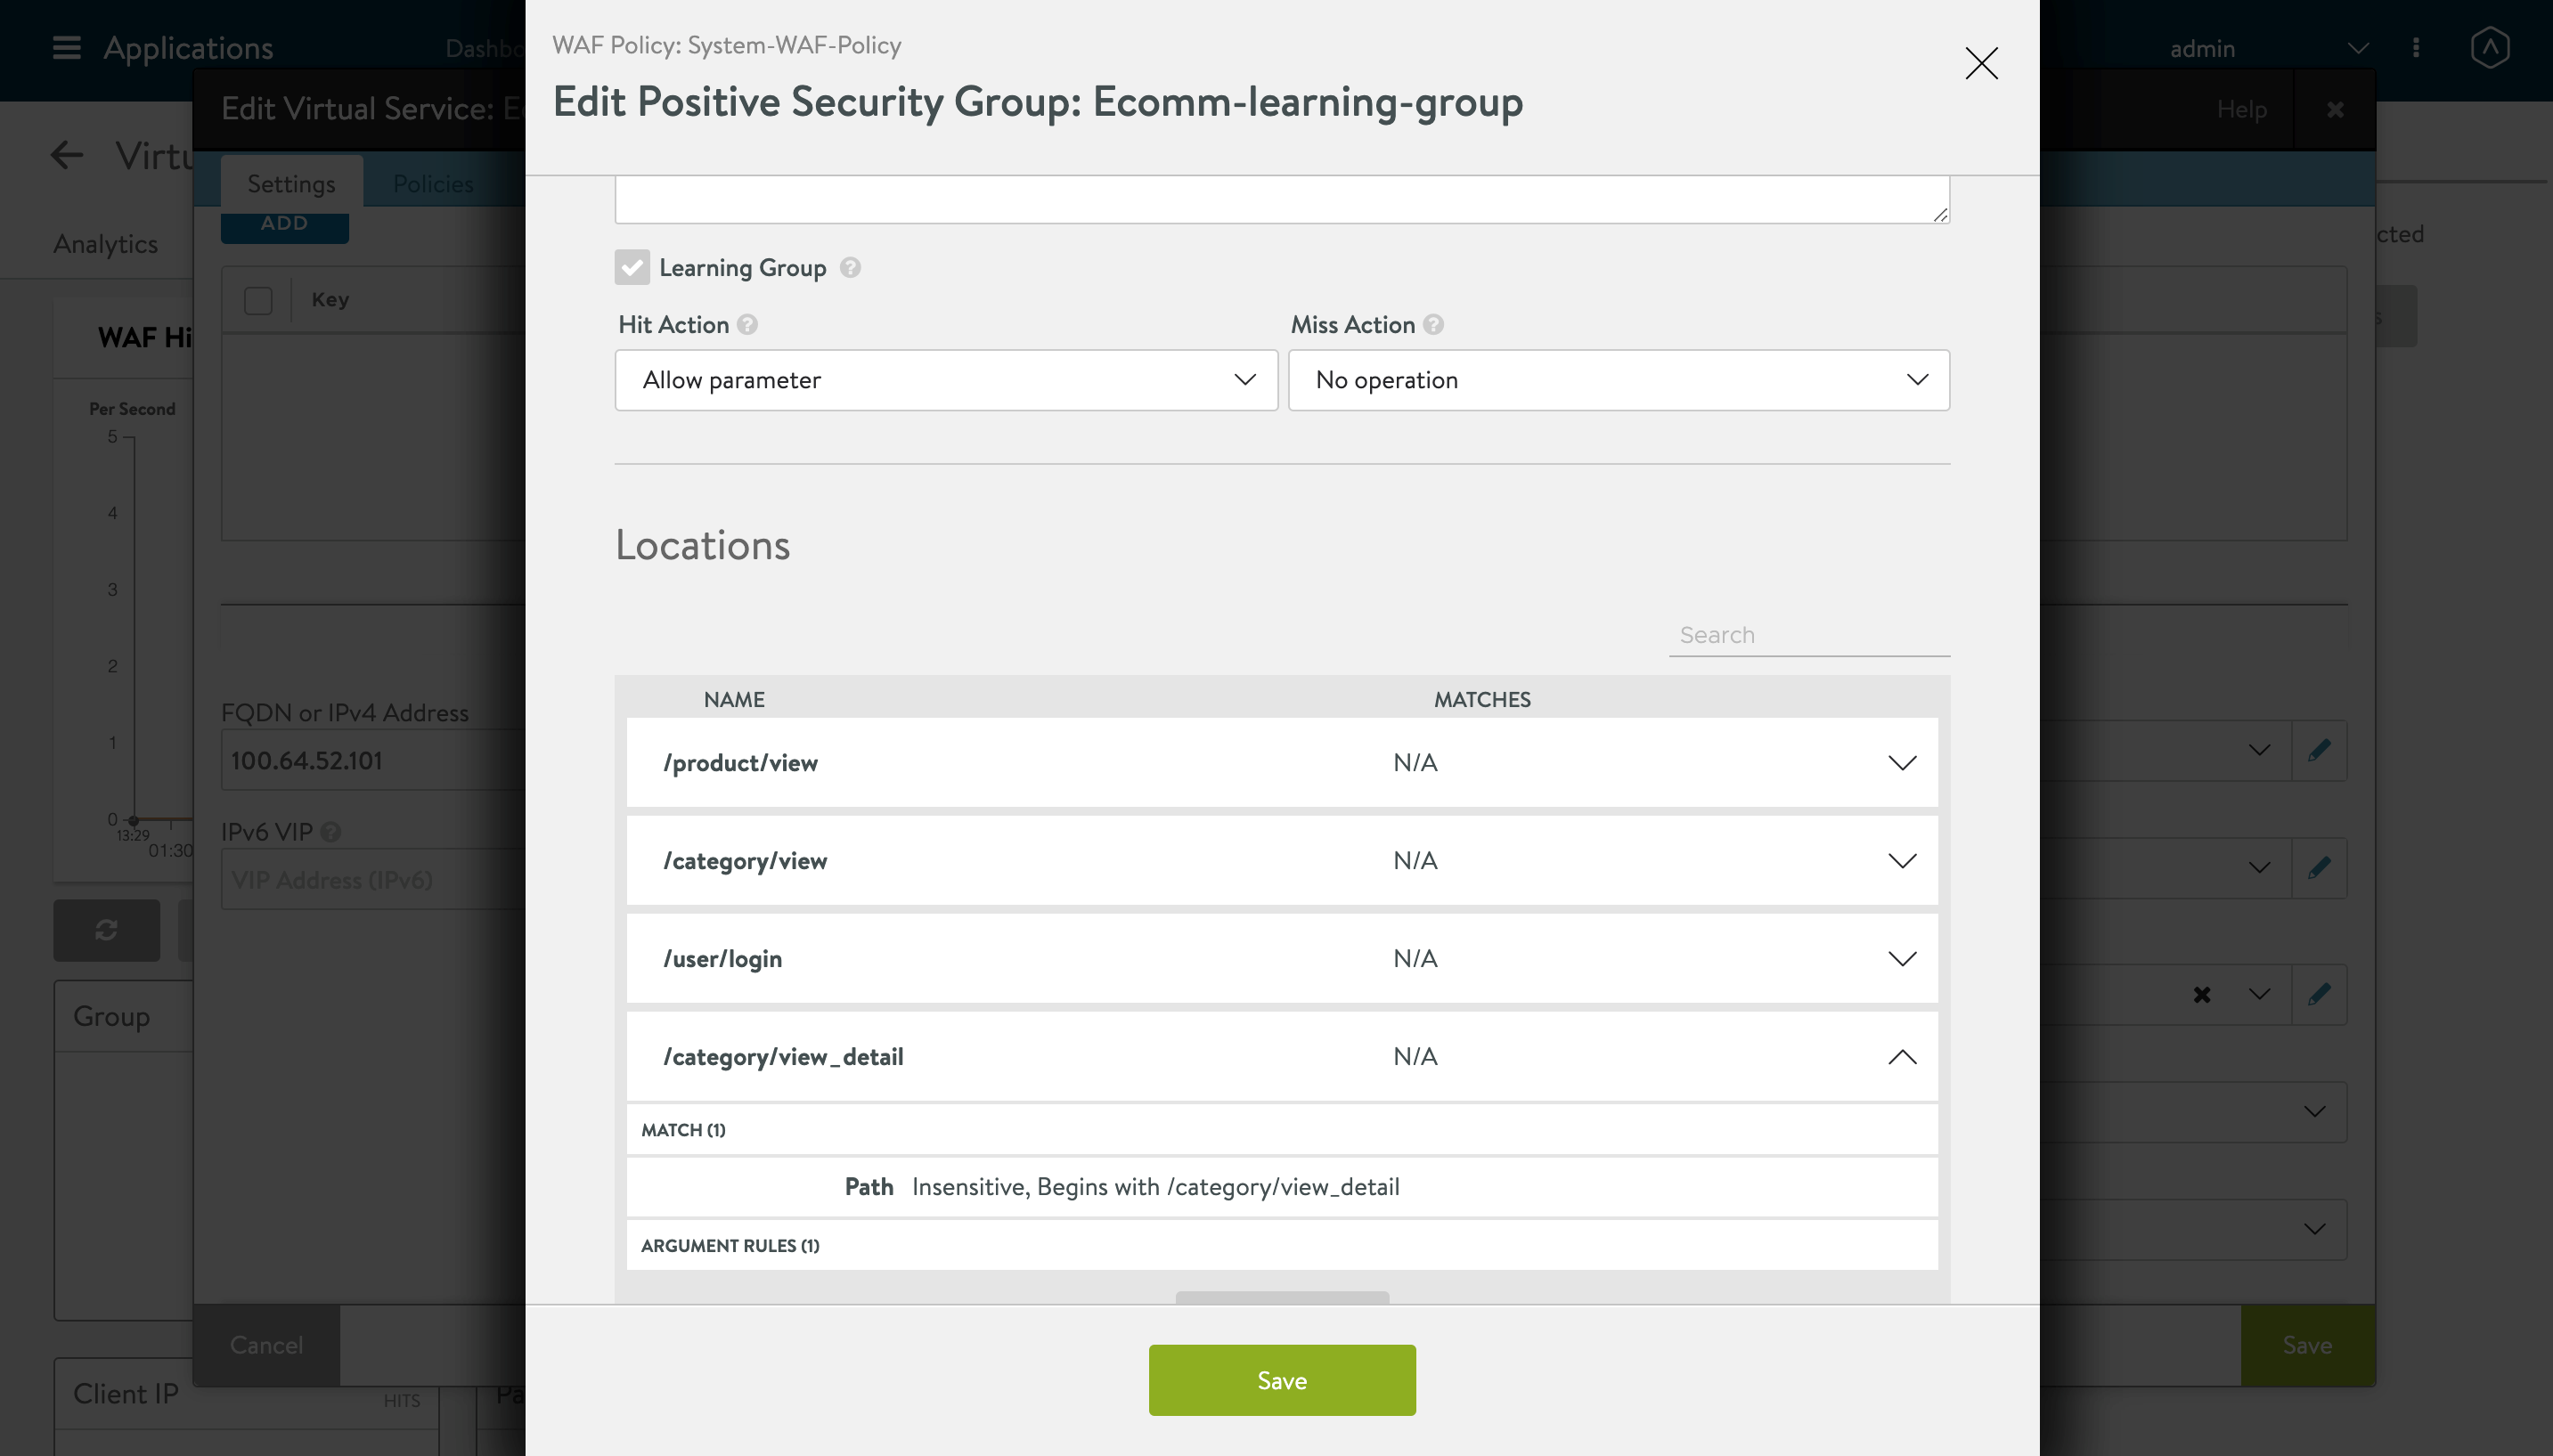
The following example shows the details of a location when the prefix is considered for the similar URIs instead of the full URIs. Similar URI’s are consolidated into one Location using prefix (for example, /category/view_detail) and accordingly the path is matched as Begins with (instead of equals).
Signatures
The rules enabled under this tab will be applied on enabling the specific WAF policy. The following are the defined categories:
- PRE-CRS RULES: The custom rules that are applied before the supplied OWASP Core Rule Set (CRS).
- CRS RULES: The Avi Vantage supplied OWASP CRS policy that covers OWASP top ten attack protection.
- POST-CRS RULES: The custom rules that are applied after the supplied OWASP Core Rule Set (CRS).
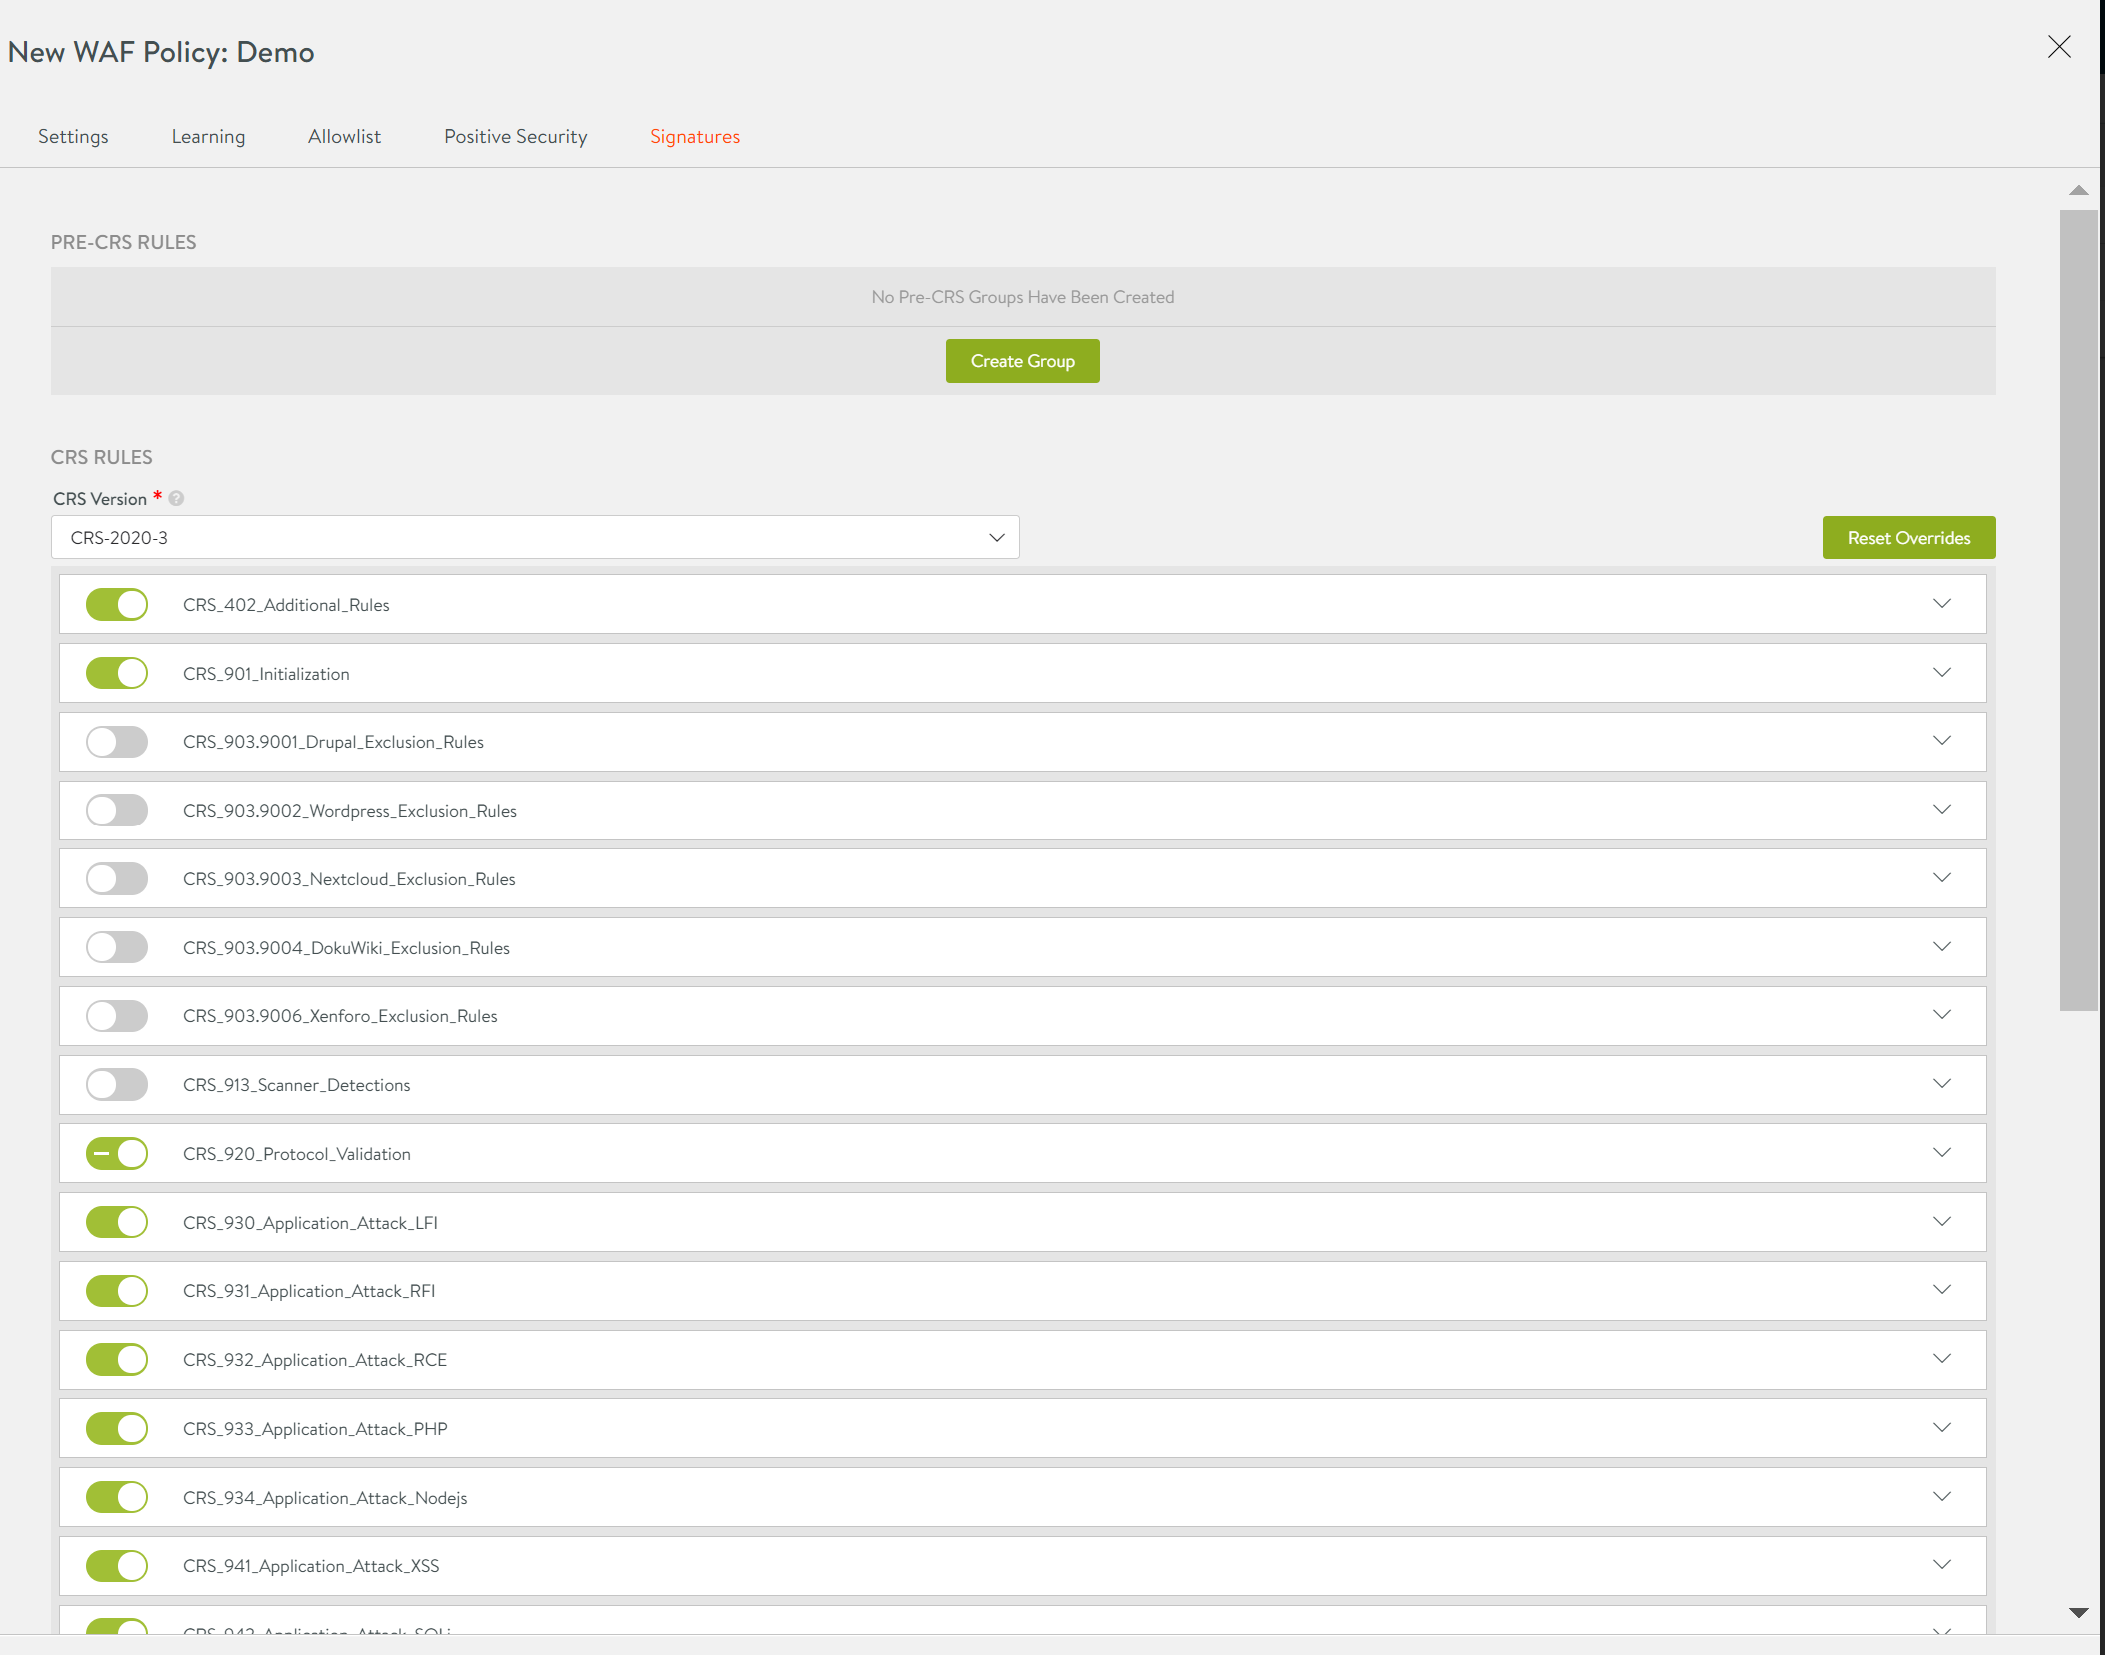
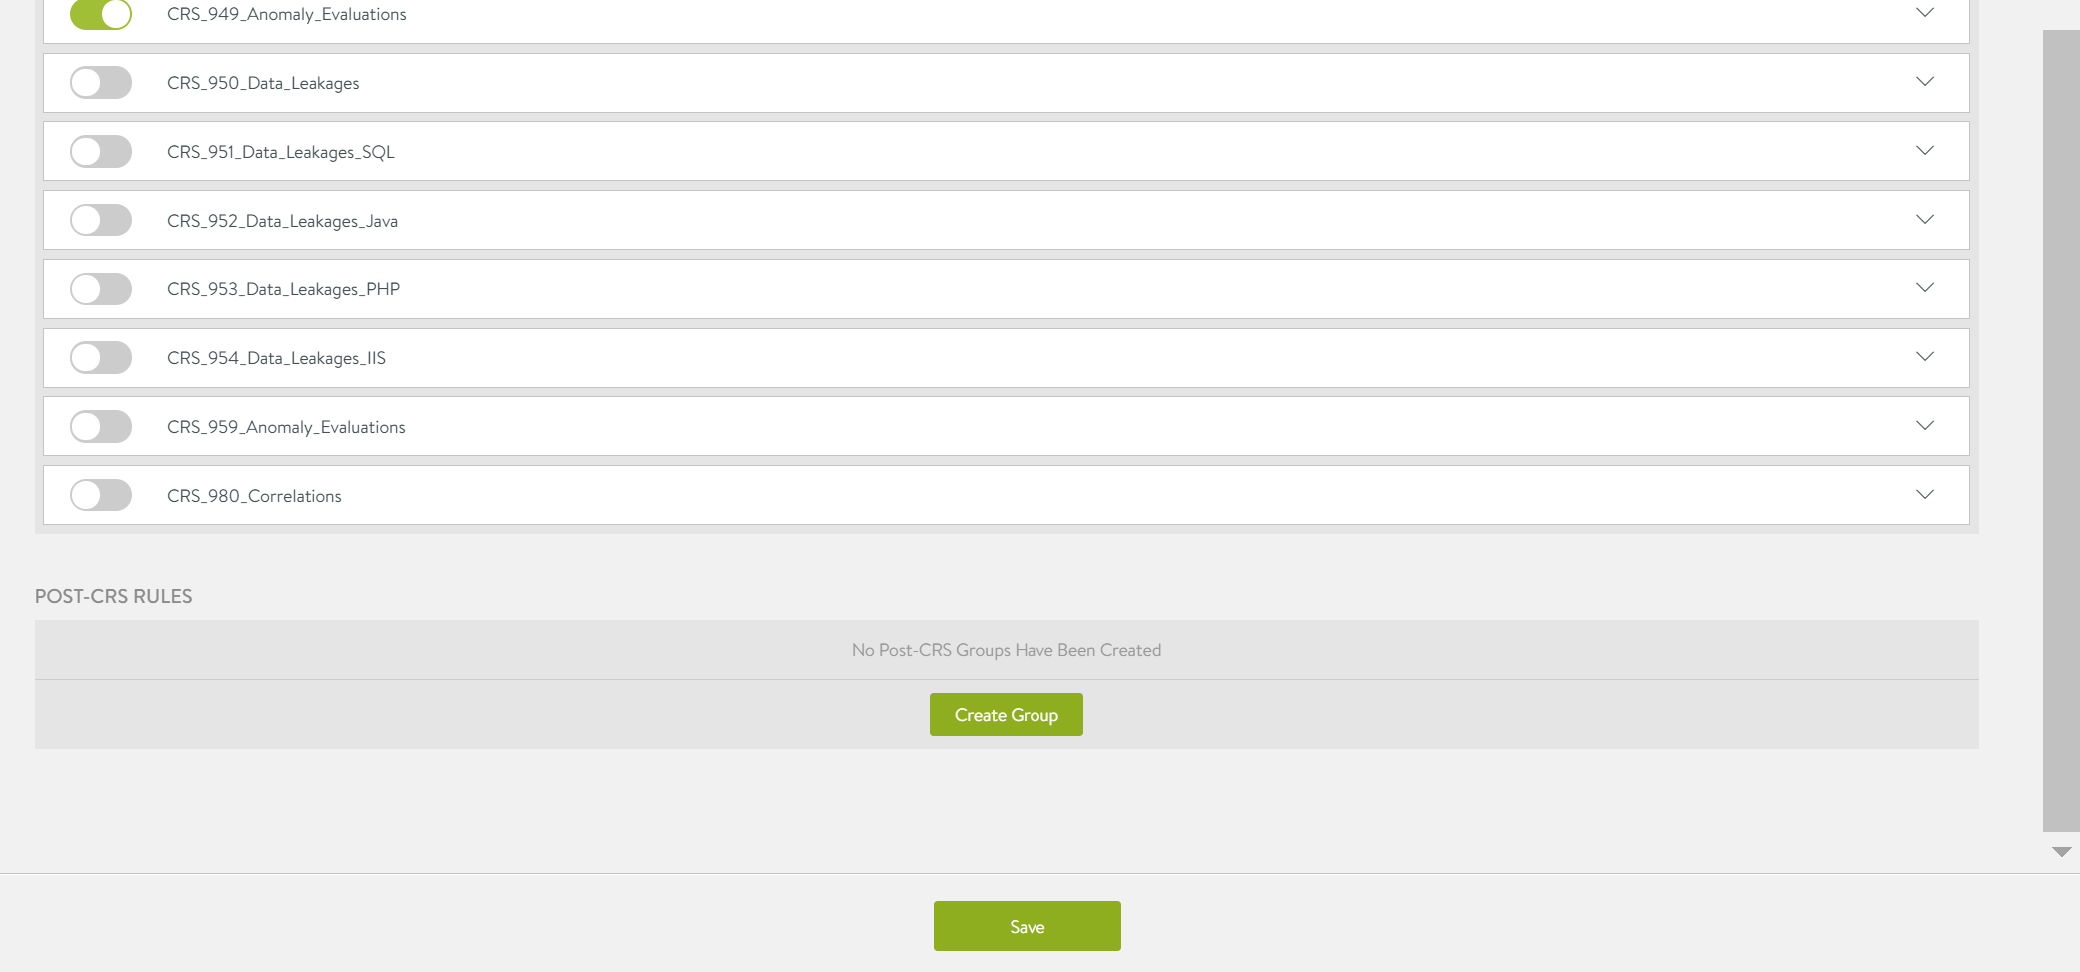
Each of these categories can have pre-defined set of rules that can be enabled or disabled using the toggle button. If a rule is disabled, then it will not be evaluated during the request check.
Custom Rules
Custom ModSecurity rules can be created under the PRE-CRS RULES and POST-CRS RULES categories.
The three parts of ModSecurity rules are the variable to be examined, the test to submit the variable to, and the action to carry out if the test evaluates to be true for the selected variable.
For more information on ModSecurity Language refer to the ModSecurity Handbook.
To create custom rules, click on Create group and provide the following details:
- Enter the required group name. Every rule needs to be configured within a group.
- Rule Name:
- Provide a name for the rule.
- Specify the rule text in ModSecurity language.
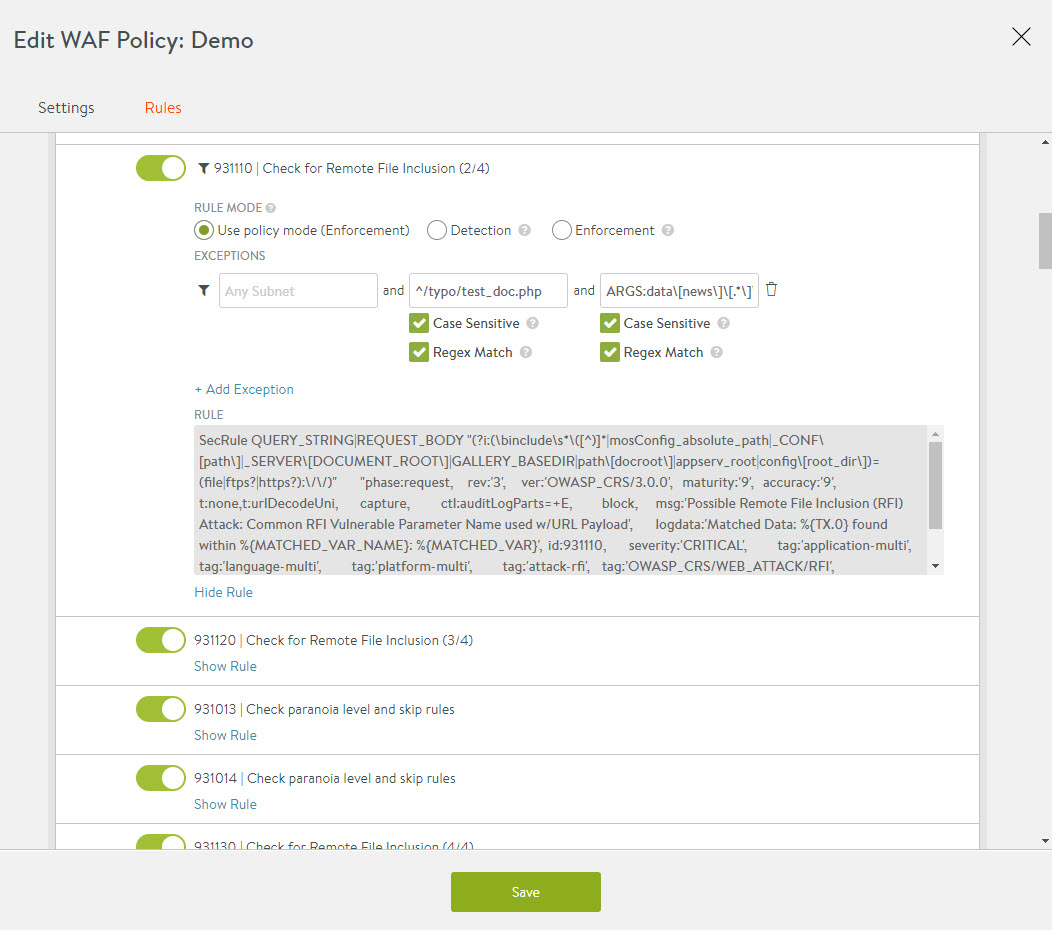
As displayed in the example below, SecRule REQUEST_URI “@beginsWith /admin” “id:1000,phase:request,block” is the rule text. On detecting external access on admin interface, this rule is configured to blacklist the URL. Post rule configuration, the allowed IP range for the internal IT department can be added as an exception rule, so that they can use the URL for admin access.
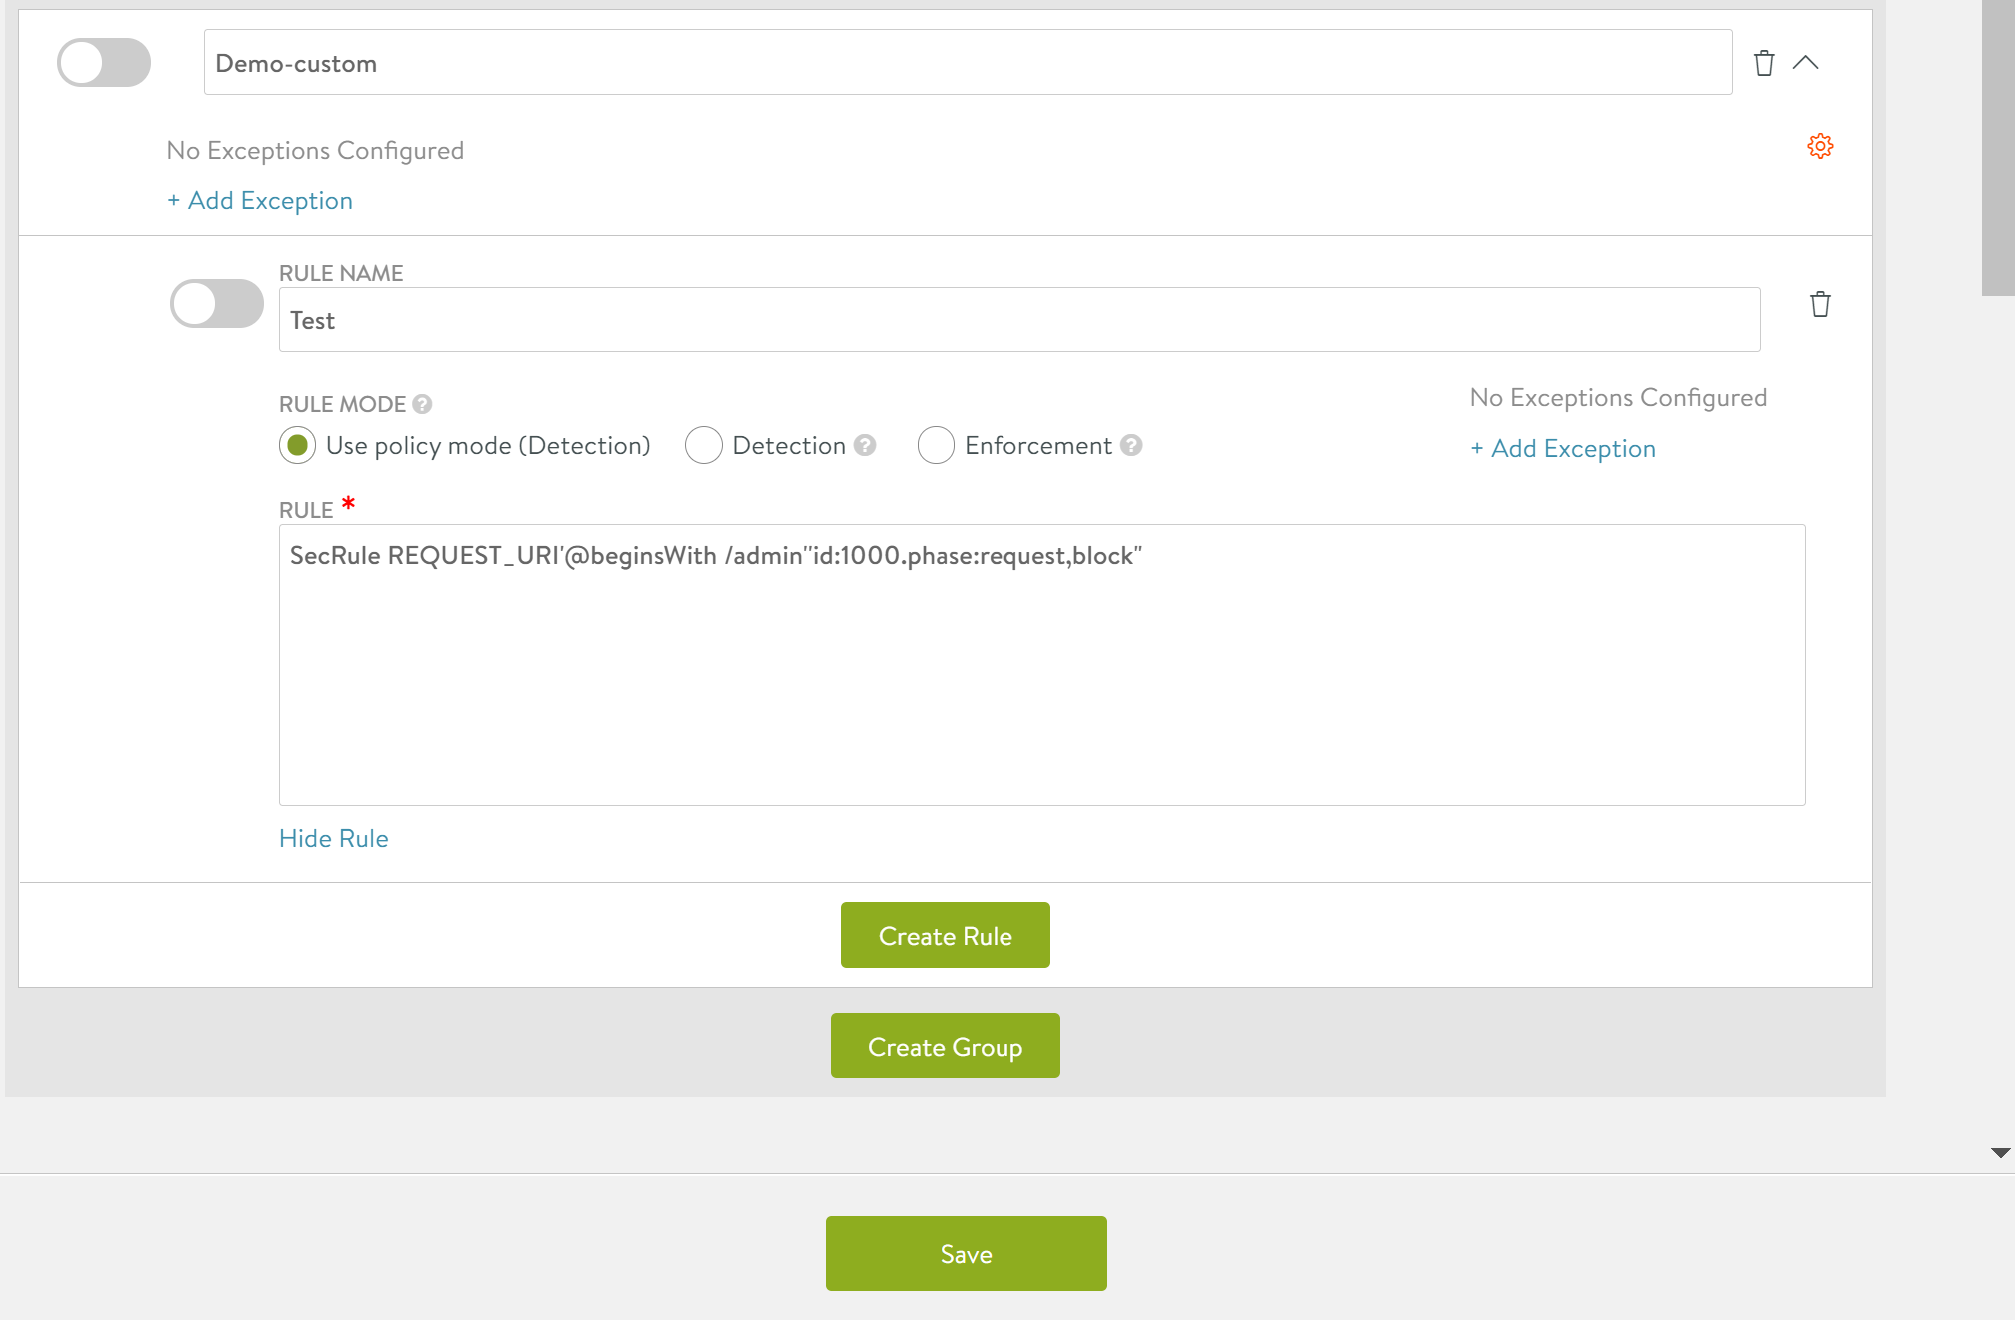
- Any group or rule can have one or more exceptions.
Exceptions
Exceptions are a common way of tuning a WAF policy to work with an application. These are normally created when an application’s regular traffic matches specific WAF rules. The following are a few other reasons for creating exceptions:
- For false-positive mitigation.
- For applications that do not conform with the System-WAF-Policy.
- For applications transmitting data that might appear like an attack. For instance, transferring HTML content in query parameters.
- For applications with special requirements that are not allowed in the policy. For instance, accessing application on its direct IP address.
You can use Avi Vantage’s recommendation system to create exceptions or you can even add them manually.
Manually Configuring Exceptions
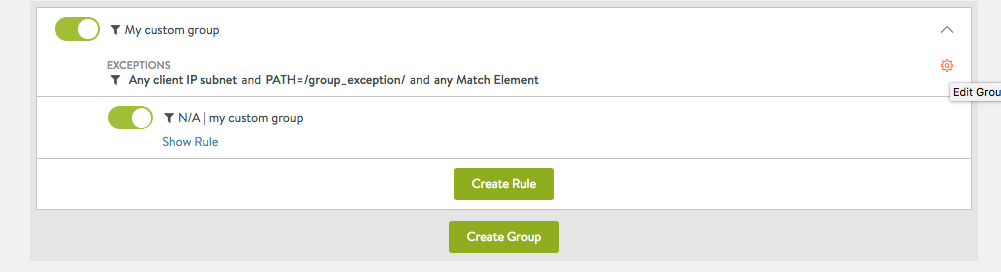
- Click on + Add Exception to configure exceptions.
- These exceptions can be created on a group or rule level.
- With exceptions, a group or a rule check can be bypassed for the defined criteria.
- Exceptions can be configured for IP address/subnet, path, any match element, or a regular expression. For example, Subnet- 10.0.0.0/8, Path- /admin/ , Match Element - REQUEST_HEADERS.
- On adding an exception, a funnel icon will appear which indicates that a rule or group contains an exception.
- Exceptions can be deleted using the trash can icon.
Supported match elements
You can create exceptions for the following match elements:
The exceptions can be created for the following match elements:
ARGS, ARGS_GET, ARGS_POST, ARGS_NAMES, FILES
QUERY_STRING, REQUEST_BASENAME, REQUEST_BODY, REQUEST_URI, REQUEST_URI_RAW,
REQUEST_COOKIES, REQUEST_HEADERS, RESPONSE_HEADERS, XML.
For example, creating an exception for ARGS:password at a WAF rule level means that the rule, and only this rule, will not examine the password HTTP parameter (sent in URL or HTML form). The rule will continue checking other parts of a HTTP request not specified as exceptions.
Recommended Assisted Workflow
The following steps are for a recommended workflow to configure exceptions:
- Using WAF Log Analytics and find possible false-positives.
- False-positives may occur in large numbers and for different client IP addresses.
- To understand the context for false-positives, consult the application owner if possible.
- In the log, choose the WAF Hit entry that you want to add the exception for, and click on + Add Exception.
- The modal dialog will generate a set of suggested values.
- These values are precomputed from the log entry and related findings.
- Save the exception to apply it to the policy.
XML exceptions
Starting with Avi Vantage 21.1.1, support for the XML exceptions is available.
WAF rules use an XML variable with an XPath expression to specify XML request body fragments that must be examined.
Example:
SecRule XML:/* text_to_match "id:1,phase:2,log,deny,status:403" – If a text representation of an XML request matches text_to_match, the WAF will block the request.
Consequently, XML exceptions are also specified using the XPath expressions.
Example: ‘XML:/*’.
It is common in WAF rules to use XML:/* expression to enable processing for the whole XML request body.
Using XPath expressions in WAF exceptions is a powerful tool that allows to configure WAF to skip checks for the whole XML document or to selectively exclude only parts of the XML document from WAF inspection. In a common scenario, when a CRS rule generates a false-positive WAF hit, it might be sufficient to follow the steps described in the Recommended Assisted Workflow section to disable XML processing by a given rule. However, it is also possible for a user to manually configure an exception and specify the XPath expression to exclude parts of the document from WAF rules processing.
Example
XML request body is being sent:
<example>
<username>joe</username>
<password>!@#$%</password>
</example>
The WAF rule generates a hit
match element: XML:/*
When following the Recommended Assisted Workflow option, the match element “XML:/*” is used to disable processing of the whole XML document from the rule 12345.
Alternatively, create a rule-level exception and specify the match element as XML:/example/password to exclude only an element responsible for a WAF hit. As a result, WAF will continue examining of the remaining parts of the XML document.
WAF Profile
A WAF profile contains the basic settings for WAF functionality and is attached to a WAF Policy. As the profile is independent of the policy, it can be easily reused. Generally, WAF profile is defined for a specific set of virtual services and is reused to a feasible extent.
The following are a few examples for WAF profiles:
- Application Java profile: Contains all necessary elements for your Java applications.
- Application PHP profile: Contains all necessary elements for your PHP applications.
- API profile: Contains API specific settings.
Navigate to Templates > WAF > WAF Profile to locate the default profile. System-WAF-Profile is the default profile that contains most commonly used web application settings served through a virtual service.
Note: For customizing a profile, it is highly recommended to create a new profile instead of editing the default profile (System-WAF-Profile).
Mapping WAF Profile
WAF profile contains a mapping from HTTP Content-Type value to Request body processor.
Request body processor is a WAF component responsible for parsing a particular format of HTTP request, like XML or JSON.
WAF ships with default settings for popular content types but on some occasions it might be required to configure a specific content type that given application uses. For instance, when you configure application/xml Content-Type to use request body processor XML, it means that when WAF processes a HTTP request with Content-Type header equal to application/xml, it will use XML request body processor which parses the XML contents of the request, and allows for a use of XML variable in signature rules.
The following are the list of available request body parsers:
-
URL Encoded
- WAF request body parser for URL encoded data (application/x-www-form-urlencoded Content-Type)
-
Multipart
- WAF request body parser for multipart form data (Content-Type multipart/form-data)
-
JSON
- WAF request body parser for JSON data
-
XML
- WAF request body parser for XML data
-
As String
-
WAF request body parser that does not attempt to interpret the body of incoming requests in any way and does not set ARGS WAF variables. However
REQUEST_BODYvariable is set to the value of request body data. -
HTTP request is treated as a text and WAF attempts to scan for potential problems in request data. However, it is advised to use more specific request body parser if possible.
-
-
Do Not Parse
- WAF request body parser that does not attempt to parse incoming requests and does not set any WAF variables, effectively turning off WAF protection for a given content type. Use
ctl:forceRequestBodyVariablein custom signature rule to setREQUEST_BODYvariable if it is needed.
- WAF request body parser that does not attempt to parse incoming requests and does not set any WAF variables, effectively turning off WAF protection for a given content type. Use
Note: You can use ctl:requestBodyProcessor action to set the request body processor when the conditions specified in the rule are met. Setting request body processor using ctl:requestBodyProcessor action takes precedence over WAF Profile setting.
When no request body processor is configured for a given Content-Type value, WAF uses As String value.
Configuring WAF Profile
To create a new profile, navigate to Templates > WAF > WAF Profile and click on Create icon.
Settings Tab
Provide the following details to configure the WAF profile:
| |
|
|
|---|---|---|
| Name | Enter a relevant name for the profile. | |
| Allowed Versions | Enter the allowed HTTP versions for the profile. | 1.0 and 1.1 are the default entries. |
| Allowed Methods | Enter the allowed HTTP method for the profile. Different applications might need different methods. | Websites might use only the default GET HEAD POST options. APIs might use other HTTP methods such as PUT, DELETE, etc. Refer to the note below the table for more information on Allowed Methods. |
| Allowed Content Types | Enter the accepted request content types for the profile. | Default entry covers all standard content types. |
| Restricted Extensions | Enter extensions that should be restricted and blocked. | Generally, these are files that do not reside on a web server. |
| Restricted Headers | Enter headers that will not be allowed by WAF. | |
| Static Extensions | Enter the list of static file extensions that will bypass the WAF check. | A GET request without any parameter or dynamic part is classified as a static request. It does not contain any attack vector. |
| Default Actions | Request Header, Request Body, Response Header, and Response Body are the four WAF phases. Each of this phase has a default action. The fields defined for this default action are phase,action,status code,additional logging,WAF logs. | |
| phase | Enter the WAF phase. | Allowed values are phase:1, phase:2, phase:3, and phase:4. Example- phase:1 |
| action | Enter the action to be executed for that specific phase. | Two options are permit and deny. Example- deny |
| status code | Enter the status code sent to the client. | Example- status:403 |
| additional logging | Enter the additional logging level. | Example- log |
| WAF logs | Enter the WAF logging level. | Example- auditlog |
| Other Settings | ||
| Maximum non-file upload size | Enter the maximum file body size in KB examined by WAF. Larger body sized files will be blocked. | Example- 128 |
| Maximum file upload size | Enter the maximum file upload size in KB allowed by WAF. | Example- 1024 |
| Maximum backend response size | Enter the maximum response size in KB allowed by WAF. | Example- 128 |
| Argument Separator | Enter the separator for specical applications that have different argument separators. | Example- & |
| Cookie Format Versions | Select the preferred cookie format version. | Version 1 cookies have been deprecated and so Netscape cookies are recommended. |
Note: The options under Allowed Methods are GET, HEAD, POST, PUT, DELETE, OPTIONS, TRACE, and CONNECT. Starting with Avi Vantage release 18.2.3, you can also choose from the additional options such as PATCH, PROPFIND, PROPPATCH, MKCOL, COPY, MOVE, LOCK, and UNLOCK.
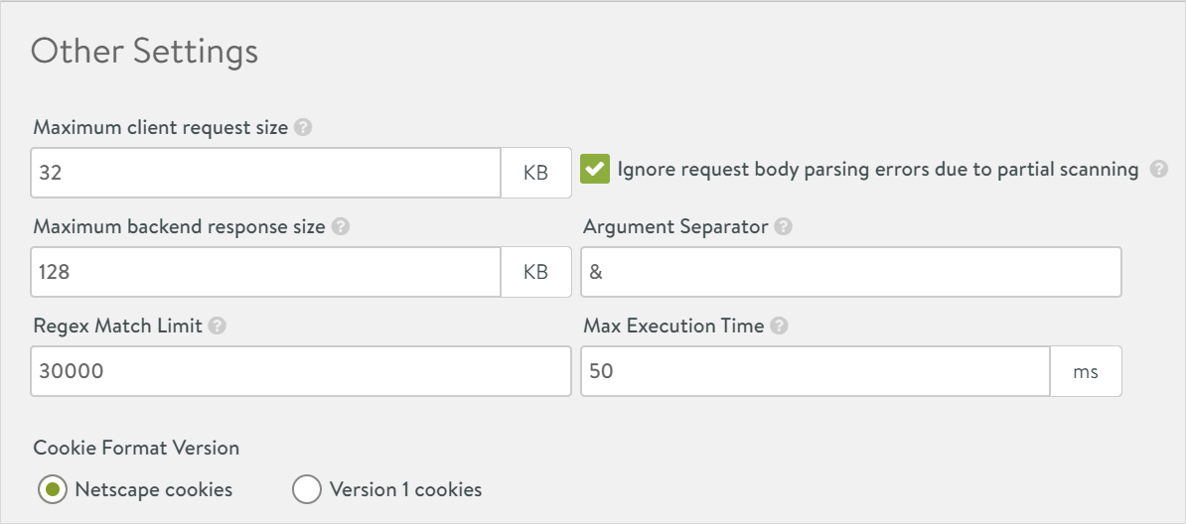
Other Settings
- Enter a value between 1 to 32768 (in KB) as the Maximum client request size. This is the maximum size for the client request body scanned by WAF.
- Click on Ignore request body parsing errors due to partial scanning to enable the option, if required.
- Enter a value between 1 to 32768 (in KB) as the Maximum client request size. This is the maximum size for response body scanned by WAF.
- Enter an Argument Separator. For example, &.
- Enter the Regex Match Limit. This is the limit CPU utilization for each regular expression match when processing rules.
- Enter a value between 0 to 5000 as the Max Execution Time.
- Select either Netscape Cookies or Version 1 Cookies as the Cookie Format Version.
The Other Settings section of the New WAF Profile is as shown below:
With this, you have configured the Settings tab in the New WAF Profile screen.
Default Actions
There are four WAF phases:
- Request Header
- Request Body
- Response Header
- Response Body
Each of this phase has a default action. The fields defined for this default action are in the format phase,action,status code,additional logging,WAF logs.
For example, phase:1,deny,status:403,log,auditlog.
In CRS there are rules for response header and response body phase. The default actions configured here will be used in the rules under Signatures.
For example, you can change the response code from 403 to 404, or as required.
| Action | Description | Example |
|---|---|---|
| phase | Enter the WAF Phase | Allowed values: phase:1, phase:2, phase:3, and phase:4 |
| Action | Enter the action to be executed in a specific phase | Allowed values: permit and deny |
| Status code | Enter the status code sent to the client | status:403 |
| Additional Logging | Enter the additional logging level | log |
| WAF logs | Enter the WAF logging level | auditlog |
The Default Actions section of the New WAF Profile screen is as shown below:
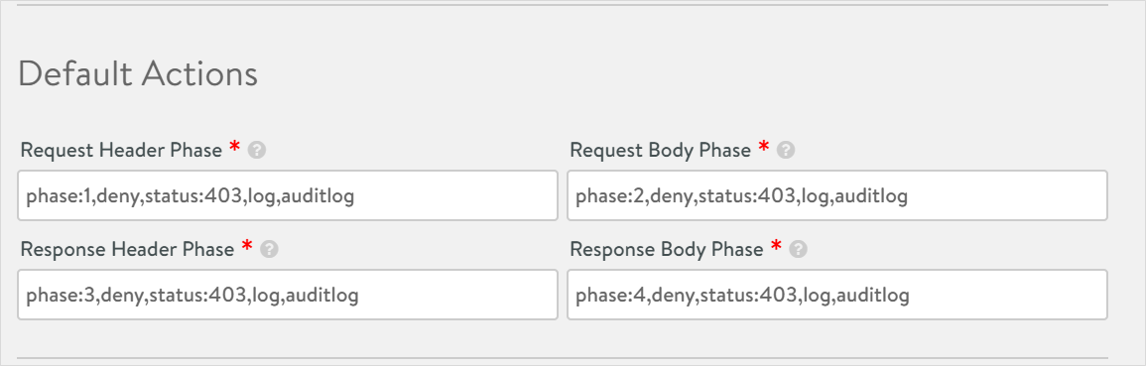
The following screenshot displays a sample configuration:
Files Tab
The static input data in a WAF profile that is shared between virtual services is stored here. For instance, the file name sql-errors.data has the default data set which contains strings for examining HTTP responses for data leakage protection.
To create a new file, scroll to the bottom of the page and click on + Add File. Provide a Name and enter the relevant Data. These files can be referred in the custom WAF policy rules.

Enabling WAF on Virtual Server
Each virtual service can have one WAF policy attached to it.
To add a WAF policy to an existing virtual service, follow the given steps:
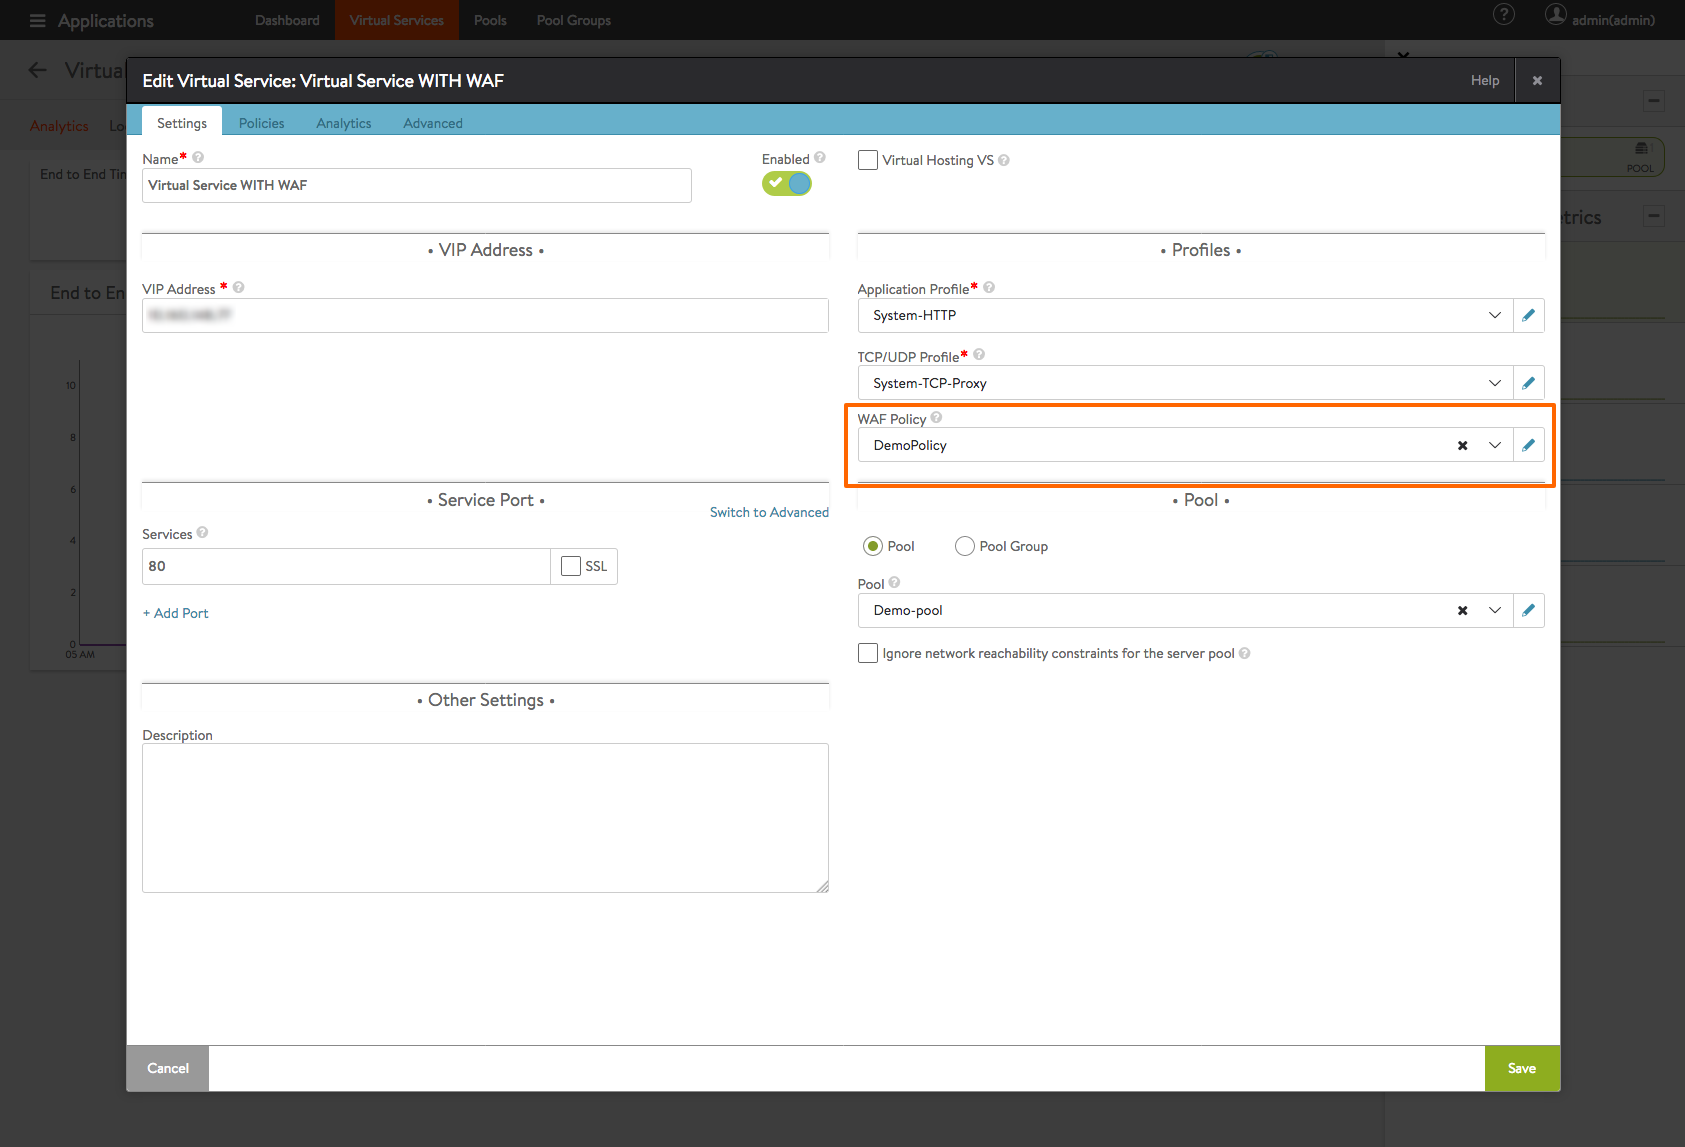
Navigate to Applications > Virtual Services. Select the virtual service and click on the edit icon.

In the Profiles section, click on the drop-down menu under WAF Policy, to either select an existing policy or to create a new one.
Caution: Attaching a WAF policy to a virtual service, will immediately put that policy into effect. If the policy is in enforcement mode, then it will start blocking requests. So, for new applications and untuned WAF policies, we recommend running the policy only in detection mode initially.
Save the configuration.
Navigate to Applications > Dashboard to verify if WAF is enabled on the virtual service. If enabled, you will notice a halo and a shield on the attached virtual service object.

CRS
Starting with Avi Vantage release 18.2.3, you can upload Core Rule Set (CRS) compatible with iWAF.
Navigate to Templates > WAF > CRS. Click on the Upload button to upload the CRS file in JSON format.

These rules are based on the OWASP CRS project. For more information, refer to OWASP ModSecurity Core Rule Set.
Updating CRS Rules
To update the CRS rules,
-
Navigate to Templates > WAF > WAF Policy.
-
Click on the Edit icon against a WAF policy.

-
In the Edit WAF Policy: screen, click on the Signatures tab.
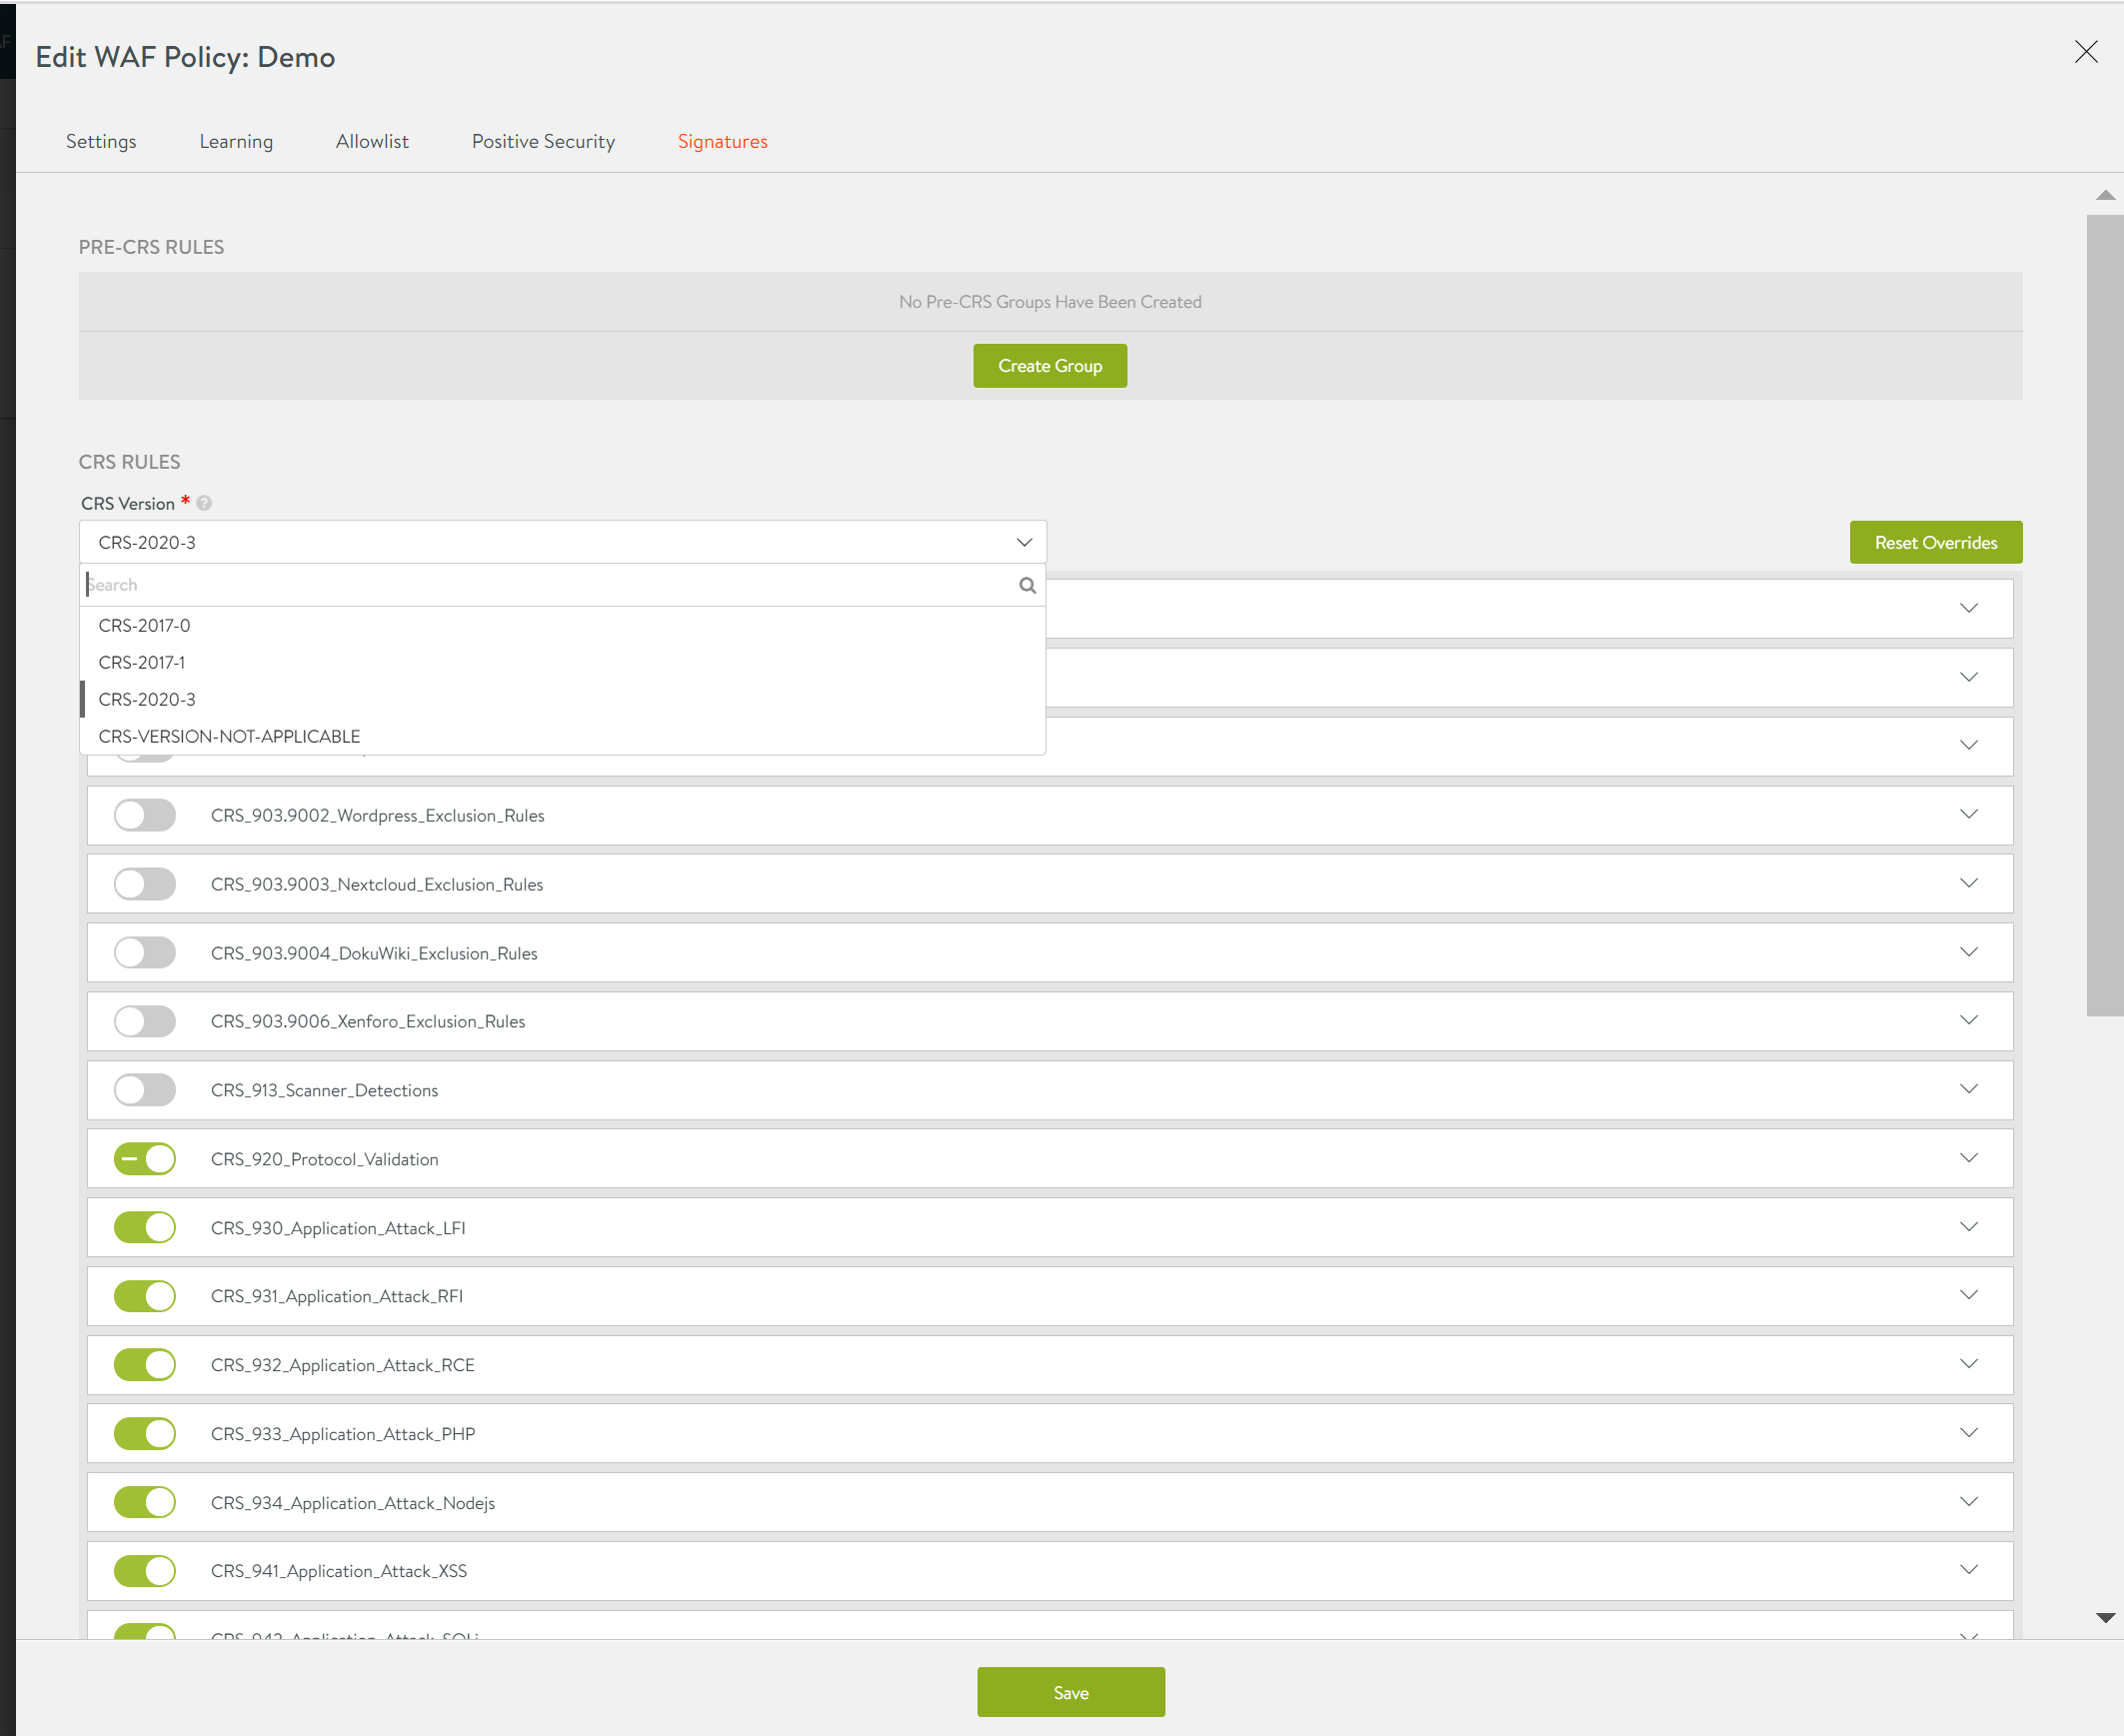
-
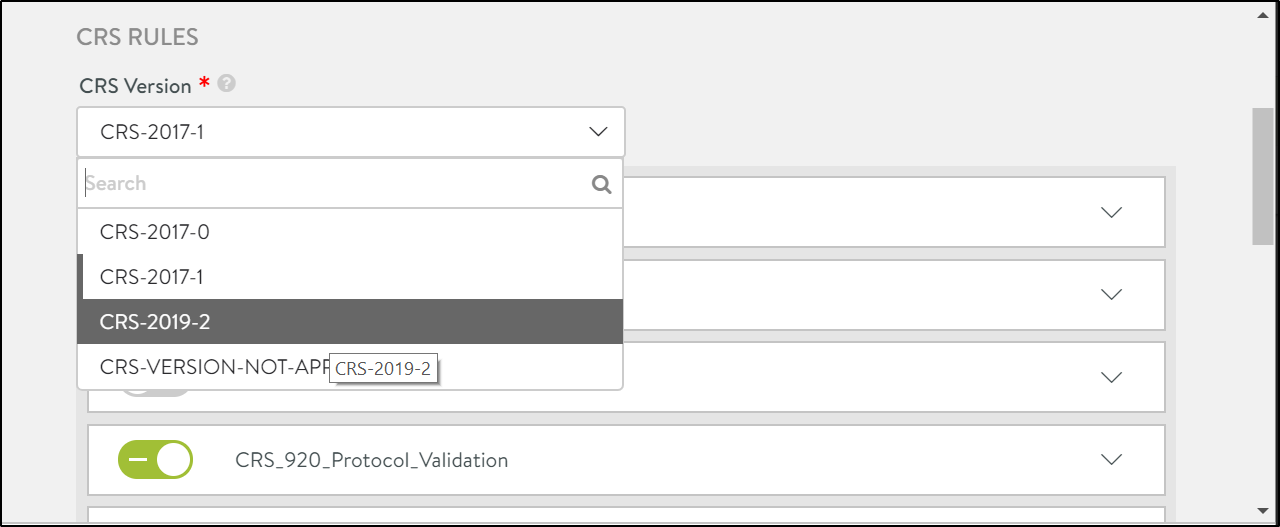
Click on the CRS Version field to select the WAF core rule set required.
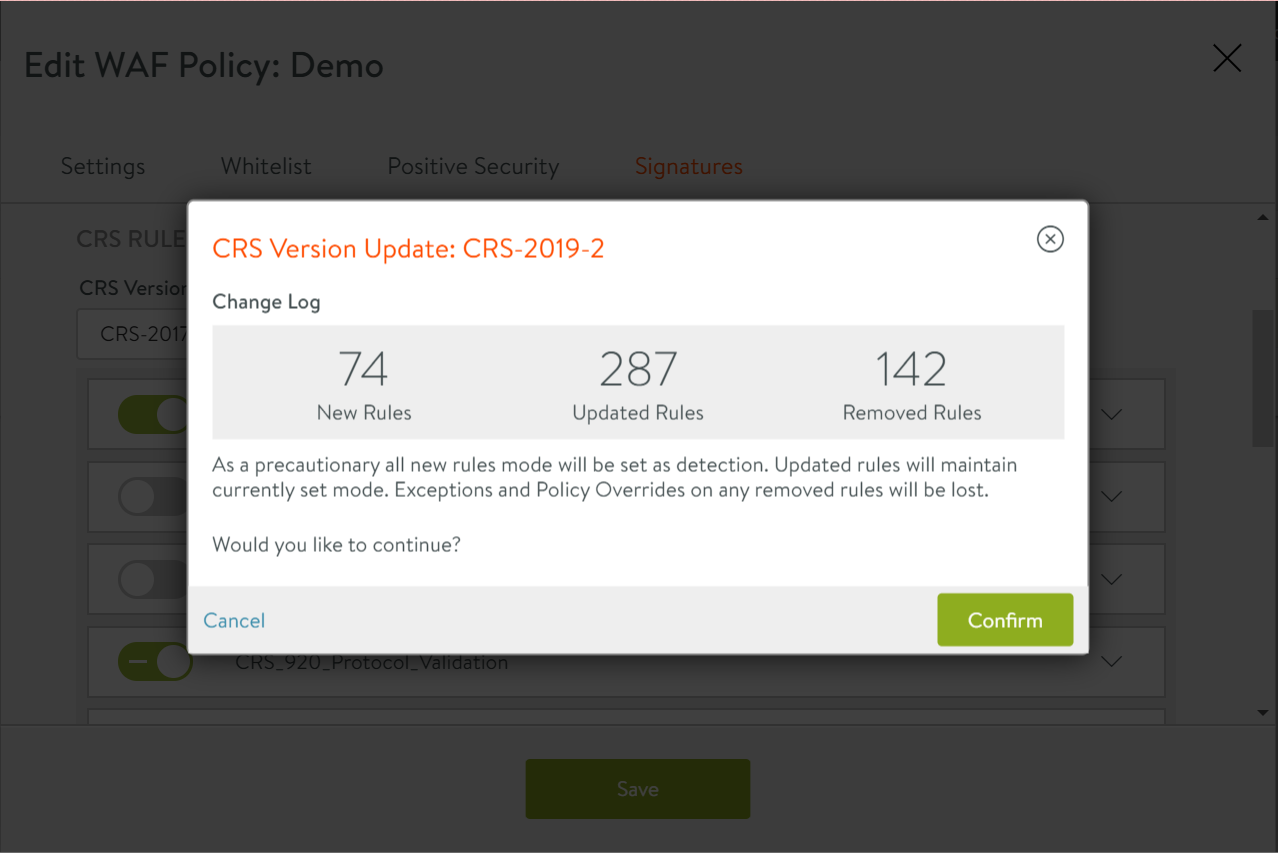
-
Click on the Confirm button to continue.
-
Enable/ disable the CRS rules listed, as required.
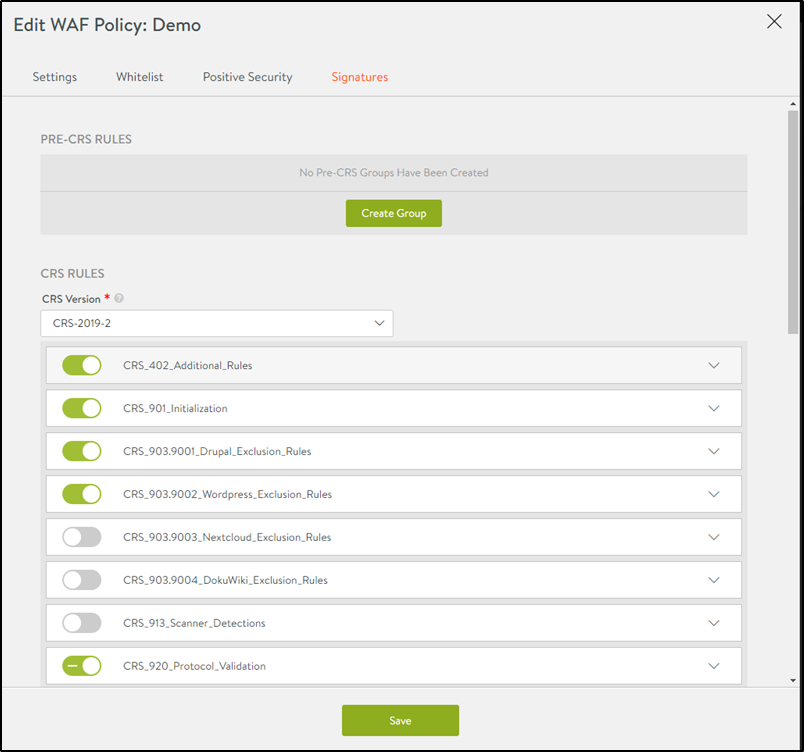
-
Click on Save to update the CRS rules.
WAF Mode
Detection only and enforcement are the two modes supported for a WAF policy in Avi Vantage. Every policy runs in one of these modes to evaluate the requests and responses. The following section discusses the differences between these two modes.
| |
|
|
|---|---|---|
| Policy | Logs alerts during an attack, but no deny action is taken. | Rejects requests when a policy is matched and deny action is taken. |
| Operation | Evaluates the whole policy without stopping at the first rule hit. | Matches the first rule that rejects the request and implements the default action or returns a rule specific error code. |
| Log files | Contains the WAF log section where the policy violation was found and entries for every rule that is matched. | Contains specific WAF log section which has the first rule that rejected the request. Note: This is to improve performance. If a request is already detected as an attack, further checks are not required. |
| Response Code | 200 OK | Default is 403 Forbidden. This response code can be modified. |
Usage Recommendations
Follow the steps provided to enable a suitable mode for different usage scenarios.
For New Applications
- Create a virtual service for the application.
- Add WAF policy in detection only mode.
- Iterate through false positive mitigation.
- Eliminate WAF findings which are not attacks.
- Once no legitimate traffic is flagged by WAF, change to enforcement mode.
For Existing Applications
- Add WAF policy in detection only mode.
- Iterate through false positive mitigation.
- Once no legitimate traffic is flagged by WAF, change to enforcement mode.
Note: The time taken for evaluating detection only mode depends on several factors such as total number of requests seen, paranoia mode, and application coverage of request.
Paranoia Mode
Paranoia mode can be set for each WAF policy which defines its rigidity. Specific rules are enabled or disabled based on the set paranoia mode. The available modes are:
- 1- Low
- 2- Medium
- 3- High
- 4- Extreme
Two aspects that should be considered while setting the paranoia mode are:
- Risk level of an application.
- Resources available for policy tuning.
The following table maps paranoia modes to different risks levels and resource availability.
| High application risk level | High paranoia mode |
| Low application risk level | Low paranoia mode |
| Resources available for tuning | Higher paranoia mode |
| Limited resources avilable for tuning | Lower paranoia mode |
For more information on paranoia mode, refer to OWASP ModSec CRS Paranoia Mode.
WAF Administrator Role
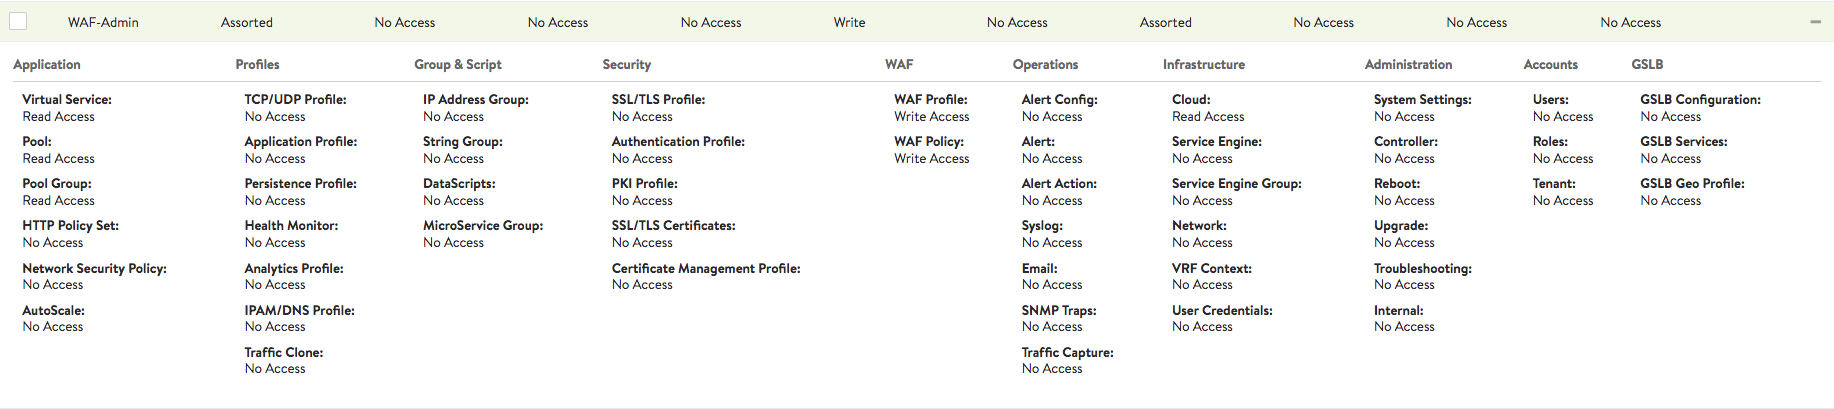
WAF administrator role assigns users specific access to several components in Avi Vantage. This role differentiates access rights between the security team and other administrators. With this, the team can independently check the security status and implement policy changes.
The WAF administrator role provides read access to essential components such as virtual service, pool, and pool groups. Components such as WAF profile and WAF policy are provided write access.
To locate the WAF administrator role, navigate to Administration > Accounts > Roles. WAF-admin defines role access for all components as shown in the screenshot below.
Document Revision History
| Date | Change Summary |
|---|---|
| December 20, 2021 | Added Mapping WAF Profile section for 21.1.3 |