Load Balancing UAGs in AVS
Overview
VMware Horizon for Azure VMware Solution (AVS) delivers a seamlessly integrated hybrid cloud for virtual desktops and applications. It combines the enterprise capabilities of the VMware Software-Defined Data Center (SDDC), delivered as infrastructure as a service (IaaS) on AVS, with the market-leading capabilities of VMware Horizon for a simple, secure, and scalable solution.
Avi Vantage can be deployed to allow multiple Unified Access Gateway (UAG) appliances and connection servers to be used in a highly available configuration. To know more about the Avi components, refer to the Architectural Overview.
Note: Avi is a customer-managed component in AVS.
Reference Design
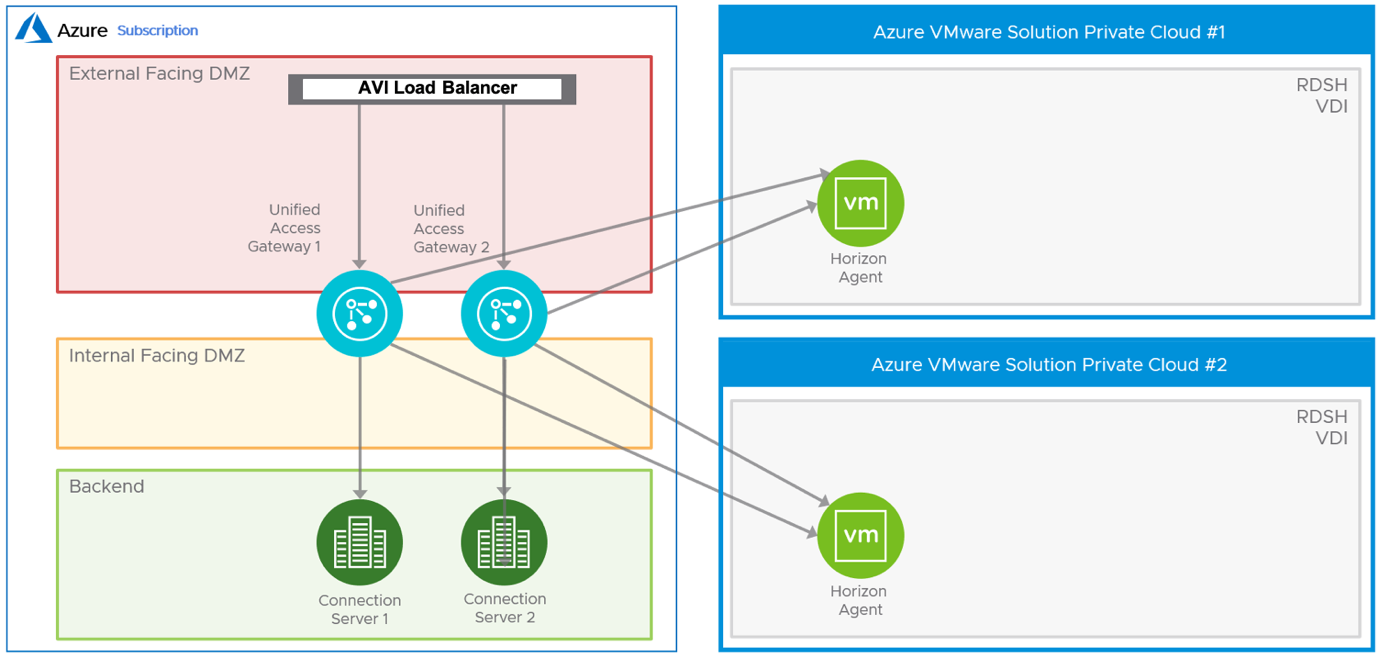
In the following figure, Avi is used in front of UAG servers to load balance the incoming requests to the UAG servers.
Note: Avi can be deployed in front of connection servers also.
Pre-requisites
Ensure that the Horizon components are deployed in AVS.
Refer to the https://techzone.vmware.com/resource/horizon-on-azure-vmware-solution-architecture#introduction article for more information.
Deploying and Configuring the Avi Controller on Azure
To install and configure an Avi Controller cluster, follow the steps in the Avi Deployment Guide for Microsoft Azure.
Installing the Avi Controller
- Refer to Avi Controller Instantiation for detailed steps on installing the Avi Controller.
The Controller can be instantiated in a separate resource group within the subscription, and provided an IP address from the same VNet as being used for Horizon Cloud. - The Avi Controller can alternately be installed on-premises, or in another subscription or VNet. In such cases, the Controller should have IP connectivity to the Azure end-points as well as peering to the Horizon Cloud Pod VNet.
Configuring the Azure Cloud
Refer to the Configuring Azure Cloud for details on initializing the Controller, and configuring an Azure Cloud within the Controller so that it can provision Avi Service Engines.
Notes:
- It is recommended that a separate Resource Group be used for the Azure Cloud connector being configured.
- The VNet should be the same as being used for Horizon Cloud.
- Dedicated management network should be enabled. This ensures that a separate NIC is used for Controller - to - Service Engine communication.
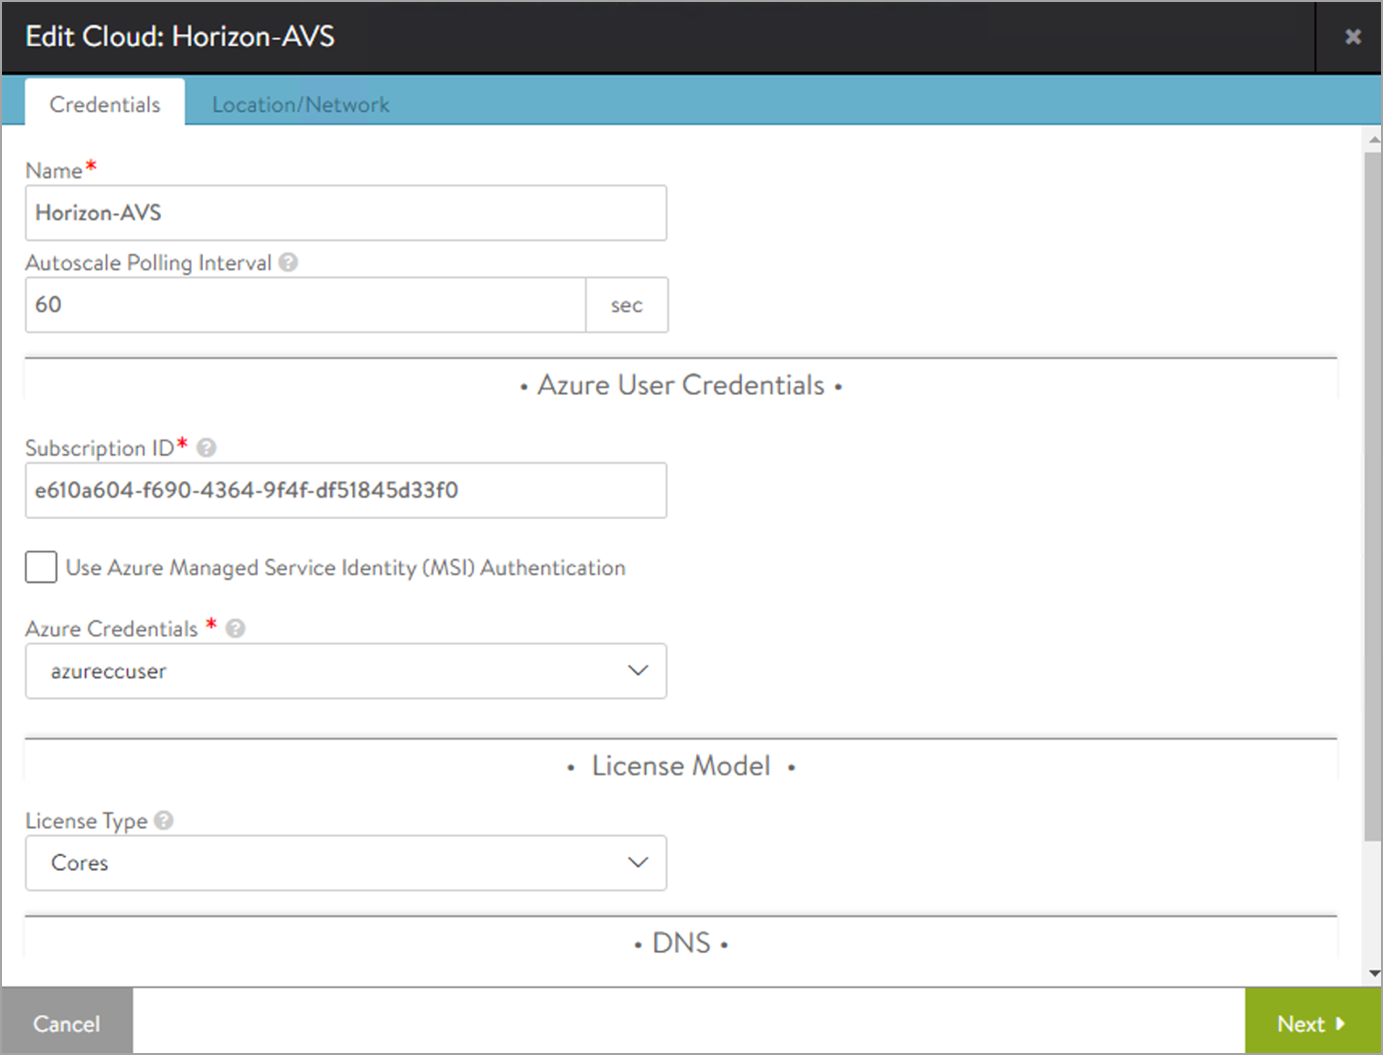
A sample cloud configuration is explained below:
-
From the Avi UI navigate to Applications > Infrastructure > Clouds.
-
Select the required cloud and click on the edit cloud.
-
Configure the cloud as shown below:

-
Click on Save.
Configuring Virtual services on Avi
L7 + L4 Virtual Service (Recommended Configuration)
After successful cloud configuration, create a virtual service on Avi.
The recommended configuration is to have two virtual services(one L7 VS and one L4 VS) having the same virtual IP (VIP).
The configuration steps for load balancing UAG are as below:
-
Create an L4 virtual service using the L7 virtual service as shared VIP and specify all the ports required for secondary protocols
Creating Custom Health Monitor for Horizon
To create a custom health monitor,
-
From the Avi UI, navigate to Templates > Profiles > Health Monitors.
-
Click on Create.
-
Select the Azure cloud that was created for Horizon.
-
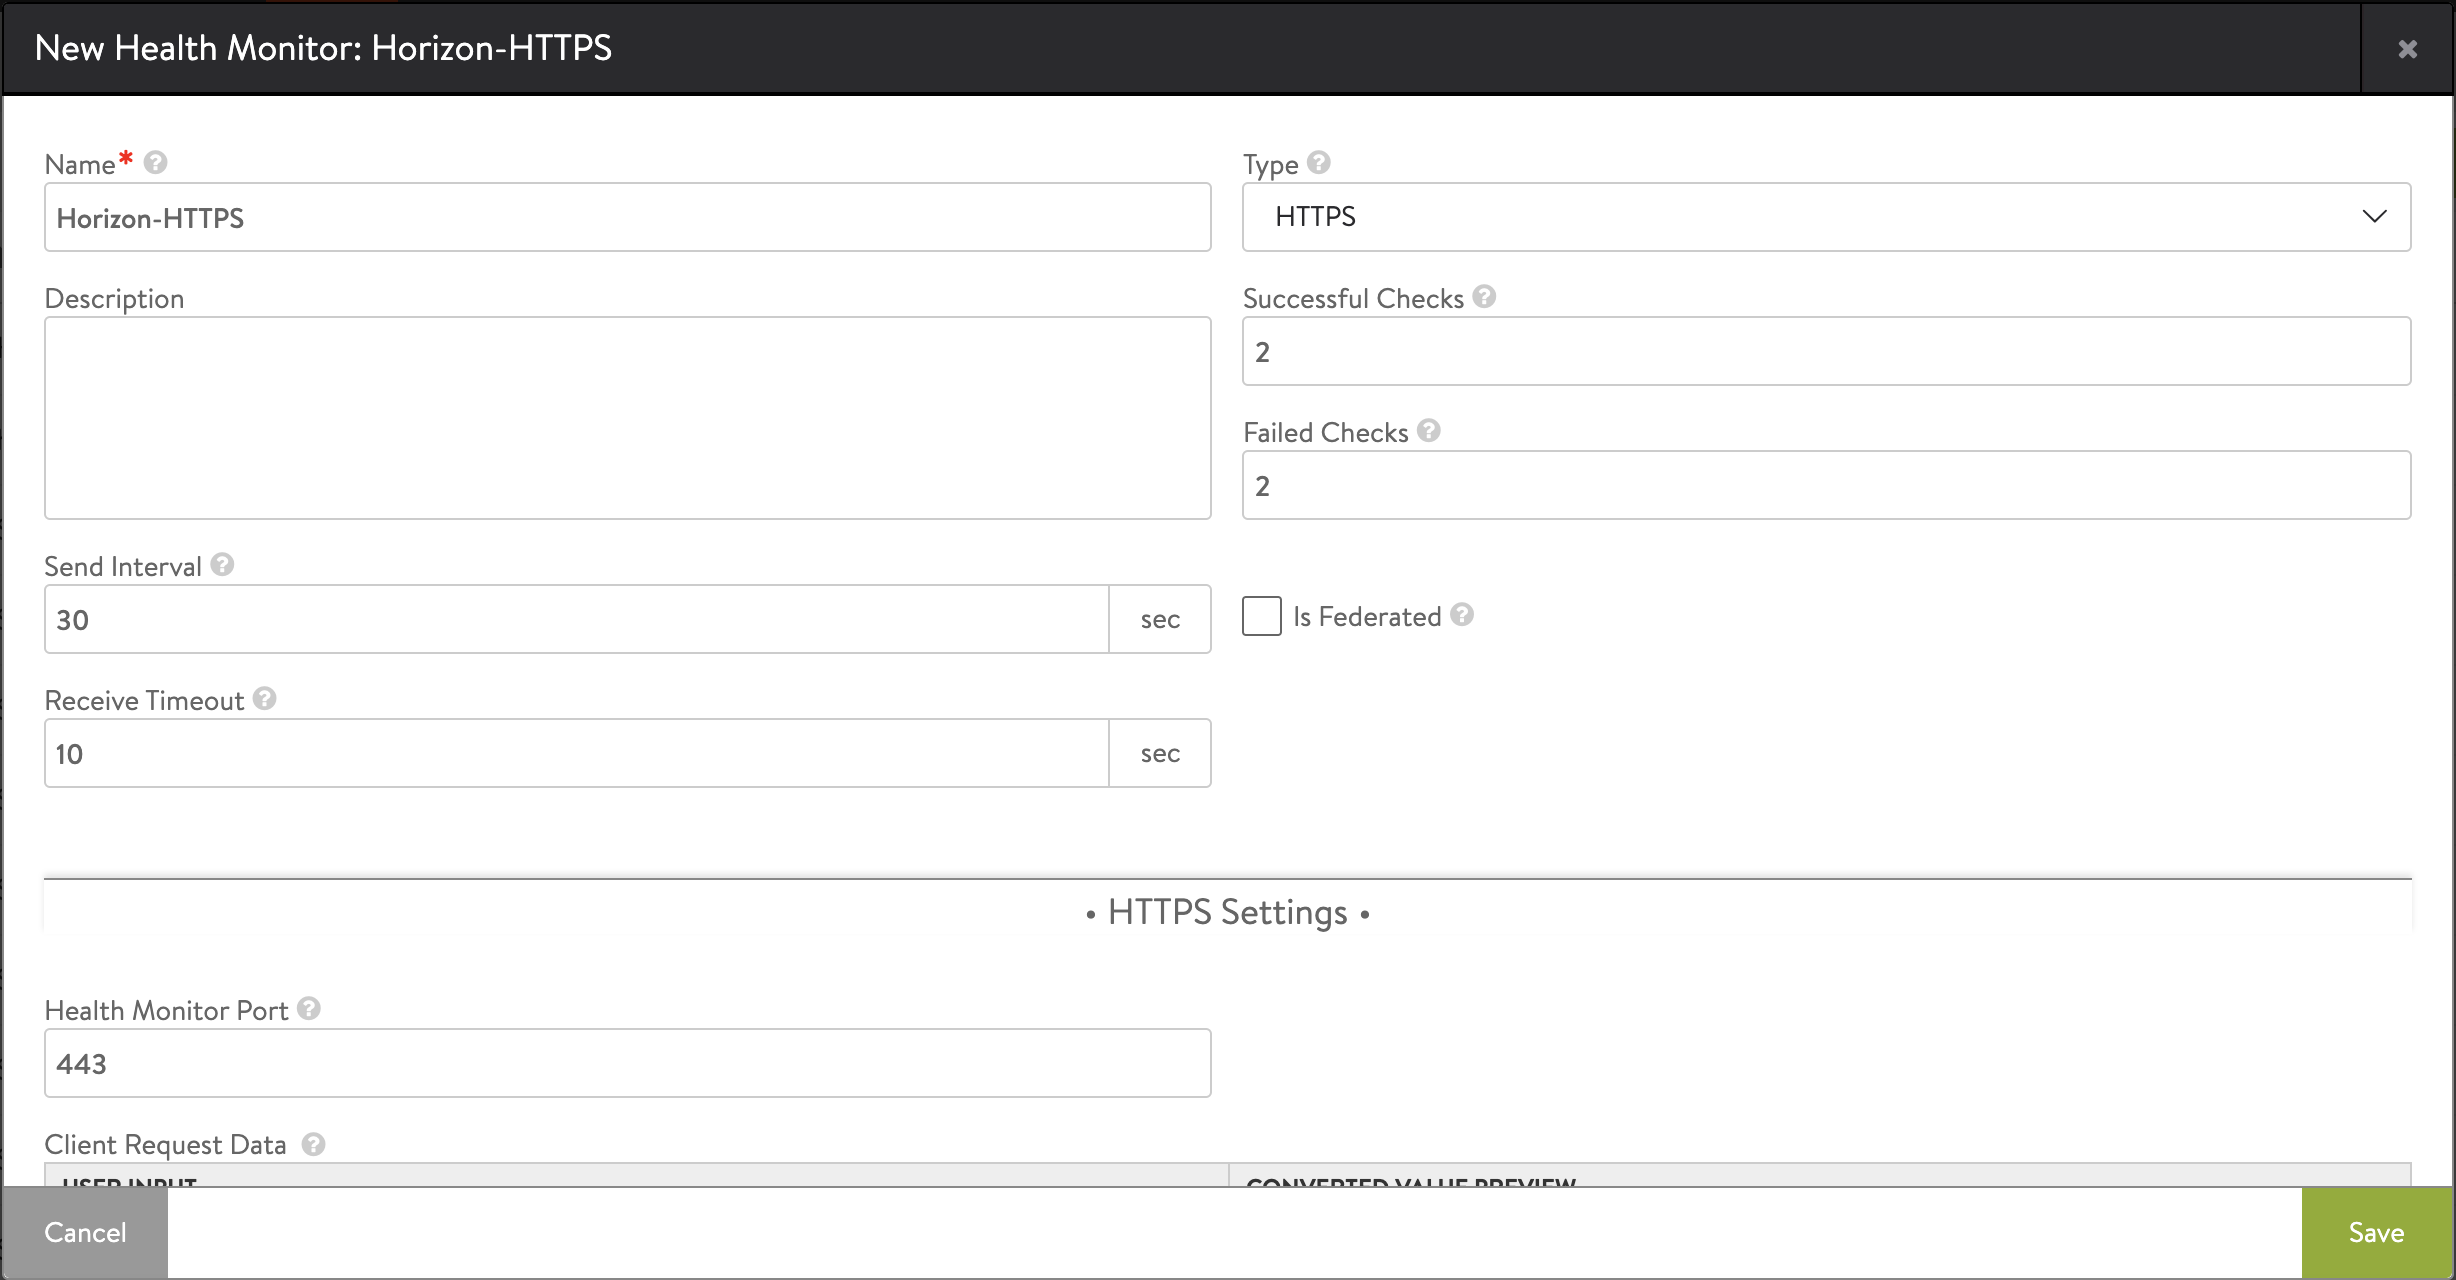
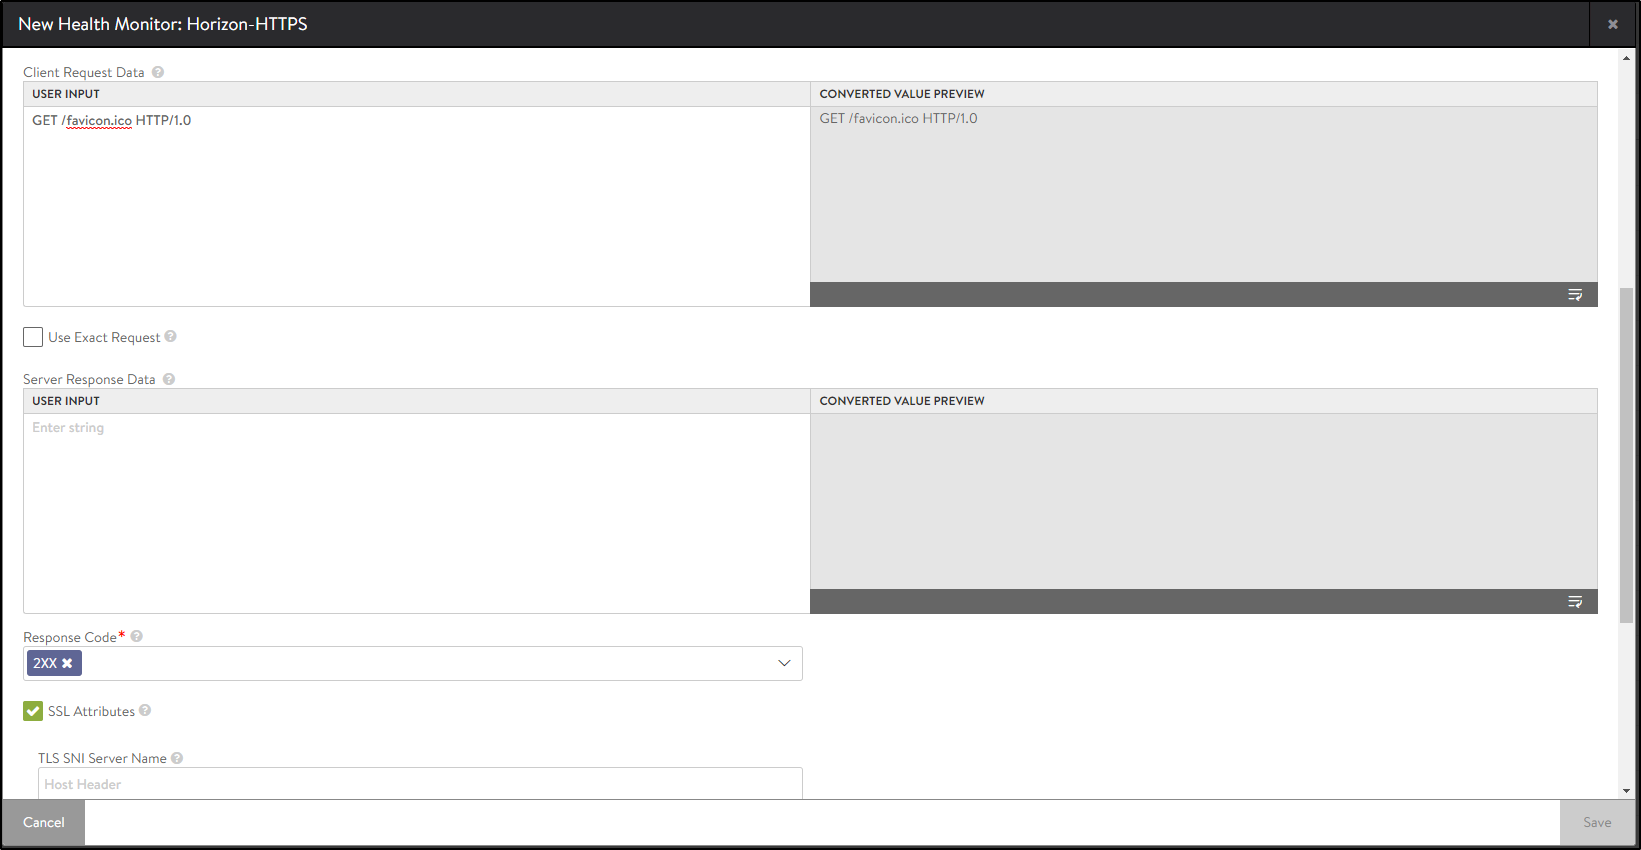
Enter the following details in the New Health Monitor screen.
Field Value Send Interval 30 Receive Timeout 10 Client Requested Data GET /favicon.ico HTTP/1.0 Response Code 2xx The New Health Monitor screen is as shown below:
-
Click on Save.
Creating Pools
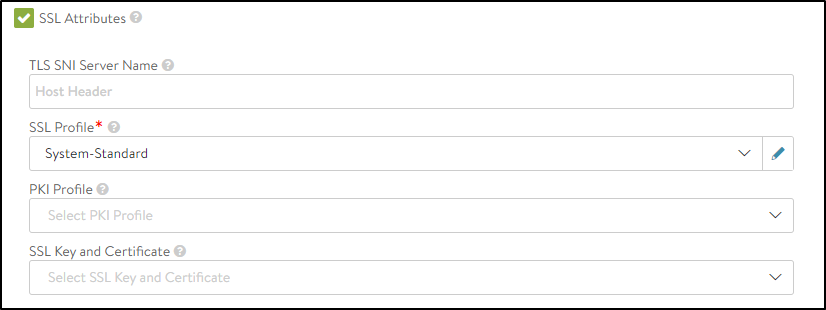
Before creating the UAG L7 pool, create the SSL profile to be used for the UAG L7 pool.
Creating SSL Profile for Pool
Create an SSL Profile for the UAG pool with the configuration given below:
- Accepted Versions: 1.2
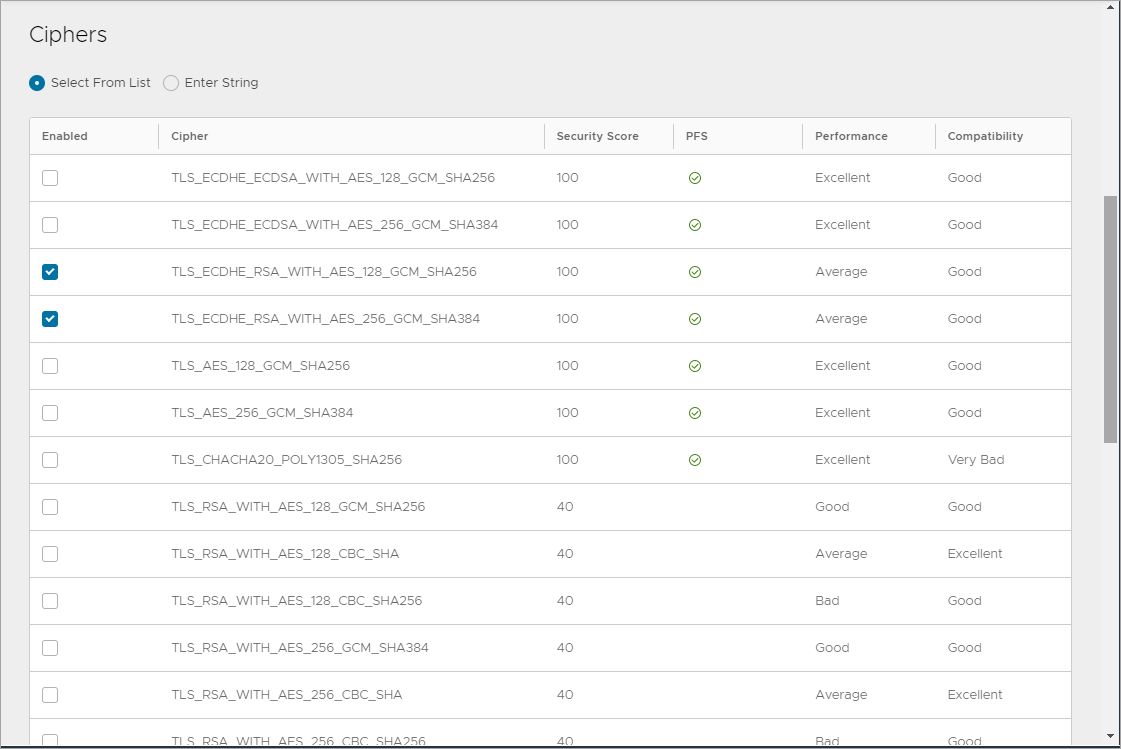
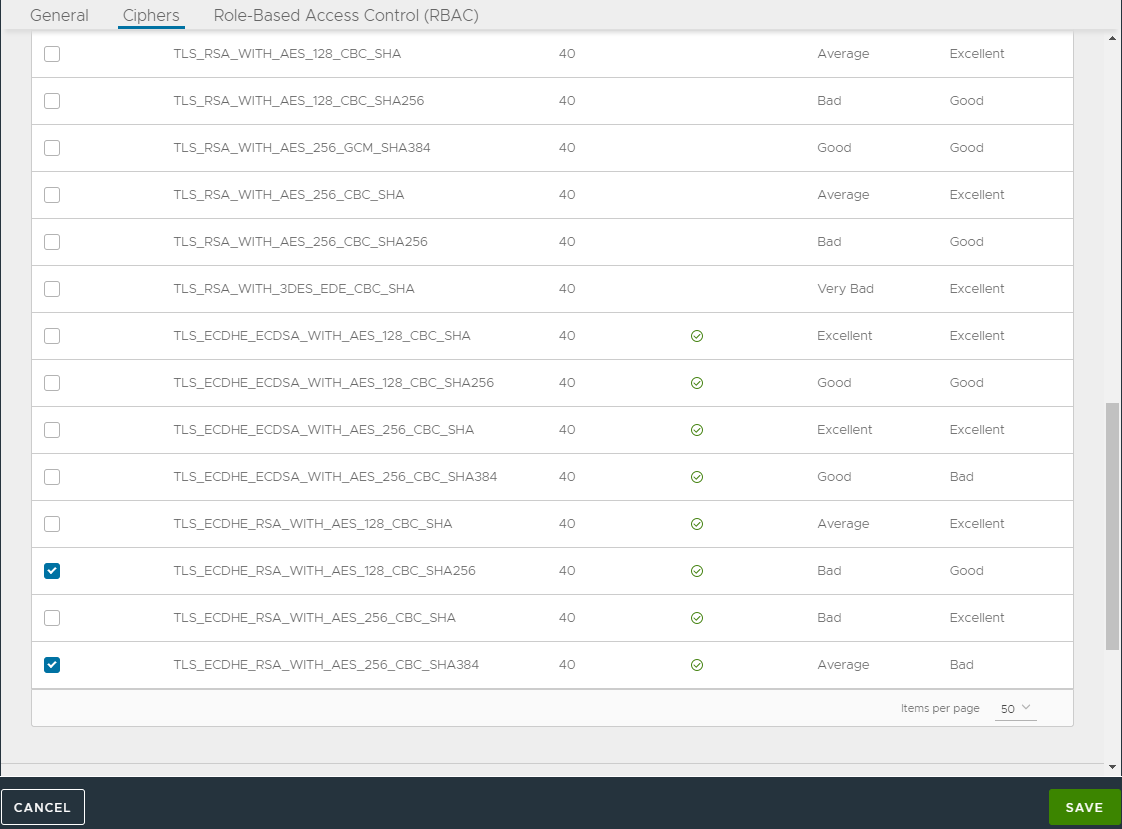
- Cipher List:
TLS_ECDHE_RSA_WITH_AES_128_GCM_SHA256
TLS_ECDHE_RSA_WITH_AES_128_CBC_SHA256
TLS_ECDHE_RSA_WITH_AES_256_GCM_SHA384
TLS_ECDHE_RSA_WITH_AES_256_CBC_SHA384
- Navigate to Templates > SSL/TLS Profile > Create.
- Select Application Profile.
- Enter the details as shown below:
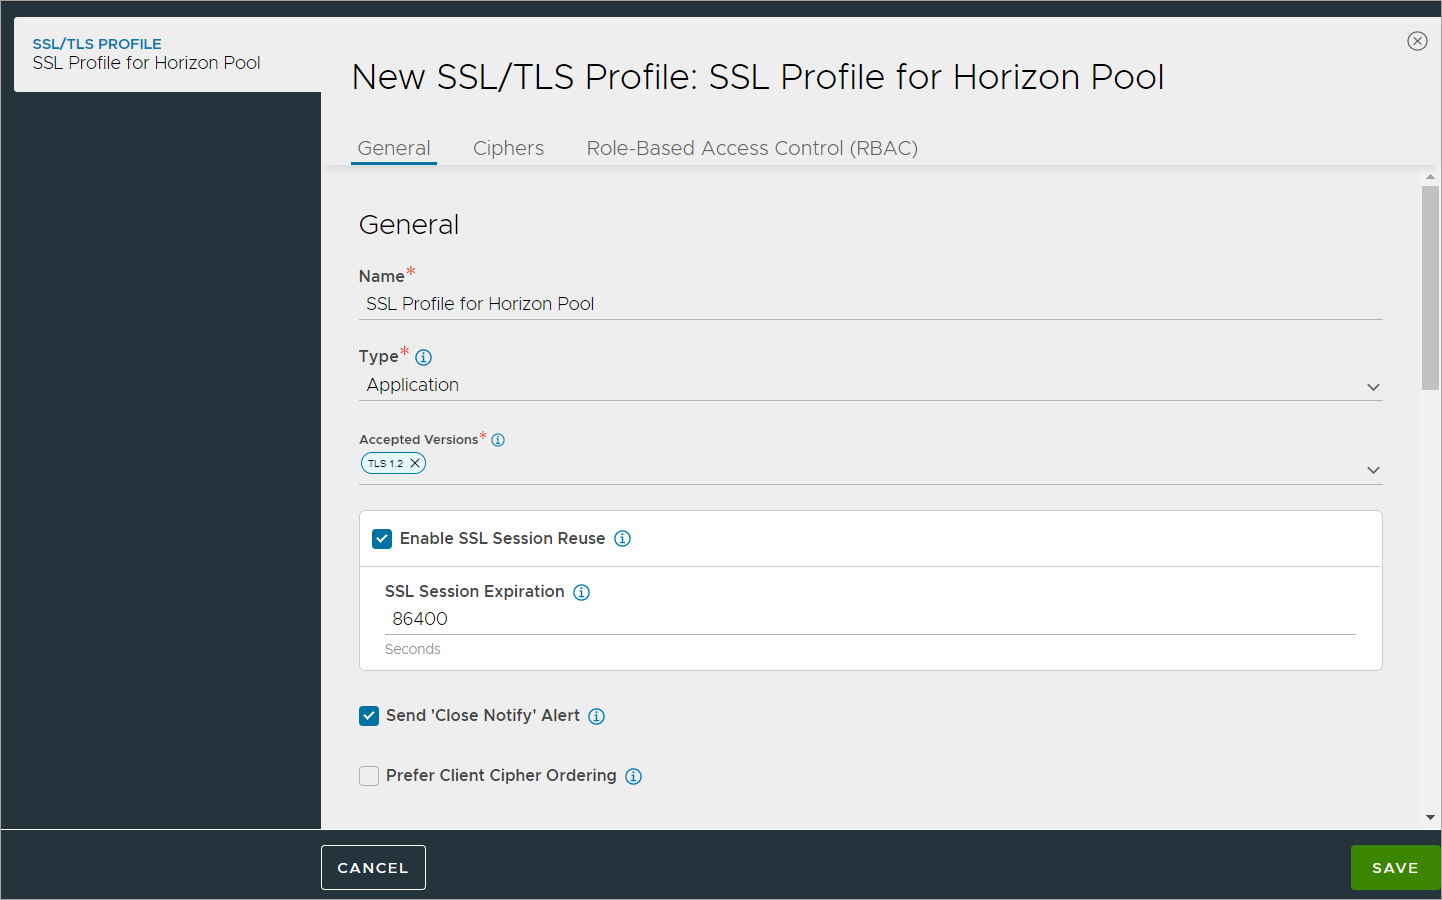
- Click on Save.
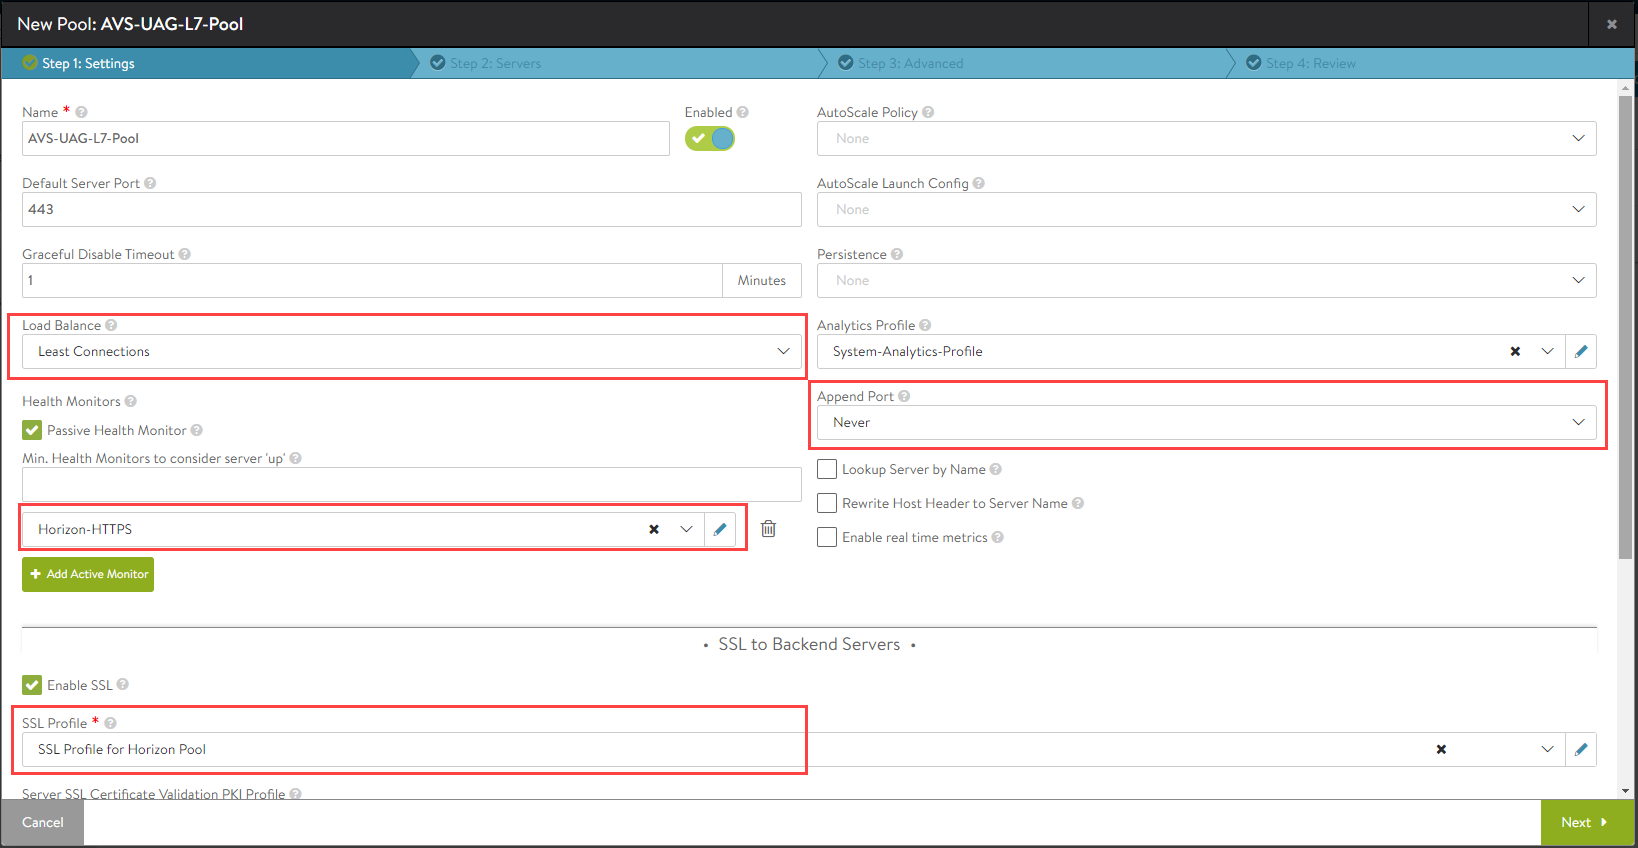
UAG L7 Pool
To create the pool,
-
In Avi Vantage, navigate to Applications > Pools.
-
Select the Azure cloud from the Select Cloud sub-screen.
-
Click on Next.
-
Click on Create Pool.
-
In the New Pool: screen, update the details as shown below:
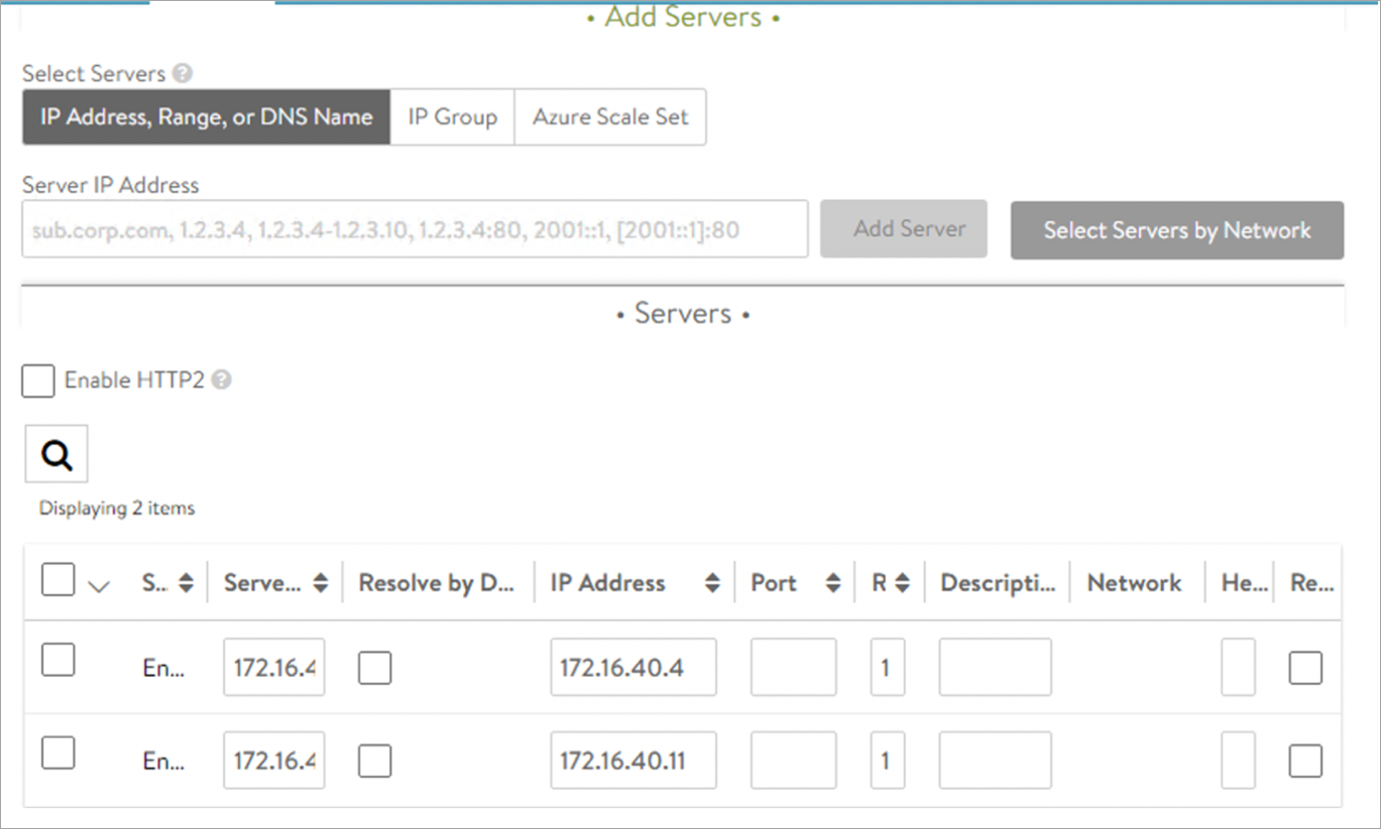
-
Click on Next. In the Step 2: Servers tab, add the Server IP Address of the UAG servers and click on Add Server.
-
Click on Next.
-
Navigate to Step 3: Advanced tab > Step 4: Review.
-
Click on Next and then click on Save.
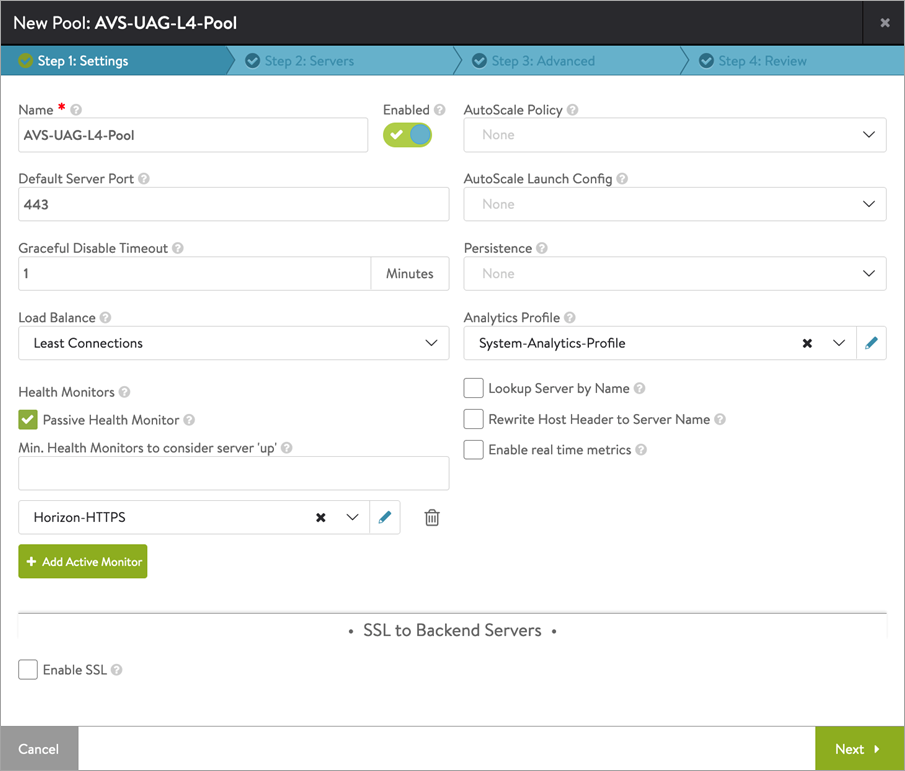
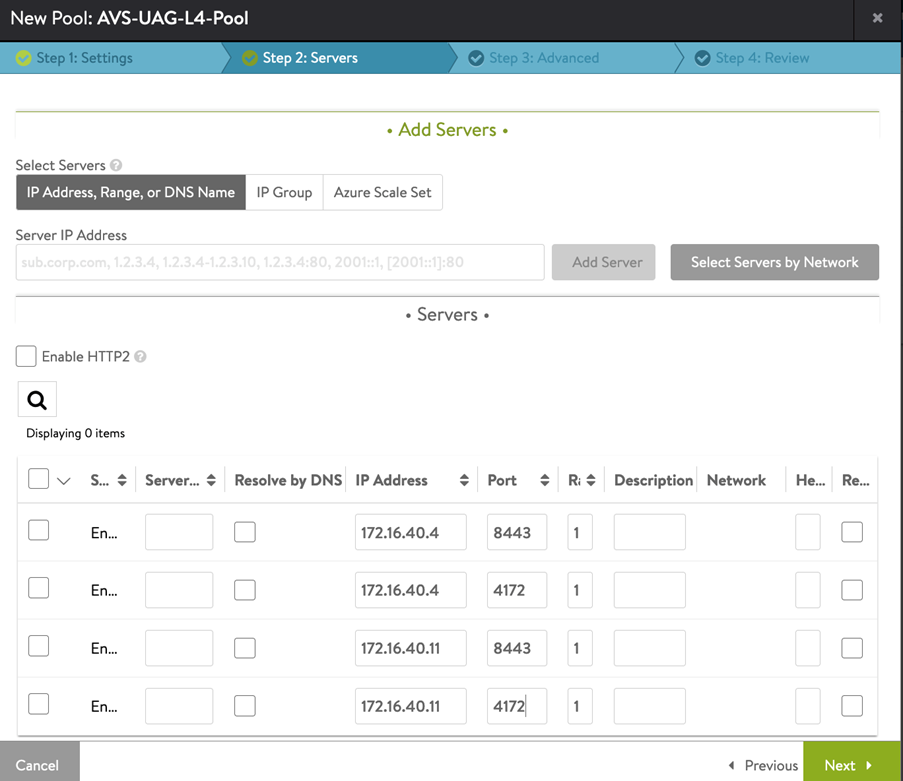
UAG L4 Pool
Follow the steps shown under UAG L7 Pool but with the configuration shown below:
Installing the SSL certificate
The SSL connection is being terminated at Avi virtual service. Therefore, the SSL certificate must be assigned to the virtual service . It is advised to install a certificate which is signed by a valid certificate authority instead of using self-signed certificates.
Install the certificate in Avi Vantage, and ensure the CA certificate is imported and linked. For instructions, refer to Import Certificates.
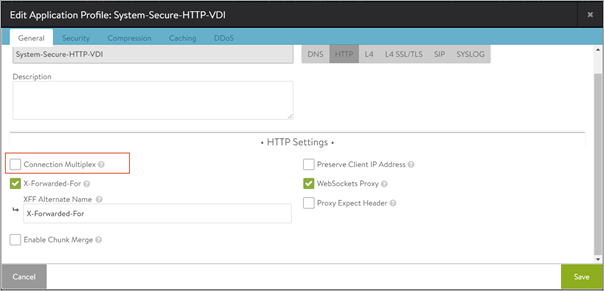
Disabling Connection Multiplexing
In case of UAG load balancing, disable connection multiplexing for the System-Secure-HTTP-VDI profile.
To disable connection multiplexing,
-
Navigate to Templates > Profiles> Application > System-Secure-HTTP-VDI.
-
Click on the edit icon.
-
Disable the option Connection Multiplexing as shown below:
-
Click on Save.
Creating SSL Profile for Virtual Service
Create an SSL Profile for the virtual service with the configuration given below:
- Accepted Versions: TLS 1.1, 1.2
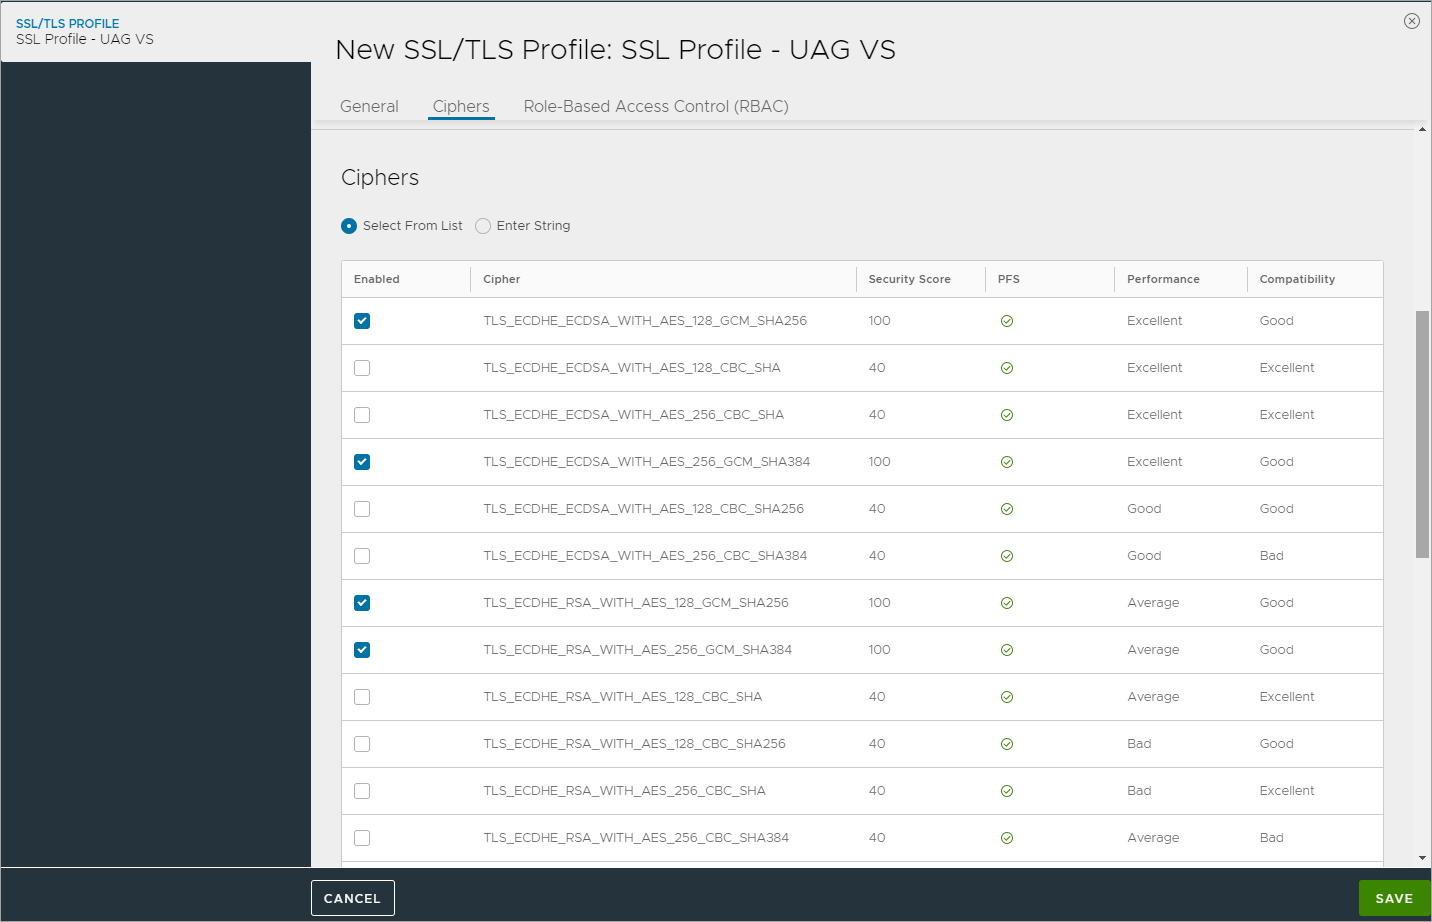
- Cipher List:
TLS_ECDHE_ECDSA_WITH_AES_128_GCM_SHA256
TLS_ECDHE_ECDSA_WITH_AES_256_GCM_SHA384
TLS_ECDHE_RSA_WITH_AES_128_GCM_SHA256
TLS_ECDHE_RSA_WITH_AES_256_GCM_SHA384
- Navigate to Templates > SSL/TLS Profile > Create.
- Select Application Profile.
- Enter the details as shown below:
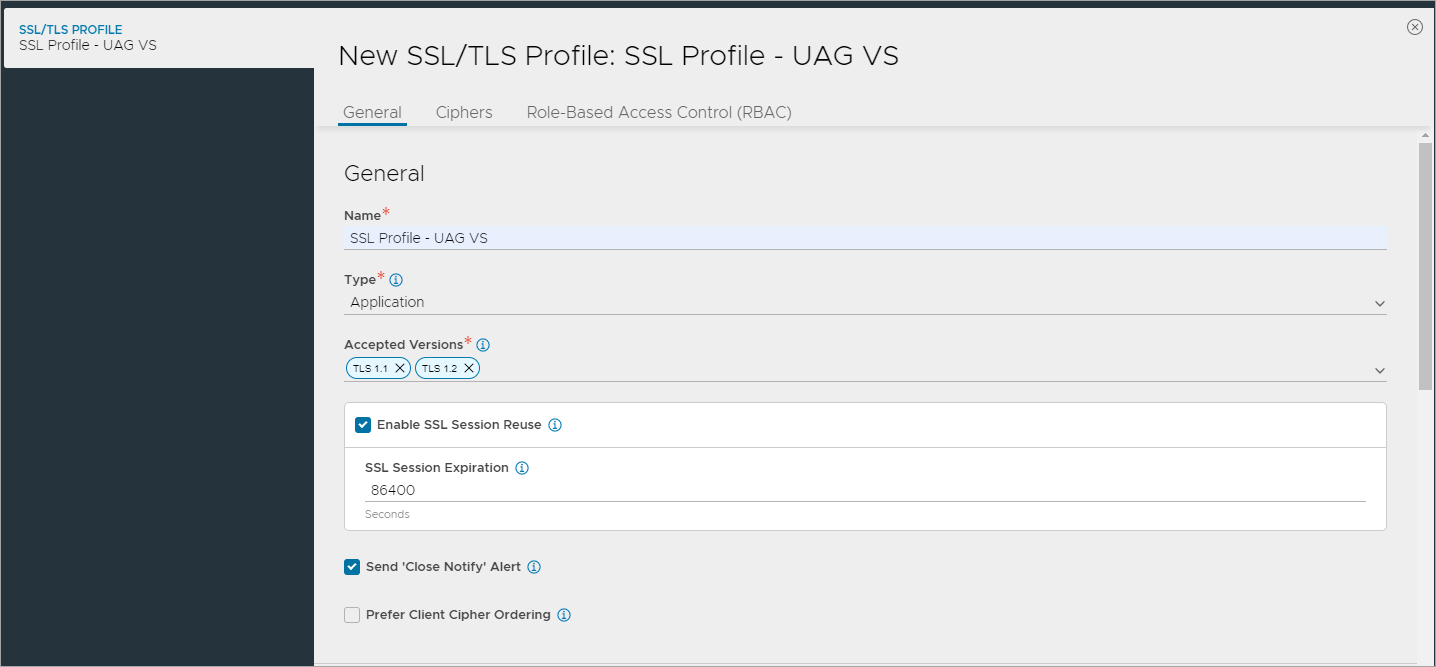
- Click on Save.
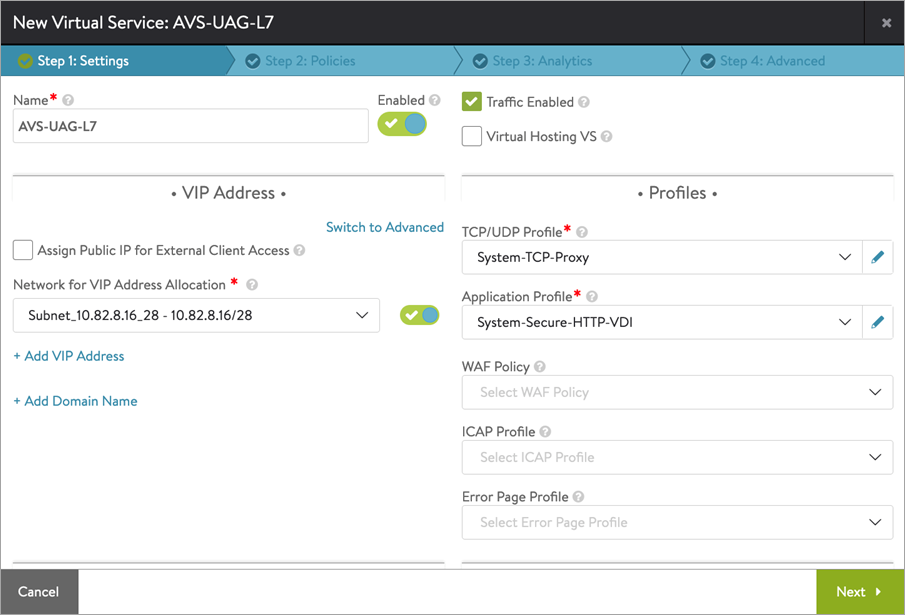
Creating L7 Virtual Service and HTTP Request Policies
To create the L7 virtual service,
-
From the Avi UI, navigate to Applications > Virtual Services.
-
Click on Create Virtual Service > Advanced Setup.
-
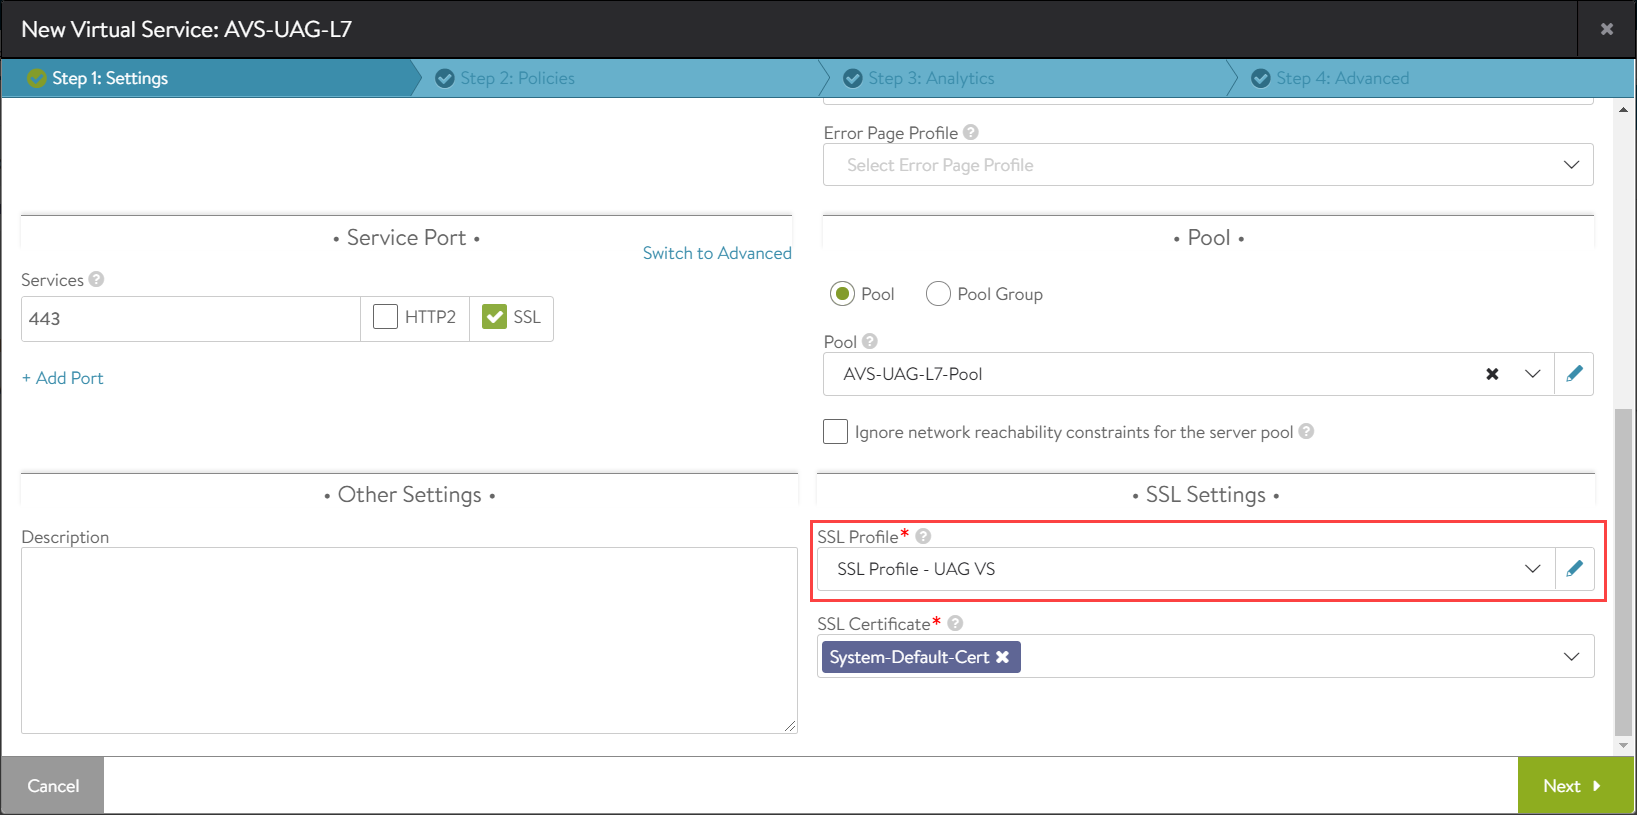
Use the System-Secure-HTTP-VDI as the Application Profile.
-
Configure the virtual service as shown below:
-
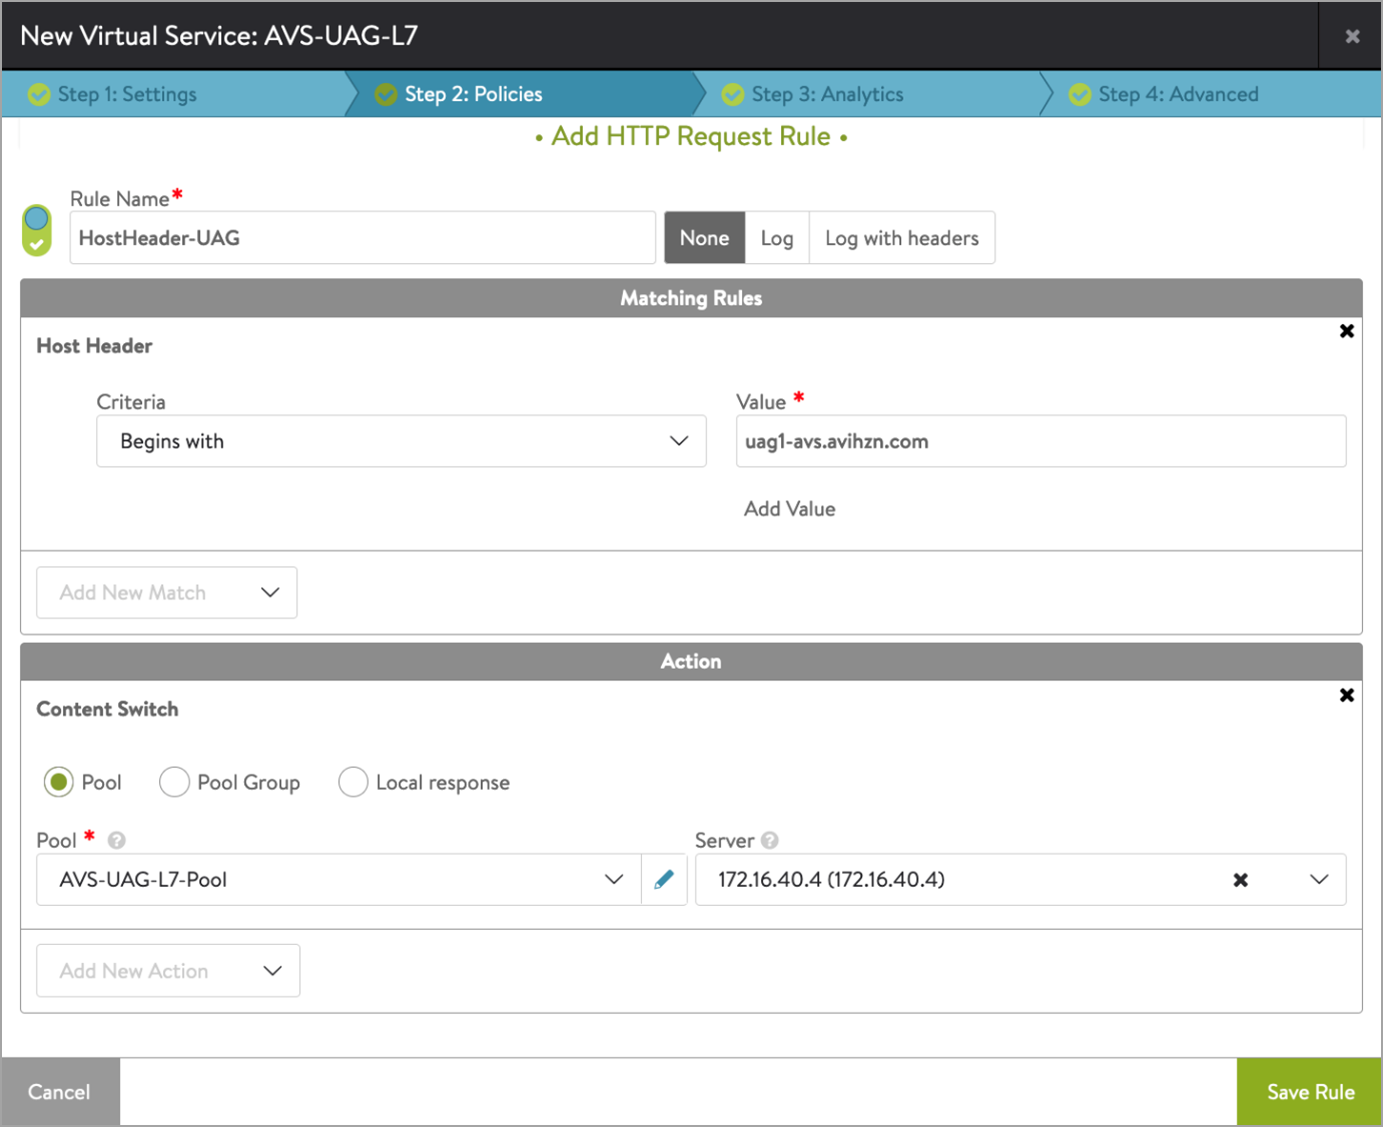
Click Next. Under Step 2: Policies, go to the HTTP Request policies and click on the green coloured + icon to add a policy rule.
-
Add the policies as shown below for host header match. Host header is the FQDN of UAG servers. As shown below, in first rule host header of uag server 1 is used and in action we have selected same server.
-
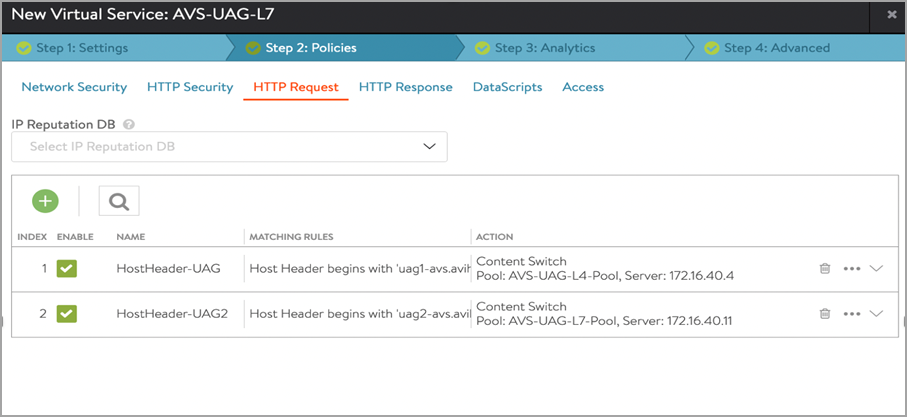
Click on Save rule.
-
Similarly, create another rule. The rule host header of uag server2 is used in this rule and under action the same server is selected.
-
Click Next.
-
Click Next and save the configuration.
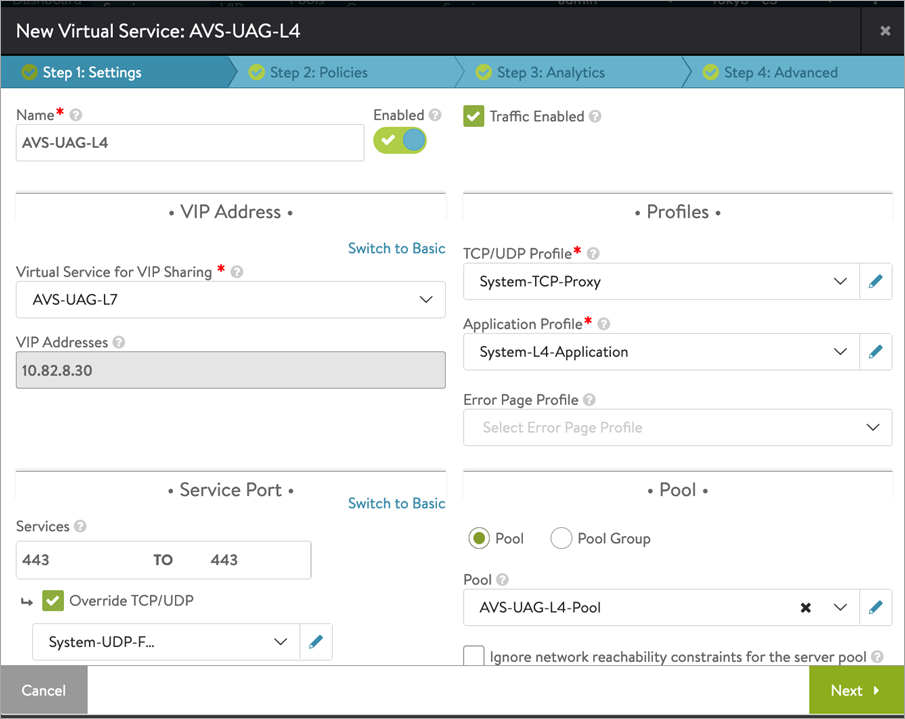
Creating L4 Virtual Service
Create another virtual service which will share the same IP address as that of the L7 VIP. This will make sure that we need only one virtual IP address for both the primary and secondary protocols. L7 virtual service will handle the primary protocol and the tunnel whereas L4 virtual service will handle other secondary protocols.
To create an L4 virtual service,
-
Click on Create Virtual Service > Advanced Setup.
-
In the New Virtual Service screen, click on Switch to Advanced under VIP Address.
-
Select the L7 virtual service that was created as the Virtual Service for VIP.
-
Under Service Port > Services, click on Switch to Advanced.
-
Add the port numbers for the secondary protocols as shown below:
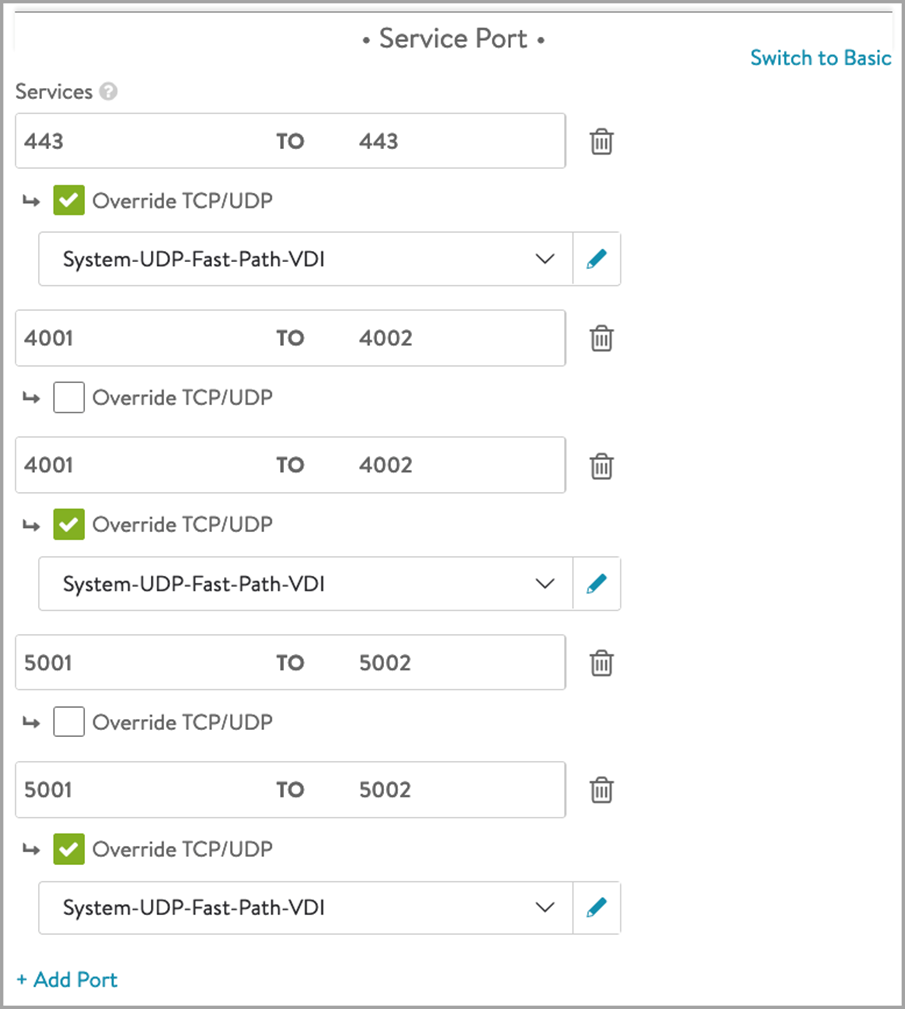
-
The virtual service is configured as shown below:
Creating the L4 DataScript
-
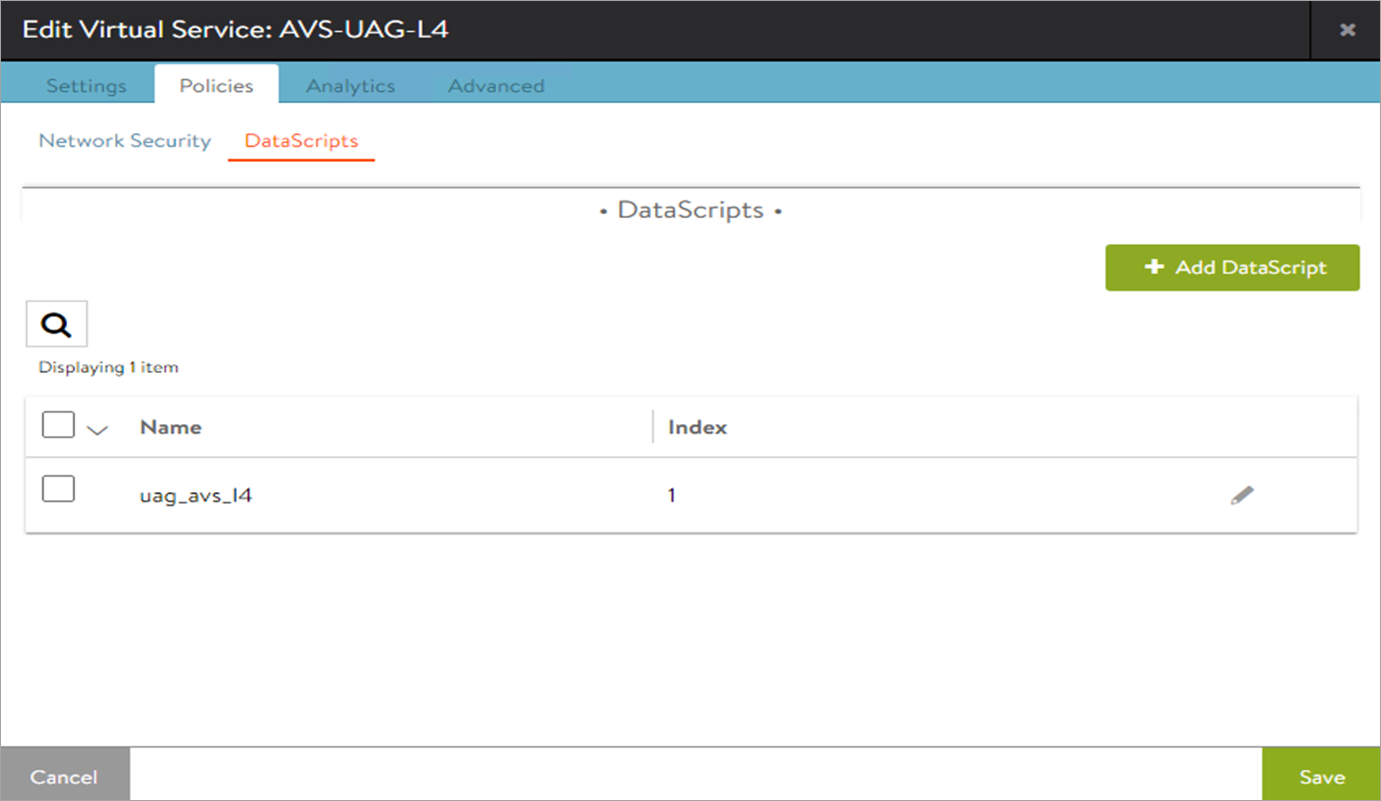
Edit the L4 virtual service which was just created.
-
Navigate to the Polices > DataScripts.
-
Click on Add DataScript.
-
Click on the dropdown under Script to Execute and click on Create DataScript.
-
Add the following DataScript for L4 Req Event:
   avi_port = avi.vs.port()
         if avi_port == "4001" then
          avi.pool.select("L4-pool", "UAG_server1_IP", 4172)
         elseif avi_port == "4002" then
          avi.pool.select("L4-pool", "UAG_server2_IP", 4172)
         elseif avi_port == "5001" then
          avi.pool.select("L4-pool", "UAG_server1_IP", 8443)
         elseif avi_port == "5002" then
          avi.pool.select("L4-pool", "UAG_server2_IP", 8443)
         end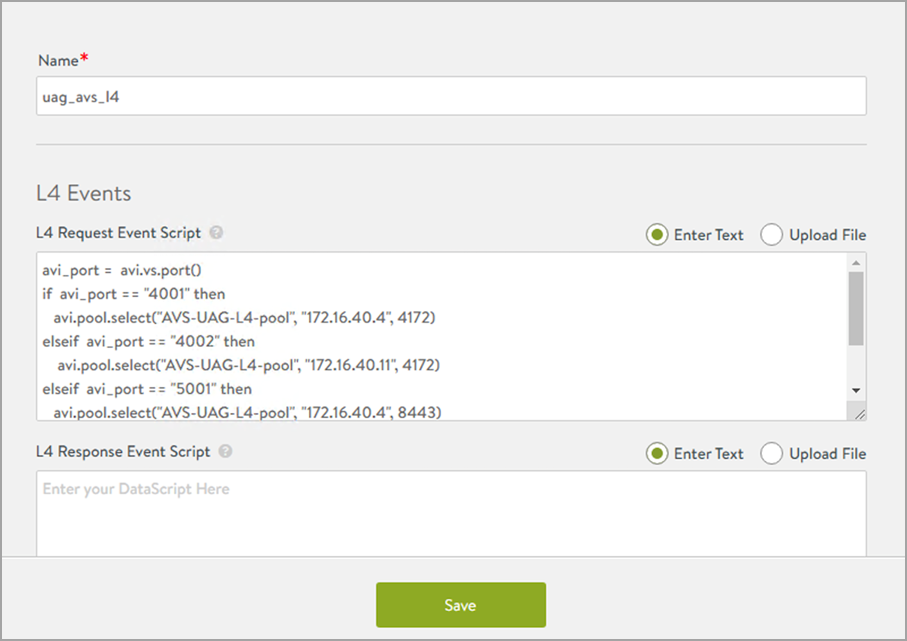
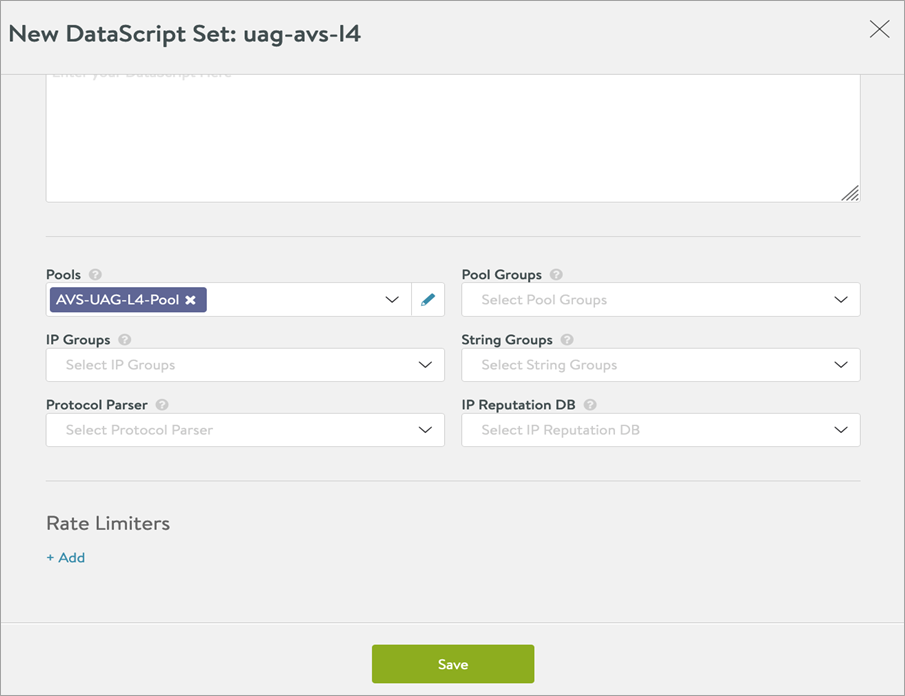
-
In the DataScript pane, select the L4 pool:
-
Click on Save.
-
Click on Save DataScript.
-
Click on Save.
Important Configuration Requirements
Requirements on the UAG
-
Blast URL should point to the UAG hostname/FQDN with the correct port numbers as shown below, for example: o UAG1 - https://<UAG1 FQDN>:5001/ o UAG2 - https://<UAG2 FQDN>:5002/
- Similarly, PCoIP should point to Avi VIP with correct port numbers.
- UAG1 - https://<Avi VIP IP on site 1>:4001/
- UAG2 - https://<Avi VIP IP on site 1>:4002/
-
Host Redirect mapping should be configured on all UAGs.
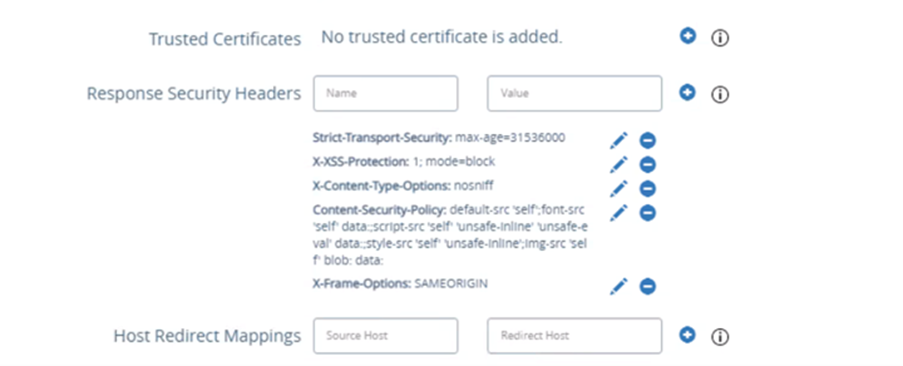
Note: Ensure the following: o The source host is the Avi VS FQDN o The redirect host is the UAG server’s FQDN
- Upload the Avi VS certificate on all the UAG servers.
On the DNS
-
DNS entries - FQDN of individual UAG servers and Avi UAG Virtual service should all point to the Avi Virtual service IP address in the DNS entries.
-
All the host names/FQDNs – Avi VS FQDN and UAG server FQDNS have to be added in SAML IDP if SAML authentication is used in Horizon
- Add the SAN certificate to UAG as explained in the Configuring TLS/SSL Certificates for Unified Access Gateway Appliances.
Install the same certificate:key pair on Avi and bind it to the UAG L7 VS. - View Connection Server instances and security servers that are directly behind a gateway, such as Access Point, must know the address by which browsers will connect to the gateway when users use HTML Access. As redirect mappings were added on the UAG, the following entries need to be added in the install_directory\VMware\VMware View\Server\sslgateway\conf\locked.properties file on the Connection servers:
portalHost.1=<UAG VS FQDN>
portalHost.2=<UAG1 FQDN>
portalHost.3=<UAG2 FQDN>
Restart the View Connection Server service for the changes to take effect. Click here. for more information. -
In cases where SAML is enabled on UAG, when accessing via VMware Horizon Client, multiple icons for the same address can be displayed as shown below:
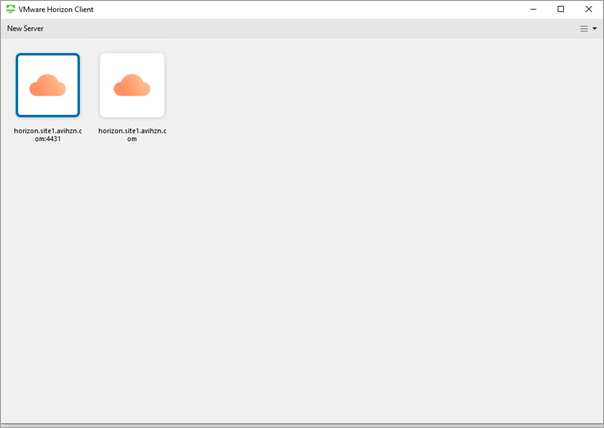
This issue will be resolved in the upcoming releases for Horizon Client.
Avi configuration for load balancing connection servers
Follow the steps mentioned under Load Balancing Traffic to Connection Servers to configure Avi entities for Connection server load balancing.
Document Revision History
| Date | Change Summary |
|---|---|
| July 05, 2021 | Published the article for Load Balancing UAGs in Azure VMware Solution |