Install Avi Kubernetes Operator
Overview
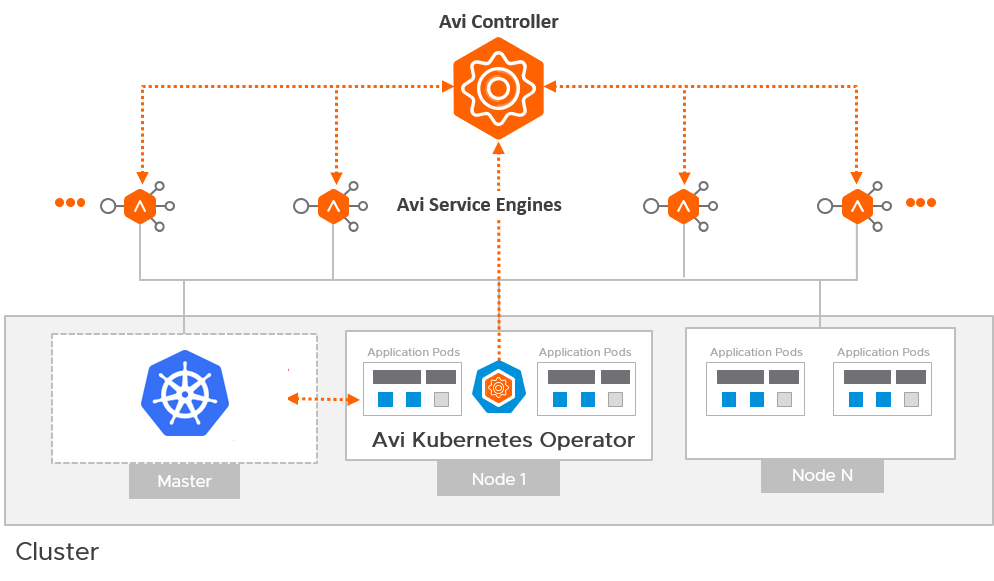
The Avi Kubernetes Operator (AKO) is a Kubernetes operator which works as an ingress Controller and performs Avi-specific functions in a Kubernetes environment with the Avi Controller. It remains in sync with the necessary Kubernetes objects and calls Avi Controller APIs to configure the virtual services.
The AKO deployment consists of the following components:
- The Avi Controller
- The Service Engines (SE)
- The Avi Kubernetes Operator (AKO)
An overview of the AKO deployment is as shown below:
This article is designed to assist you with the initial set up of Avi Integration with Kubernetes through the following steps:
- Avi Controller Configuration
- AKO Installation
Create a Cloud in Avi Vantage
The Avi infrastructure cloud will be used to place the virtual services that are created for the kubernetes application.
Note: Currently vCenter cloud in write access mode is supported, and the Avi Controller is deployed on the underlying infrastructure.
Refer to the Installing Avi Vantage for VMware vCenter to know more.
As a prerequisite to create the cloud, it is recommended to have IPAM and DNS profiles configured.
Configure IPAM and DNS Profile
Configure the IPAM profile and select the underlying network and the DNS profile which will be used for the north-south apps.
To configure the IPAM Profile,
- Navigate to Templates > Profiles > IPAM/DNS.
-
Edit the IPAM profile as shown below:
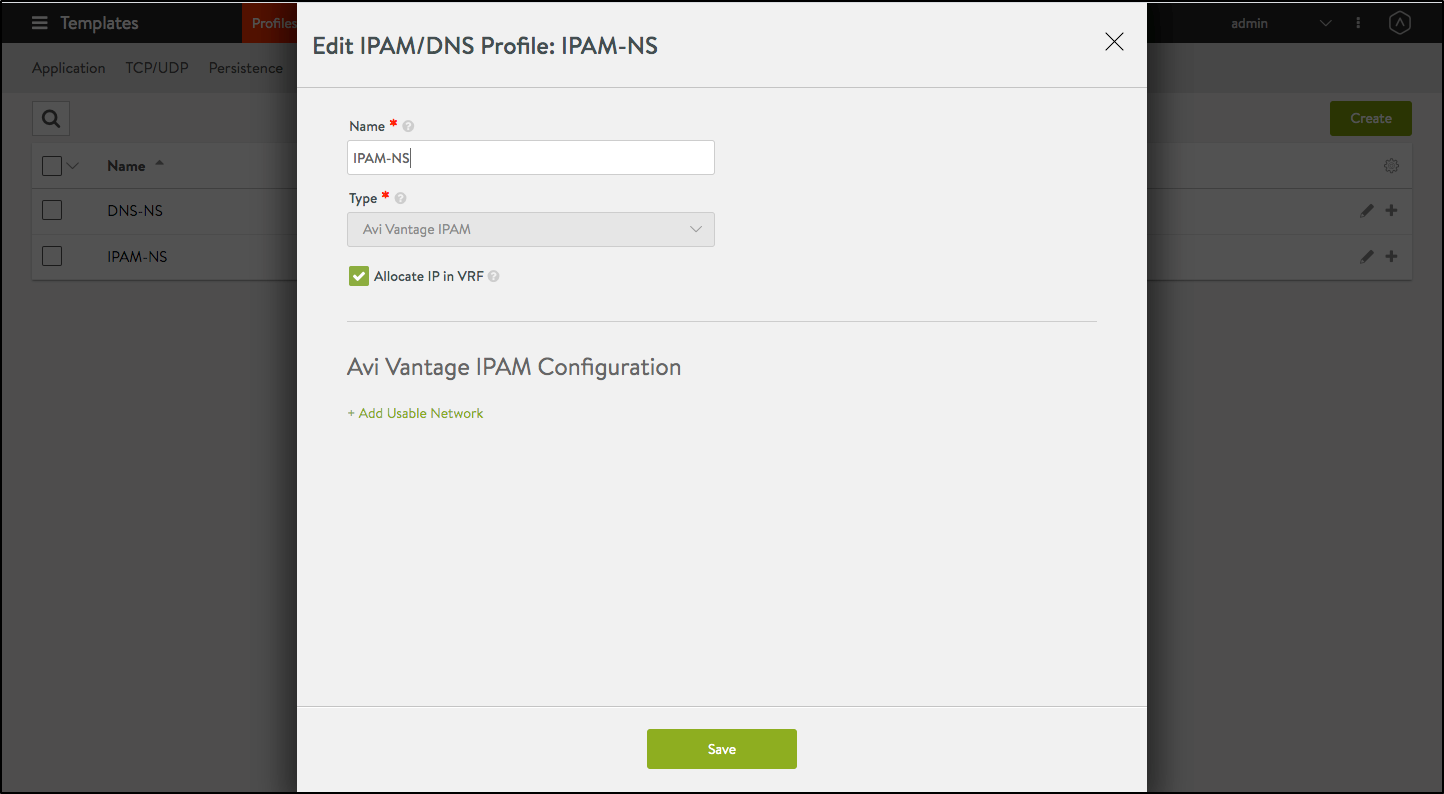
Note: Usable network for the virtual services created by the AKO instance must be provided using the fields
networkName|subnetIP|subnetPrefixfields during helm installation. - Click on Save.
To configure the DNS Profile,
- Navigate to Templates > Profiles > IPAM/DNS.
-
Configure the DNS profile with the Domain Name.
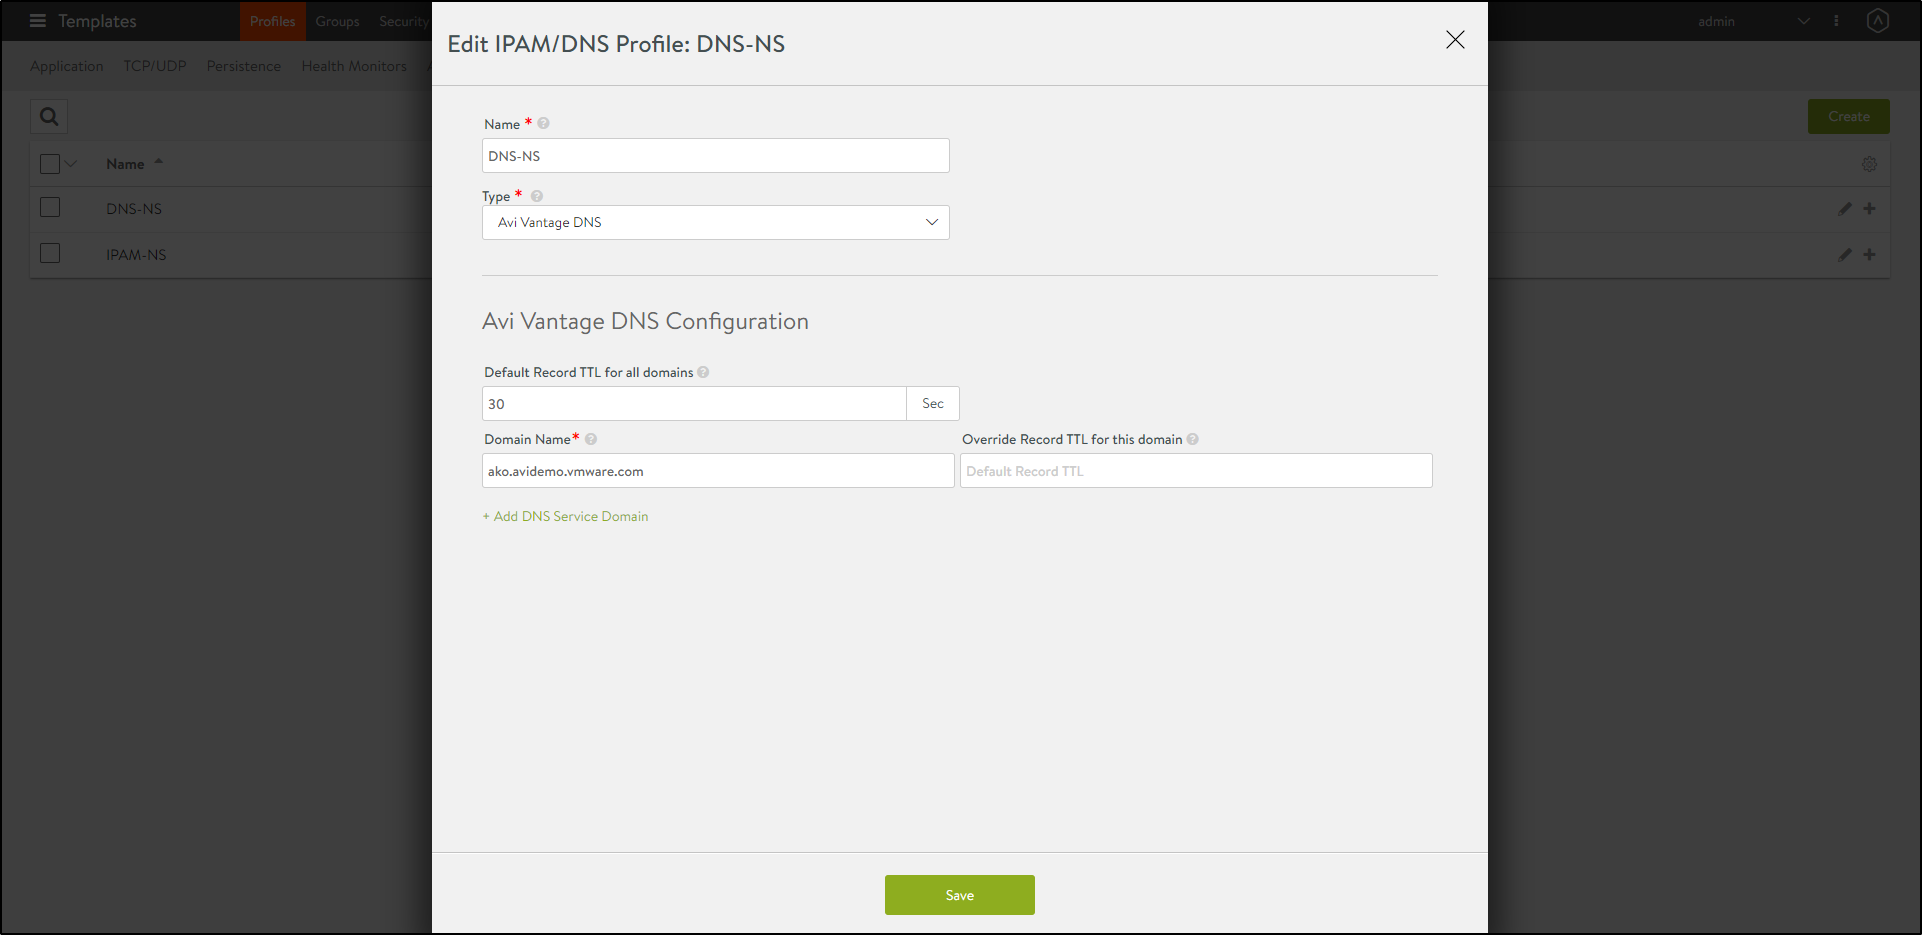
- Click on Save.
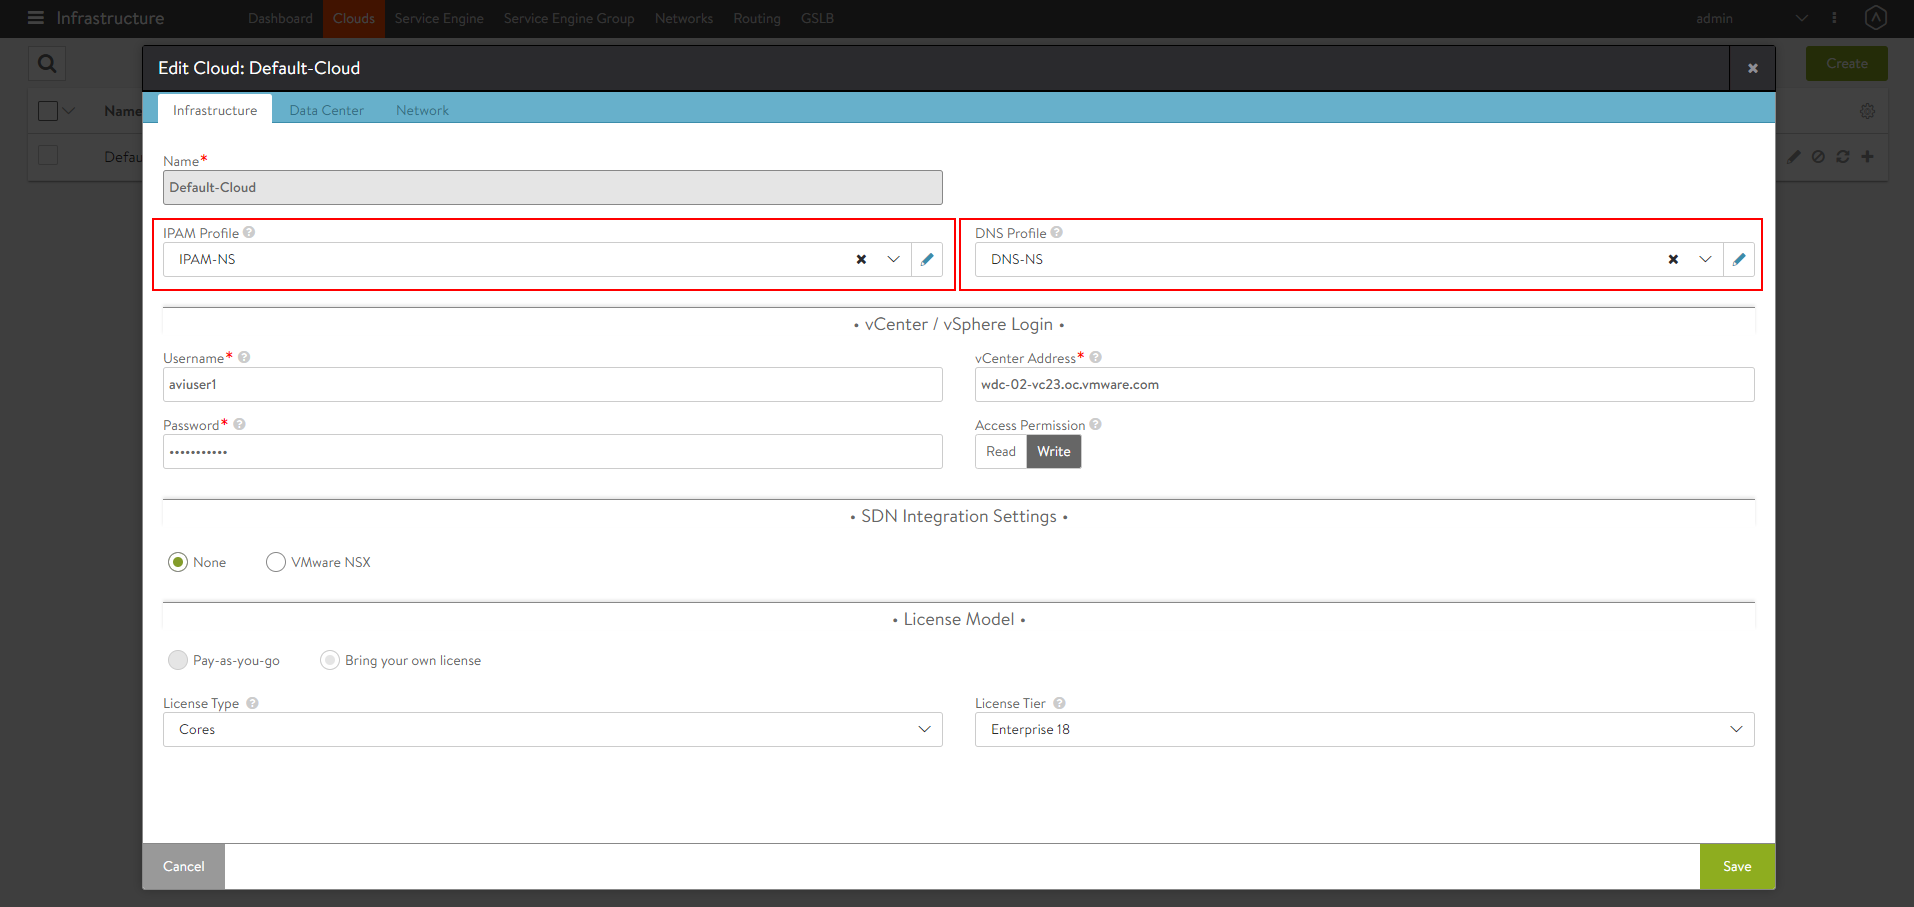
Configure the Cloud
- Navigate to Infrastructure > Clouds.
- Select the vCenter cloud and click on the edit icon.
-
Under the Infrastructure tab, select the IPAM and DNS profiles created for the north-south apps as shown below:
-
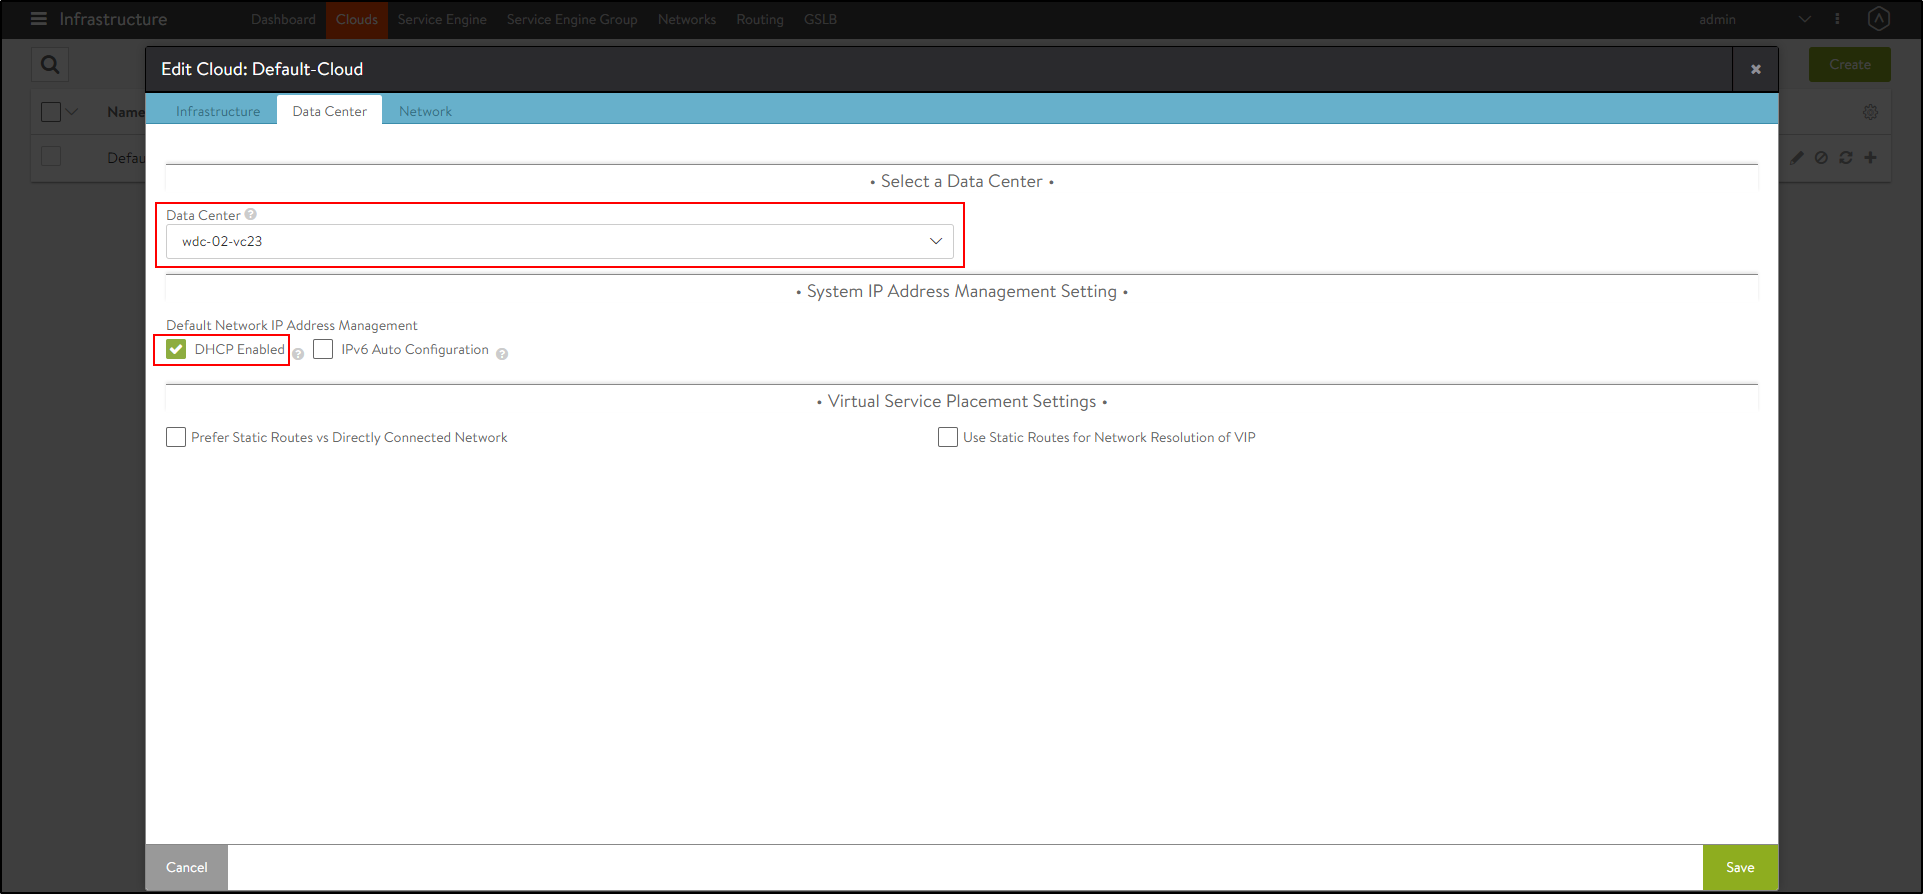
Under the Data Center tab, select the Data Center and enable DHCP as the IP address management scheme.
-
Under the Network tab, select the Management Network.
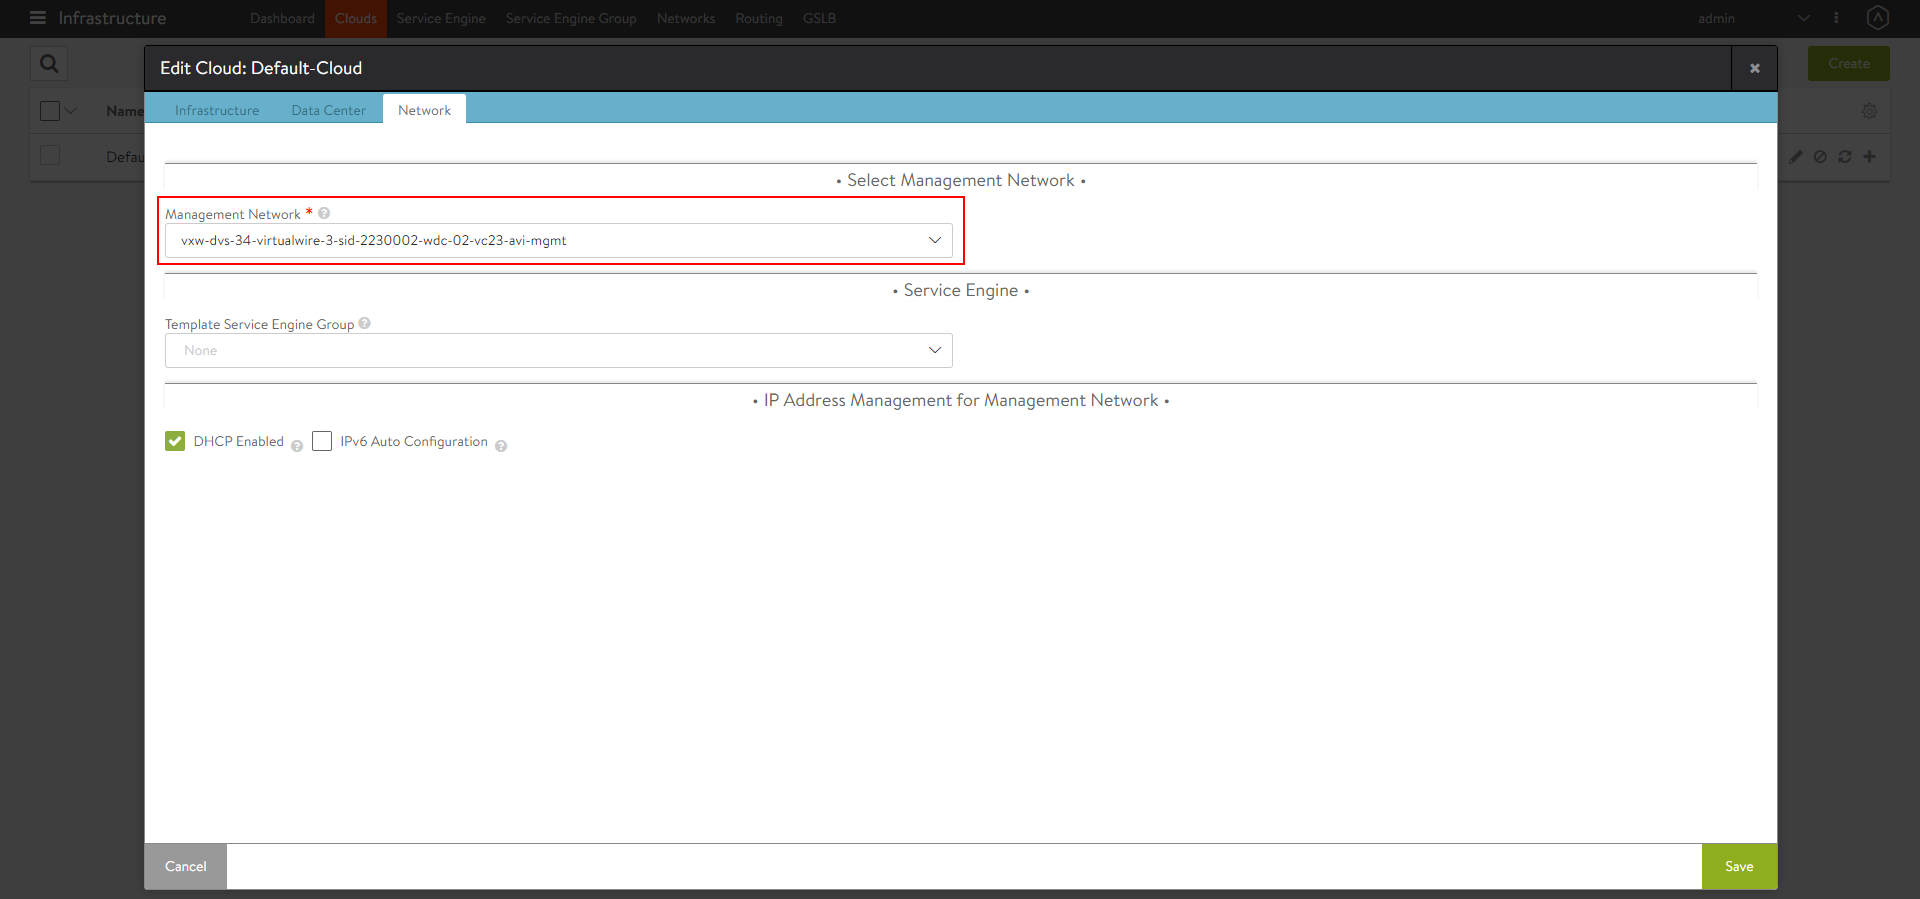
- Click on Save.
Create a VRF Context per Kubernetes Cluster
Virtual Routing Framework (VRF), is a method of isolating traffic within a system. In Avi Vantage deployments with VMware vCenter, all port groups discovered from vCenter are placed into a single VRF context. This is the global VRF context, be default.
In case there are multiple Kubernetes clusters, then create a VRF for each cluster.
VRF contexts simplify virtual service deployment by organizing the port groups discovered from vCenter into subsets.
To create a VRF via the Avi UI,
- Navigate to Infrastructure > Routing > VRF Context.
- Click on Create.
- Enter a Name for the VRF context.
- Click on Save.
Note: If you have only one Kubernetes cluster, this step can be skipped and the default VRF context Global can be used.
Configure the Network with VRF Context Information
A single Avi Cloud can be used for integration with multiple Kubernetes clusters, with each cluster running its own instance of AKO.
Clusters are separated on Service Engines in the DataPlane by using VRF Contexts.
Each Kubernetes cluster must be deployed in a separate VRF to prevent overlap of IP addresses etc.
For example, the first cluster connects to the global VRF.
All the static routes and other objects associated with this cluster will show under the global VRF.
When attaching a second cluster to the same Avi Controller, the same cloud, you must specify a different VRF. The SEs will use the VRF details to keep the routing information of each cluster from each other.
To configure the network,
- Log in to the shell with your credentials.
- View the network configuration as shown below:
[admin:10-79-175-166]: > show network vxw-dvs-34-virtualwire-3-sid-2230002-wdc-02-vc23-avi-mgmt
+----------------------------+-----------------------------------------------------------+
| Field                      | Value                                                     |
+----------------------------+-----------------------------------------------------------+
| uuid                       | dvportgroup-85-cloud-4ec3f040-4257-4cb2-b761-bdb415659f87 |
| name                       | vxw-dvs-34-virtualwire-3-sid-2230002-wdc-02-vc23-avi-mgmt |
| vcenter_dvs                | True                                                      |
| vimgrnw_ref                | vxw-dvs-34-virtualwire-3-sid-2230002-wdc-02-vc23-avi-mgmt |
| dhcp_enabled               | True                                                      |
| exclude_discovered_subnets | False                                                     |
| configured_subnets[1]      |                                                           |
|   prefix                   | 10.79.186.0/23                                            |
|   static_ranges[1]         |                                                           |
|     begin                  | 10.79.186.196                                             |
|     end                    | 10.79.186.199                                             |
|   static_ranges[2]         |                                                           |
|     begin                  | 10.79.186.174                                             |
|     end                    | 10.79.186.179                                             |
| vrf_context_ref            | global                                                    |
| synced_from_se             | True                                                      |
| ip6_autocfg_enabled        | False                                                     |
| tenant_ref                 | admin                                                     |
| cloud_ref                  | Default-Cloud                                             |
+----------------------------+-----------------------------------------------------------+
You can see that
vrf_context_refis by default set to global. - Create another VRF context either via the UI or using the CLI as shown below:
[admin:10-79-175-166]: > configure vrfcontext AKO [admin:10-79-175-166]: vrfcontext> save +----------------+-------------------------------------------------+ | Field | Value | +----------------+-------------------------------------------------+ | uuid | vrfcontext-693ba02a-7558-46a1-9072-7ac0df57f1f3 | | name | AKO | | system_default | False | | tenant_ref | admin | | cloud_ref | Default-Cloud | +----------------+-------------------------------------------------+ - Configure the required network as shown below:
 [admin:10-79-175-166]: > configure network Network1
 Updating an existing object. Currently, the object is:
 +----------------------------+----------------------------------------------+
 | Field                      | Value                                        |
 +----------------------------+----------------------------------------------+
 | uuid                       | network-c7ab34a5-6e93-4a29-81f0-da471d197f8d |
 | name                       | Network1                                     |
 | vcenter_dvs                | True                                         |
 | dhcp_enabled               | True                                         |
 | exclude_discovered_subnets | False                                        |
 | vrf_context_ref            | global                                       |
 | synced_from_se             | False                                        |
 | ip6_autocfg_enabled        | True                                         |
 | tenant_ref                 | admin                                        |
 | cloud_ref                  | Default-Cloud                                |
 +----------------------------+----------------------------------------------+
You can see that the vrf_context_ref is set to global by default.
- Update the
vrf_context_refand save.[admin:10-79-175-166]: network> vrf_context_ref AKO Overwriting the previously entered value for vrf_context_ref [admin:10-79-175-166]: network> save +----------------------------+----------------------------------------------+ | Field | Value | +----------------------------+----------------------------------------------+ | uuid | network-c7ab34a5-6e93-4a29-81f0-da471d197f8d | | name | Network1 | | vcenter_dvs | True | | dhcp_enabled | True | | exclude_discovered_subnets | False | | vrf_context_ref | AKO | | synced_from_se | False | | ip6_autocfg_enabled | True | | tenant_ref | admin | | cloud_ref | Default-Cloud | +----------------------------+----------------------------------------------+The VRF Context is updated for the selected network.
This way any number of clusters can be present, and only one Avi cloud is required.
VRF takes care of the separation of each cluster at the SE or the cloud level.
Create a Namespace
AKO runs in it’s own namespace called avi-system.
To create the namespace,
- Use the command
kubectl create ns avi-system. - View the namespace using the command
kubectl get ns.root@dev:~# kubectl get ns NAME STATUS AGE avi-system Active 34d default Active 34d dev Active 27d kube-node-lease Active 34d kube-public Active 34d kube-system Active 34d web Active 27d
Install Helm CLI
Helm is an application manager for Kubernetes. Helm charts are helpful in configuring the application.
Refer to the Helm Installation for more information.
Configure AKO Parameters
To install the Helm charts from the AKO image avinetworks/ako [version tag].
Note: Check for the required version on dockerhub. The newest image is not tagged as latest.
-
Ensure your nodes have access to your image registry that has the corresponding AKO image that the Kubernetes nodes can pull from.
-
Configure the Helm client and point it to your Kubernetes cluster.
Note: If you have thekubeconfig fileinside$HOME/.kube/config, then just install the Helm CLI. - Add the helm repo.
helm repo add ako https://avinetworks.github.io/avi-helm-charts/charts/stable/ako "ako" has been added to your repositories - Verify if the repo has been added.
$ helm repo list NAME URL ako https://avinetworks.github.io/avi-helm-charts/ako helm search repo NAME CHART VERSION APP VERSION DESCRIPTION ako/ako 0.9.1 0.9.1 A helm chart for Avi Kubernetes Operator - Get the values.yaml from ako github repo.
wget https://github.com/avinetworks/avi-helm-charts/blob/master/charts/stable/ako/values.yaml - Edit the values.yaml file to update the parameters according to the description of each parameter in available here.
Install AKO
- Install AKO using the helm command.
Note: Use your Avi Controller IP in the command mentioned below:helm install ako/ako --generate-name --version 0.9.1 -f values.yaml --set configs.controllerIP=<controller_ip> --set avicredentials.username=<avi-ctrl-username> --set avicredentials.password=<avi-ctrl-password> --namespace=avi-system NAME: ako-1593523840 LAST DEPLOYED: Tue Jun 30 19:00:44 2020 NAMESPACE: avi-system STATUS: deployed REVISION: 1 - To verify if the pod has been deployed, use the
kubectl get podscommand as shown below:# kubectl get pods -n avi-system NAME READY STATUS RESTARTS AGE ako-1586350094-86f76bd59d-c269s 1/1 Running 0 25h root@dev:~/ako/helm#
This indicates that the pod called ako-1586350094-86f76bd59d-c269s is up and running.
From the Avi UI, navigate to Infrastructure > Routing > Static Route.
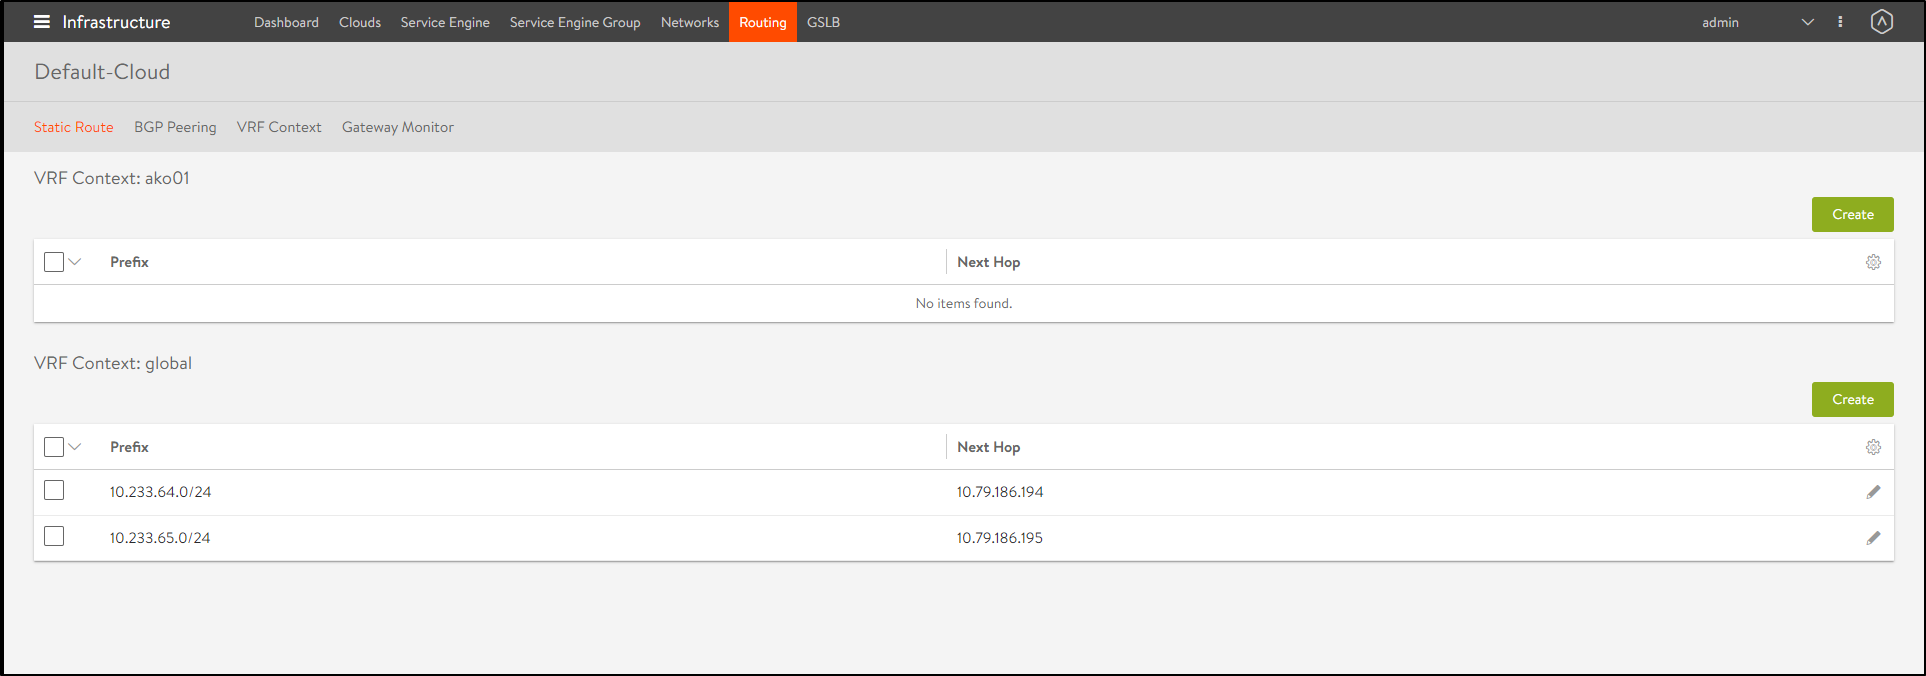
You can see that under the VRF Context global, there are new routes for Pod CIDRs with node IP as next hop. This is automatically configured by AKO to provide pod reachability.
Note: AKO creates a static route for every node IP and the POD CIDR associated with it. When Kubernetes nodes are rebooted or shut down, AKO does not remove the static route associated with it from Avi. The static route is only removed if the node is deleted in kubernetes.
Hence, AKO will not remove the static routes until the kubernetes node is completely removed from the cluster.
Upgrade AKO
AKO is stateless in nature. It can be rebooted/re-created without impacting the state of the existing objects in Avi if there’s no requirement of an update to them.
AKO will be upgraded using Helm.
During the upgrade process a new docker image will be pulled from the configured repository and the AKO pod will be restarted.
On restarting, the AKO pod will re-evaluate the checksums of the existing Avi objects with the REST layer’s intended object checksums and do the necessary updates.
To upgrade, use the Helm command helm upgrade:
helm upgrade [AKO-RELEASE] [AKO-CHART] [flags]
Note: The upgrade process does not apply for AKO 0.9.1 version and an explicit reinstall is required. Refer to the steps provided in the sections Delete AKO and Install AKO to reinstall.
Delete AKO
To remove AKO from the cluster, it is recommended to cleanup the virtual service, pools and other objects created on Avi controller before removing AKO.
- To clean up all objects belonging to the cluster from Avi controller, delete the configmap used for AKO.
kubectl delete cm avi-k8s-config -n avi-system - Then delete AKO using the command shown below:
helm delete $(helm list -n avi-system -q) -n avi-system
Document Revision History
| Date | Change Summary |
|---|---|
| June 30, 2020 | Published the Installation Guide for AKO version 0.9.1 |
| April 24, 2020 | Published the Installation Guide for AKO (Tech Preview) |