TCP/UDP Profile
Overview
A TCP/UDP profile determines the type and settings of the network protocol that a subscribing virtual service will use. It sets a number of parameters, such as whether the virtual service is a TCP proxy versus a pass-through via a fast path. A virtual service can have both TCP and UDP enabled, which is useful for protocols such as DNS or syslog.
Avi Vantage rewrites the client IP address before sending any TCP connection to the server, regardless of which type of TCP profile is used by a virtual service. Similarly, the destination address is rewritten from the virtual service IP address to the IP address of the server. The server always sees the source IP address of the Service Engine. UDP profiles have an option to disable SE source NAT.
For the UDP and TCP fast path modes, connections occur directly between the client and the server, even though the IP address field of the packet has been altered. For HTTP applications, Avi Vantage can insert the client’s original IP address via X-Forwarded-For (XFF) into an HTTP header sent to the server. Refer to the X-Forwarded-For Header Insertion article for more information.
This article explains in detail, the following profiles and how to create them:
TCP Fast Path
A TCP fast path profile does not proxy TCP connections; rather, it directly connects clients to the destination server and translates the client’s destination virtual service address with the chosen destination server’s IP address. The client’s source IP address is still translated to the service engine address to ensure that server response traffic returns symmetrically.
To create a TCP fast path network profile,
- From the Avi UI, navigate to Templates > Profiles > TCP/UDP.
- Enter the Name of the network profile.
- Select TCP Fast Path as the Type.
- Enter the Direct Server Return details, if required.
Note: Configuring the DSR settings is optional.
i. Click on Enable DSR.
ii. Click on the DSR Encapsulation Type (L2 or L3) to select the mode.
iii. Select IPinip as the DSR Encapsulation Type. - Enter the TCP Fast Path Settings as shown below:
i. Click on Enable Syn Protection. Avi Vantage will complete the three-way handshake with the client before forwarding any packets to the server. This will protect the server from SYN flood and half open SYN connections.
ii. Enter the Session Idle Timeout (between 5-14400 seconds). This is the time for which a connection needs to be idle before it is eligible to be deleted.
Note: Enter 0 to make the session idle timeout infinite.
The New TCP/UDP Profile: screen for creating a TCP Fast Path profile is as shown below: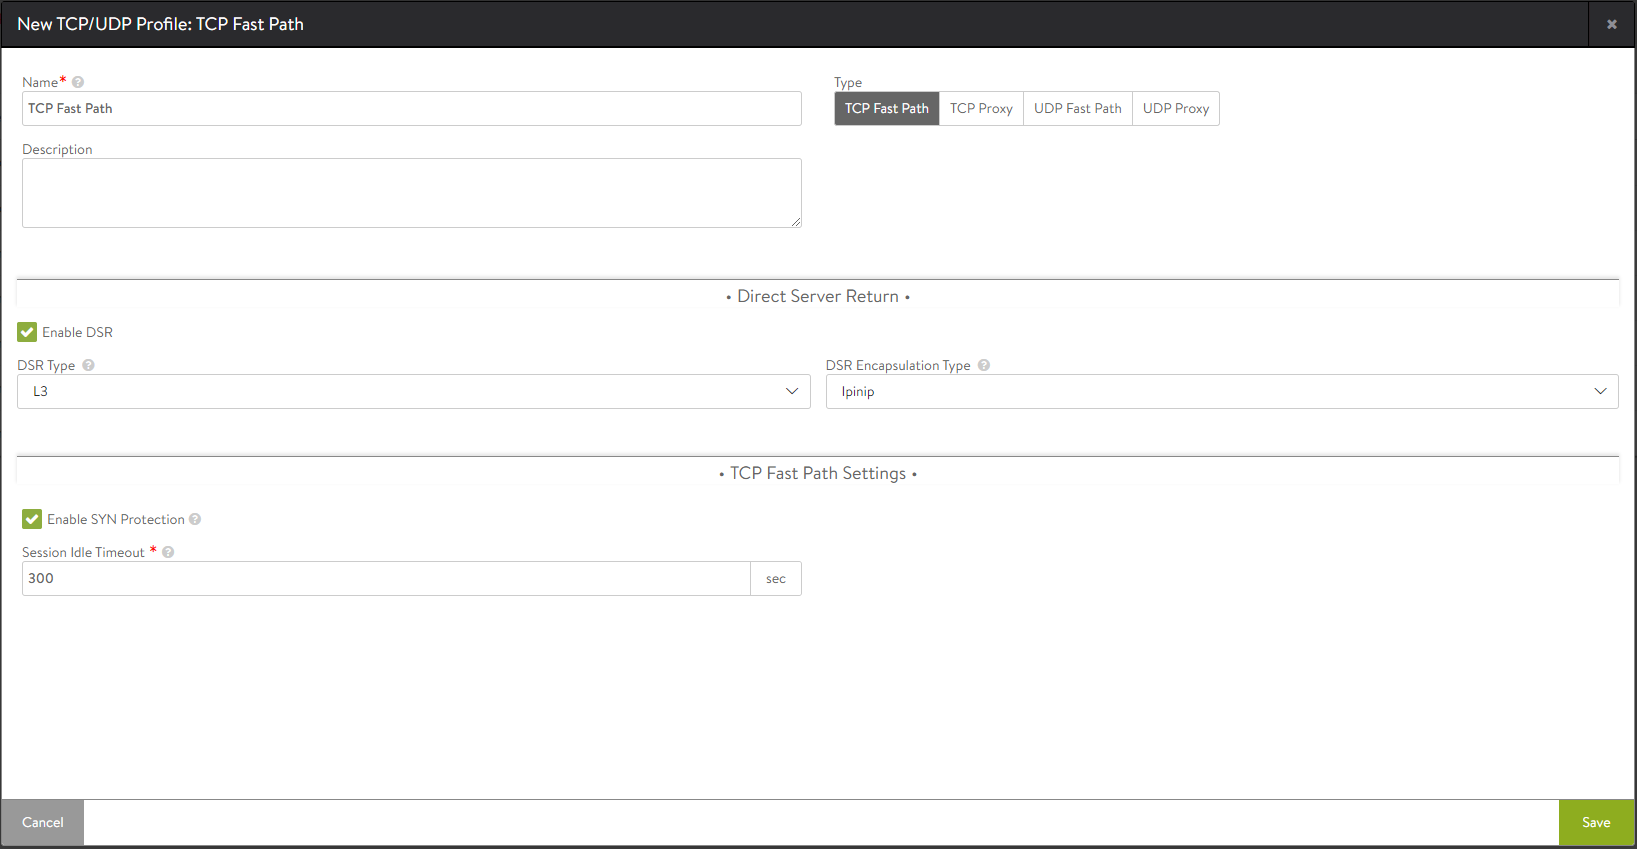
- Click on Save.
TCP Proxy
When TCP proxy is enabled, Avi Vantage terminates an inbound connection from a client. Any application data from the client that is destined for a server is forwarded to that server over a new TCP connection. Separating (or proxying) the client-to-server connections enables Avi Vantage to provide enhanced security, such as TCP protocol sanitization or DoS mitigation. It also provides better client and server performance, such as maximizing client and server TCP maximum segment size (MSS) or window sizes independently and buffering server responses. Use a TCP/UDP profile with the type set to Proxy for application profiles such as HTTP.
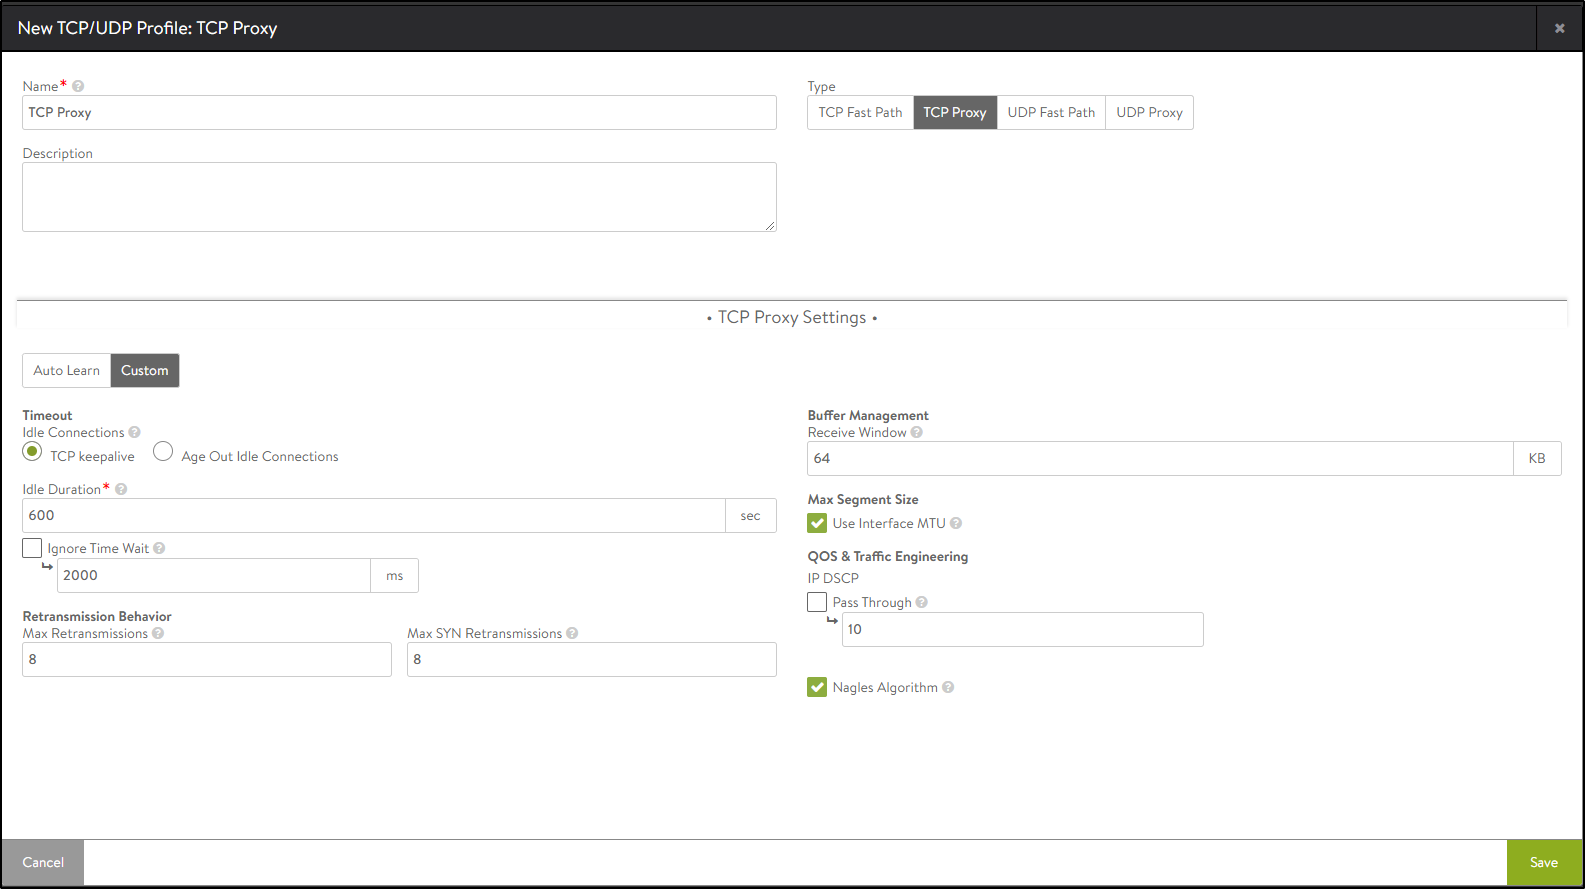
To create a TCP proxy network profile,
- In the New TCP/UDP Profile: screen, enter the Name of the network profile.
- Select TCP Proxy as the Type.
- Under TCP Proxy Settings, select the mode (Auto Learn or Custom) to set the configurations for this profile.
- Click on Save.
Auto Learn
Auto Learn mode sets all parameters to default values and dynamically changes the buffer size.
On selecting the auto learn mode, the default values configured in each field are as shown below:
| Settings | Default Value |
|---|---|
| TCP Keep Alive | Enabled |
| Idle Duration | 10 minutes. After 10 minutes of idle, Avi Vantage initiates the TCP keepalive protocol. If the other side responds, the connection will continue to live. |
| Max Retransmissions | 8 |
| Max SYN Retransmissions | 8 |
| IP DSCP | No special DSCP values used. | Nagles Algorithm | Disabled |
| Buffer Management | The receive window advertised to the client and on the server dynamically change. It starts out small (2 KB) and can grow when needed up to 64 MB for a single TCP connection. The algorithm also takes into account the amount of memory available in the system and the number of open TCP connections. |
Custom
The custom mode is used to configure the TCP Proxy Settings manually as shown below:
Timeout
- Select either TCP keepalive or Age Out Idle Connections to control the behaviour of the idle connections.
i. TCP keepalive : Sends a periodic keep-alive signal to the client that will keep the current connection open.
ii. Age Out Idle Connections: Terminates the idle connections that have no keep-alive signal from the client, as specified by the Duration field. - Enter the Idle Duration in seconds (between 5-14400 seconds, or a 0 for an infinite timeout). This is the time before the TCP connection is eligible to be proactively closed by Avi Vantage. The timer resets when any packet is sent or received.
Note: Setting this value higher may be appropriate for long-lived connections that do not use keepalive packets; however, higher settings may also increase the vulnerability of Avi Vantage to denial of service attacks, as the system will not proactively close out idle connections. - When a connection between either a service engine and a client or the service engine and a server is closed, the unique client or server IP:Port + service engine IP:port (called a 4-tuple) is placed in a TIME_WAIT state for a period of time. This 4-tuple cannot be reused until it is clear that there are no more delayed packets on the network that are still in flight or that have yet to be delivered. The Time Wait value defines the timeout period before this 4-tuple may be reused. Enter a value between 500 – 2000 ms or enable the Ignore Time Wait option to allow Avi Vantage to immediately reopen the 4-tuple connection if it receives a SYN packet from the remote IP that matches the same 4-tuple.
Retransmission Behavior
- Enter a value (between 3 to 8) as Max Retransmissions.This is the number of attempts at retransmit before closing the connection.
- Enter a value (between 3 to 8) as Max SYN Retransmissions. This is the maximum number of attempts at retransmitting a SYN packet before giving up.
Buffer Management
The Receive Window informs the sender how much data Avi Vantage can buffer before sending a TCP acknowledgement. Enter the size of the Receive Window (in KB). This can be a value between the range 2KB to 64MB.
Max Segment Size
Max segment size (MSS) is calculated by using the maximum transmission unit (MTU) length for a network interface. The MSS determines the largest size of data that may be safely inserted into a TCP packet. In some environments, the MSS should be smaller than the MTU. For example, traffic between Avi Vantage and a client that is traversing a site-to-site VPN may require some space reserved for padding with encryption data. Click on Use Interface MTU to set the MSS based on the MTU size of the network interface. The MSS is set to MTU - 40 bytes to account for the IP and TCP headers. For an MTU of 1500 bytes, the MSS will be set to 1460. Alternatively, you can enter a custom value in the range 512–9000 bytes.
QoS & Traffic Engineering
IP DSCP allows Avi Vantage to either pass an existing differentiated services code point (DSCP) parameter or specify a custom number. DSCP is an 8-bit field in the TCP header that can be used for classifying traffic in a manner similar to the deprecated TCP TOS field.
- Either enable Pass Through or enter a custom value in the range 0 to 63. This controls the value of the Differentiated Service Code Point field inserted in the IP header.
- Enable Nagles Algorithm to reduce latency by combining small packets into a smaller quantity of larger packets before sending.
The reduction in impact of network latency is by reducing the number of round-trip times required due to TCP acknowledgements. This option could adversely impact real-time protocols, particularly SSH and Telnet. For example, typing in a telnet session many not reflect any text back until either a user types 1500 characters (enough to fill a typical packet) or enough time has elapsed and the packet is sent half-full.
The New TCP/UDP Profile: screen to create a TCP Proxy is as below:
Configuring MTU via the CLI
The maximum transmission unit (MTU) can be configured as a global property, which will set the MTU across all SEs managed by the Controller cluster. By default the MTU is learned via DHCP. This may be manually set via the CLI. The following command sets the MTU to 1500 bytes. Two examples illustrate the need to change MTU from the default:
- If the installation is in an environment using VXLAN or some other type of overlay network (e.g., OpenStack), the MTU must be reduced to accommodate the additional tunnel headers.
- If the DHCP option sets the MTU to 9000 (jumbo), but the entire infrastructure (switches and routers) does not support jumbo MTU. This can happen in AWS environments.
configure serviceengineproperties
se_runtime_properties
global_mtu 1500
Overwriting the previously entered value for global_mtu
save
save
Note: Avi Vantage Service Engines support MTU a maximum of 1500 bytes.
UDP Fast Path
The UDP fast path profile enables a virtual service to support UDP. Avi Vantage translates the client’s destination virtual service address to the destination server and rewrites the client’s source IP address to the service engine’s address when forwarding the packet to the server. This ensures that server response traffic traverses symmetrically through the original SE.
To create a UDP Fast Path network profile,
- In the New TCP/UDP Profile: screen, enter the Name of the network profile.
- Select UDP Fast Path as the Type.
- Enter the Direct Server Return details, if required.
Note: Configuring the DSR settings is optional. - Click on Enable DSR.
i. Click on the DSR Encapsulation Type (L2 or L3) to select the mode.
ii. Select IPinip as DSR Encapsulation Type. - Enter the UDP Fast Path Settings as shown below:
i. NAT Client IP Address (SNAT): By default, Avi Vantage translates the client’s source IP address to an IP address of the Avi service engine. This may be disabled for connectionless protocols which do not require server response traffic to traverse back through the same service engine. For example, a syslog server will silently accept packets without responding. Therefore, there is no need to ensure response packets route through the same SE. When SNAT is disabled, it is recommended to ensure the session idle timeout is kept to a lower value.
Enabling NAT Client IP Address (SNAT) performs source NAT for all client UDP packets.
ii. Per-Packet Load Balancing: By default, Avi Vantage treats a stream of UDP packets from the same client IP:Port as a session, making a single load balancing decision and sending subsequent packets to the same destination server. For some application protocols, each packet should be treated as a separate session that can be uniquely load balanced to a different server. DNS is one example where enabling per-packet load balancing causes Avi Vantage to treat each packet as an individual session or request.
Enable Per-Packet Load Balancing to consider every UDP packet as a new transaction.
When disabled, packets from the same client source IP and port are sent to the same server.
iii. Session Idle Timeout: Idle UDP flows terminate (time out) after a specified time period. Subsequent UDP packets could be load balanced to a new server unless a persistence profileis applied.
Enter the Session Idle Timeout (between 2-3600 seconds). This is the amount of time for which a flow needs to be idle before it is deleted.
The New TCP/UDP Profile: UDP Fast Path screen is as shown below:
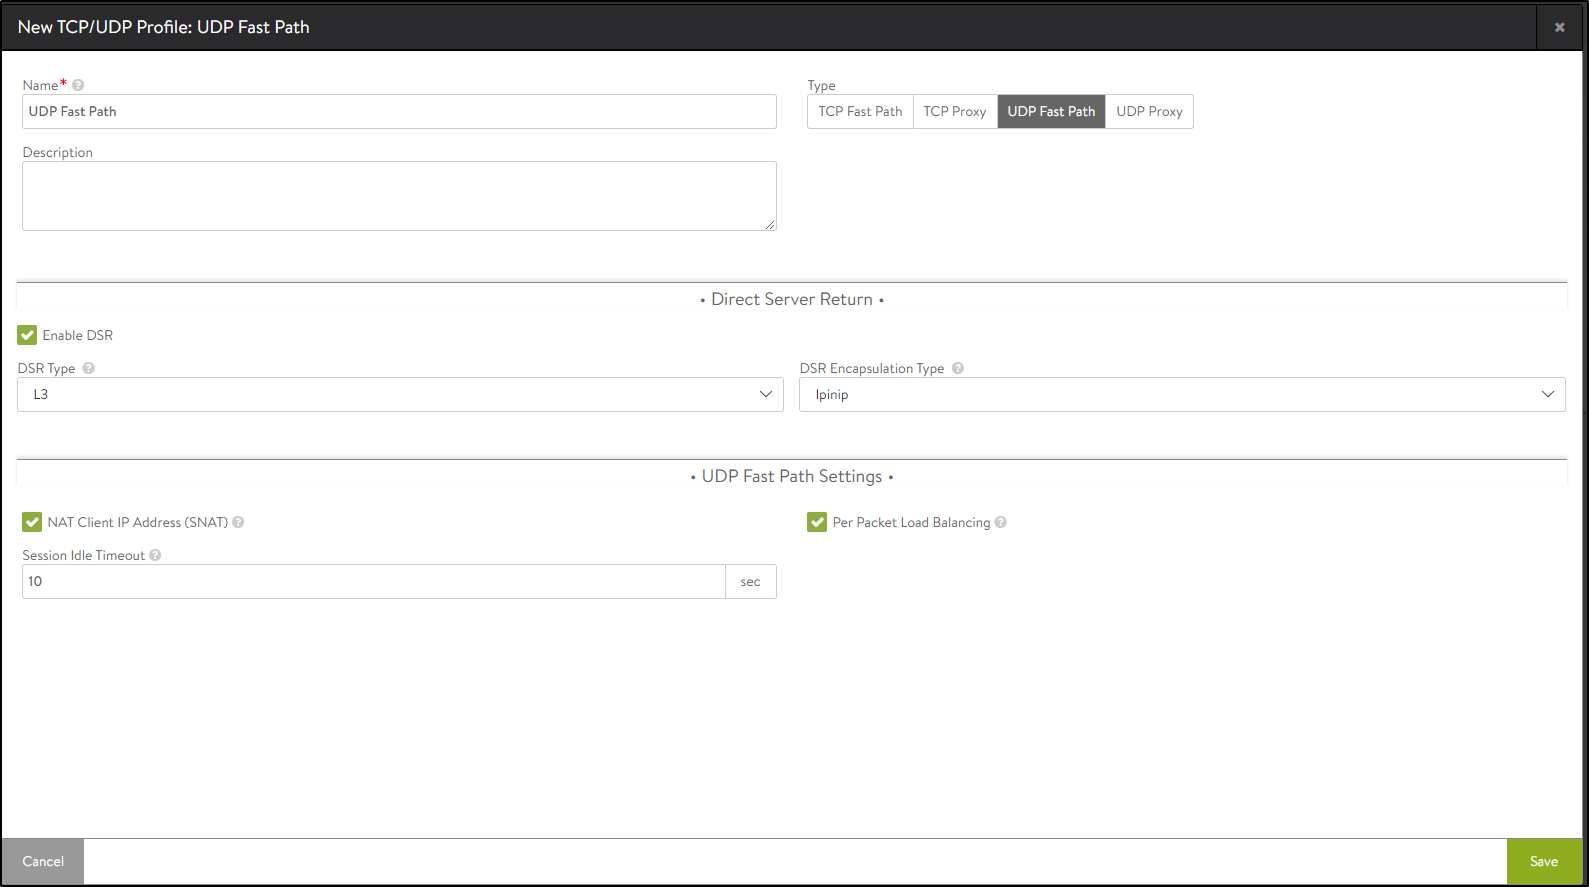
- Click on Save.
UDP Proxy
The UDP proxy profile is currently supported only for SIP applications. This profile maintains different flow for both frontend and backend transmissions.
To create a UDP Proxy network profile,
- In the New TCP/UDP Profile: screen, enter the Name of the network profile.
- Select UDP Proxy as the Type.
- Enter the Session Idle Timeout (between 2-3600 seconds). This is the amount of time for which a flow needs to be idle before it is deleted.
The New TCP/UDP Profile: screen for creating UDP Proxy network profile is as shown below:
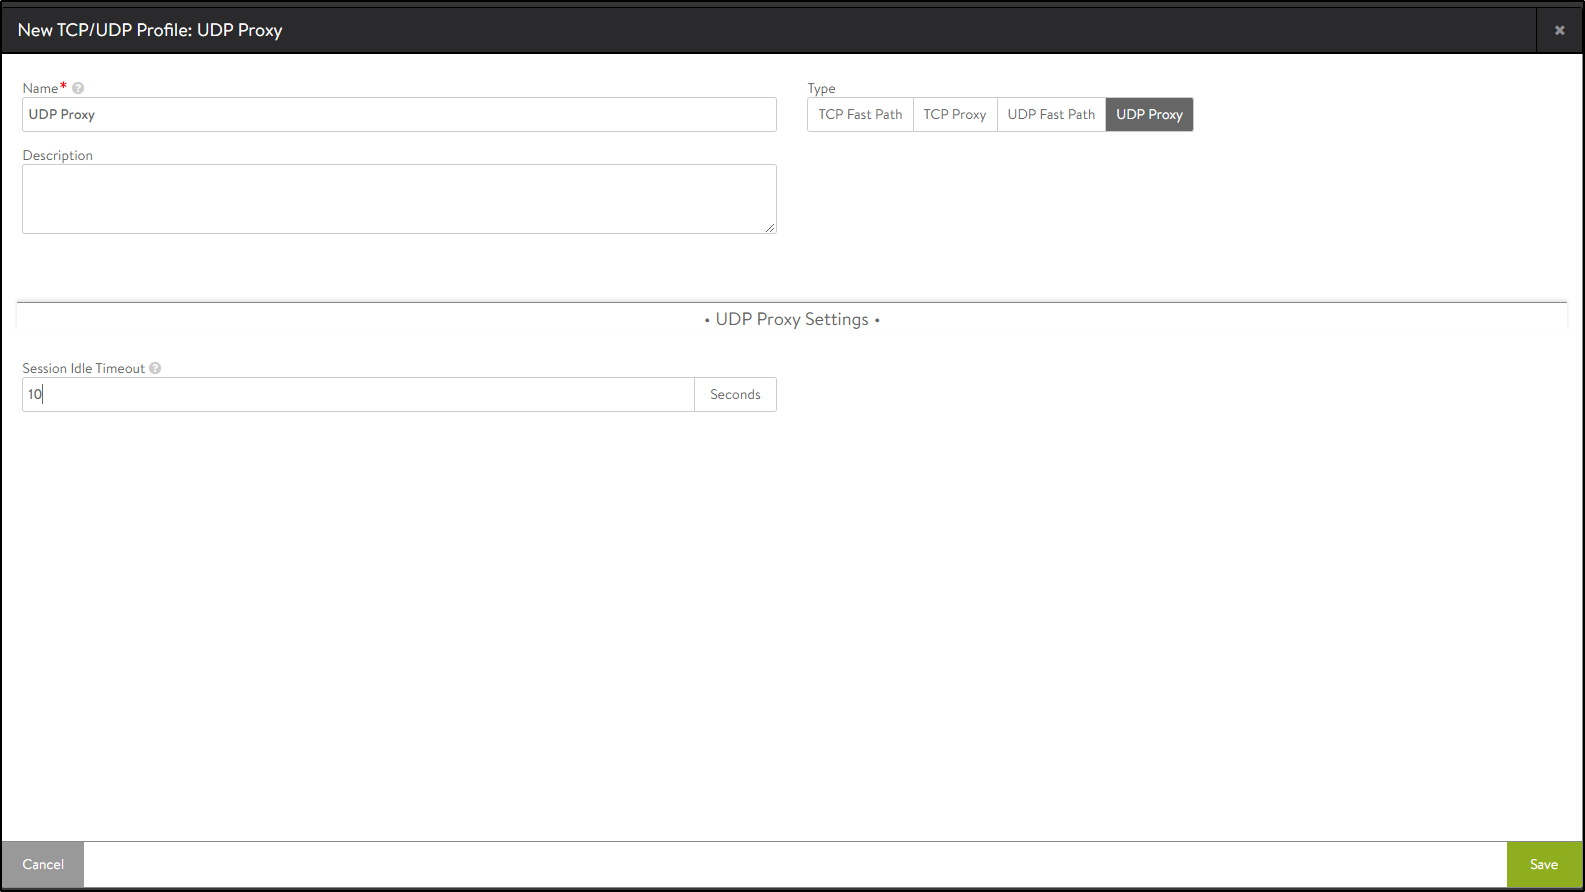
- Click on Save.
Refer to Configuring Avi Vantage for SIP Application for more details.