Installing Avi Vantage on KVM
Overview
This guide explains the installation procedure for the Avi Controller and SEs on the KVM hypervisor.
Avi Networks Cloud Application Delivery Platform (CADP) is a software-based solution that provides real time analytics, application visibility, and elastic application delivery services, such as SSL termination, load balancing, and content acceleration.
Avi Networks CADP includes two components, the Avi Controller and the Avi Service Engines (SEs). The Controller stores and manages all policies related to application delivery services and acts as a single point of control while providing GUI, REST APIs, and real time analytics services. The SEs are micro load balancers, which handle network traffic and provide application delivery services.
Prerequisites
Before starting the installation, ensure the following minimum requirements are met:
-
Host — The host hardware requirement can vary widely depending on your needs:
-
Intel Xeon with 8 cores, 16GB RAM, 256GB HDD/ SSD
-
2 x 1Gbps NICs
-
-
Host OS — The following are the supported operating system:
-
Oracle Enterprise Linux 6.1.2 or later
-
Ubuntu 12.04 or later
-
Red Hat Enterprise Linux 6.5 or later
-
-
Software Packages required on Host — The package names can be different depending on Linux distribution.
-
qemu-kvm
-
libvirt, libvirt-client, virt-top, and virt-viewer to manage VMs
-
virt-manager for GUI (optional)
-
-
Avi Networks CADP Software qcow2 Image — The raw images are also available via www.avinetworks.com.
- Avi Controller image (controller.qcow2)
- Avi SE image (se.qcow2)
-
Avi Networks CADP Resources — The VM resource requirement can vary widely depending on your needs. The following requirements are for a single instance. For redundancy, multiple instances will be required.
-
Avi Controller: 8GB DRAM, 4 vCPUs, 64GB HDD/SSD
-
Avi SE: 2GB DRAM, 2 vCPUs, 10GB HDD
-
-
DHCP Service — If DHCP service is not available, extra configuration steps are required on the Avi Controller.
-
VNC Viewer — VNC viewer is required to access the console of Controller and Service Engine VMs.
You can verify if the KVM is running on your host using the following command:
lsmod | grep kvm
kvm_intel             129746  14
kvm                   436463  1 kvm_intel
Installing CDAP
The following are the steps to install CDAP:
-
Create Linux bridges.
-
Deploy the Avi Controller image.
a) Connect to the Avi Controller console via virt-viewer.
b) Find the new Controller’s management IP address via bash.
-
Deploy the Avi SE image.
a) Run an Avi SE initialization script on bash and specify the Avi Controller IP address.
-
Connect to Avi UI for initial configuration.
The following is the diagrammatic representation to show the steps to deploy one Avi Controller, one Avi SE, and two bridge networks. To enable fully redundant Controller and Service Engines, additional VMs for each will need to be created.
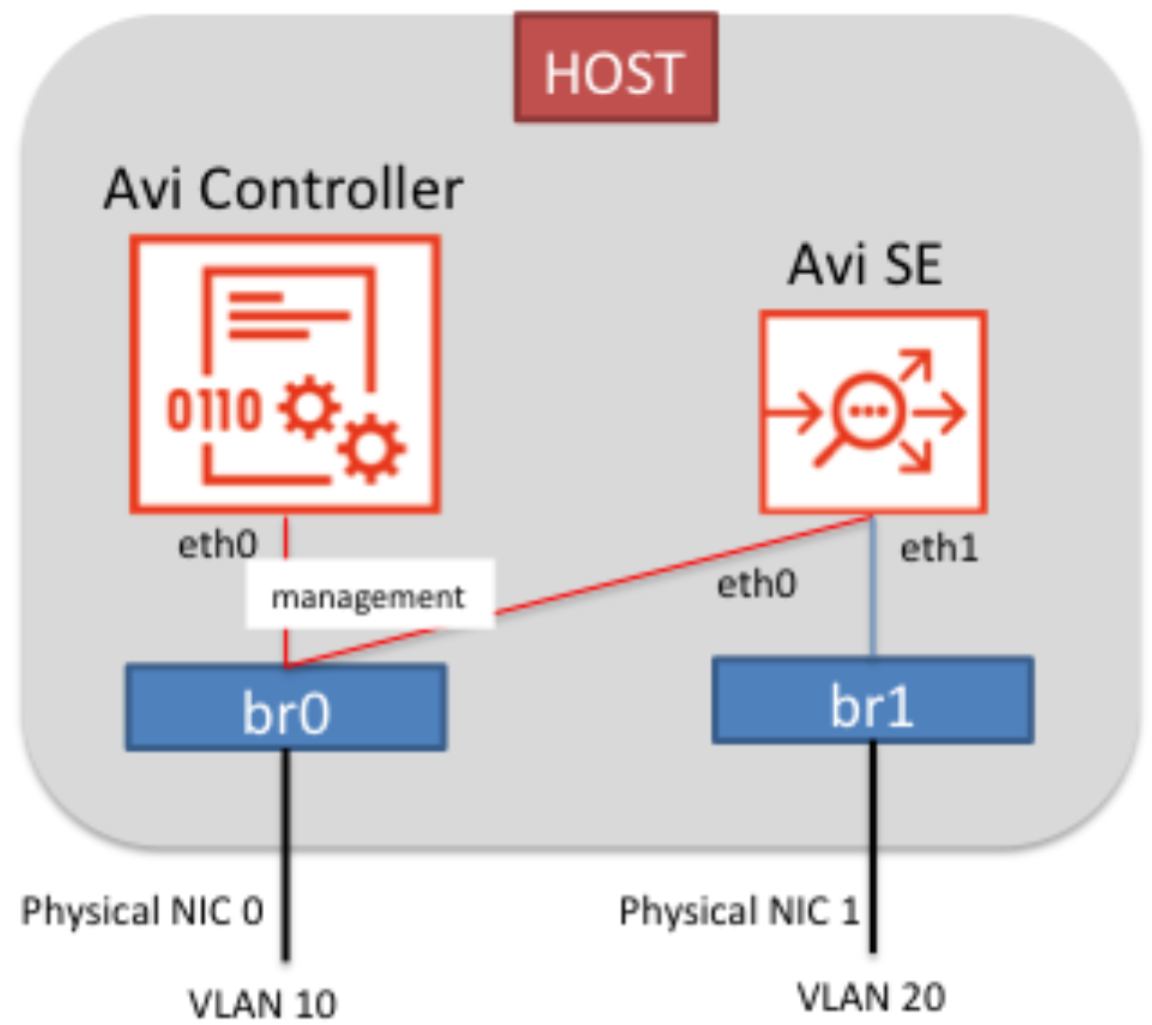
Creating Linux Bridges
Create two Linux bridges, br0 and br1. br0 connects to the management VLAN and br1 connects to the data VLAN.
root@host:~#
brctl addbr br0
brctl addif br0
ifconfig br0 up

brctl addbr br1
brctl addif br1
ifconfig br1 up
The management VLAN is used for the communication between the Avi Controller and the Avi SE. In this deployment example, a load balancing virtual service IP and servers exist on the same VLAN. If the virtual service needs to exist on a different network from the server network, then follow the same procedures to create an additional Linux bridge and network.
Deploying Avi Controller
You can either use virsh or virt-manager GUI to create VMs. In this guide virsh is used.
The following are the steps to deploy Avi Controller:
-
Create an Avi Controller using the qcow2 image and connect it to
br0.root@host:~# virt-install --name "avi-controller" --virt-type kvm --ram 8192 --vcpus 8 --os-type=linux --graphicsvnc --disk path=/tmp/controller.qcow2,device=disk,format=qcow2 --import --os-variant=ubuntuquantal --noautoconsole --network bridge=br0Note: You need to replace
avi-controller,controller.qcow2,br0in the above code with the appropriate data for your installation. -
Attach the Avi Controller VM console, using
virt-viewer.export DISPLAY=virt-viewer "avi-controller" </code></pre> -
Verify the IP address of the Avi Controller obtained via DHCP.
Deploying Avi SE
-
Create an Avi SE, using the Avi SE qcow2 image and connect it to
br0andbr1.root@host:~#virt-install --name "avi-se" --virt-type kvm --ram2048 --vcpus 2 --os-type=linux --graphics vnc --disk path=/tmp/se.qcow2,device=disk,format=qcow2 --import --os-variant=ubuntuquantal --noautoconsole --network bridge=br0--network bridge=br1 -
Attach the Avi SE VM console, using
virt-viewer. Run an initializationinit_system.pyscript.root@Avi-Service-Engine:~#/opt/avi/scripts/init_system.py Is Management interface DHCP? (yes/no) : yes Management IP address of the controller: 10.10.10.11
Configuring Avi Controller
The following are the steps for initial configuration of Avi Controller:
-
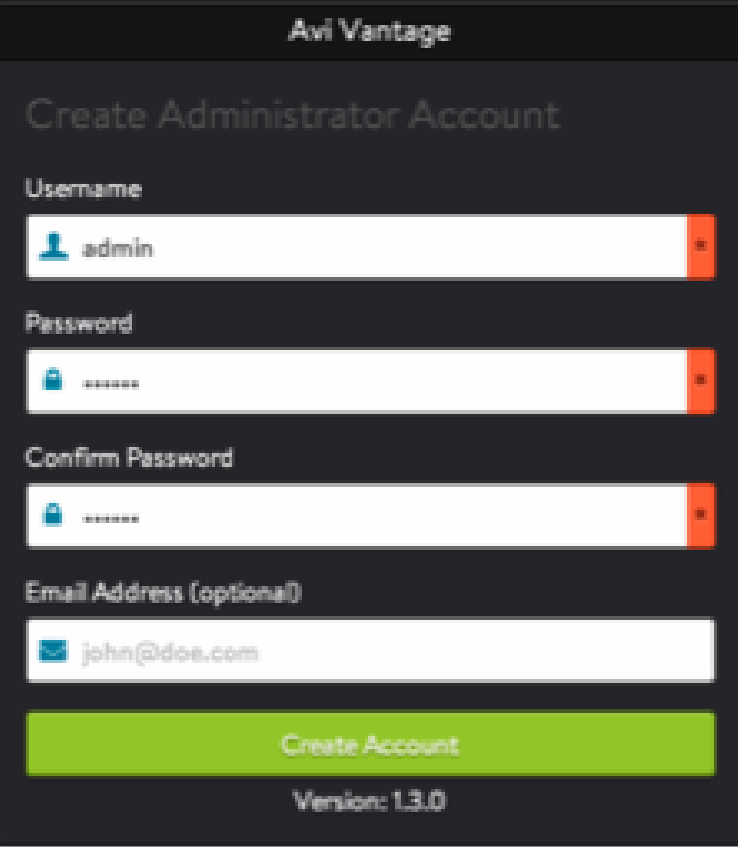
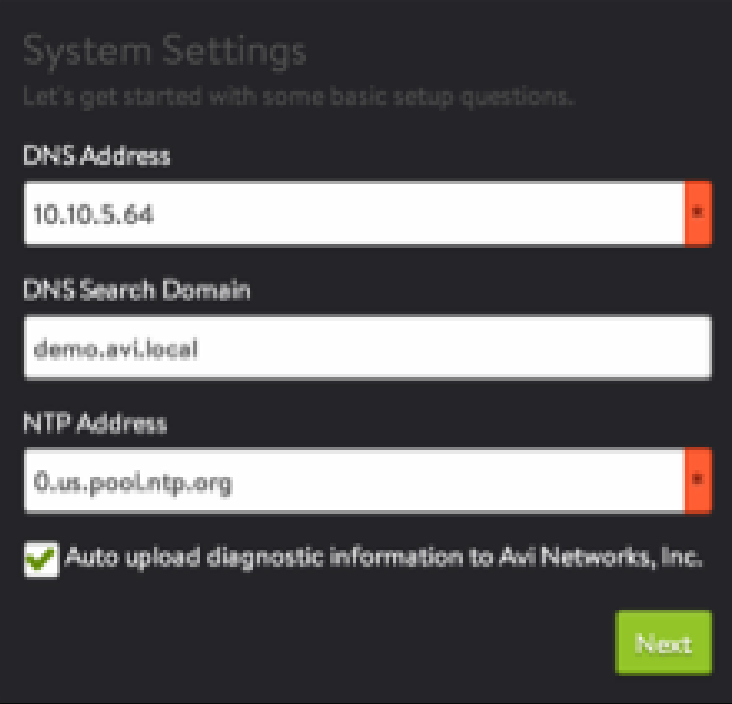
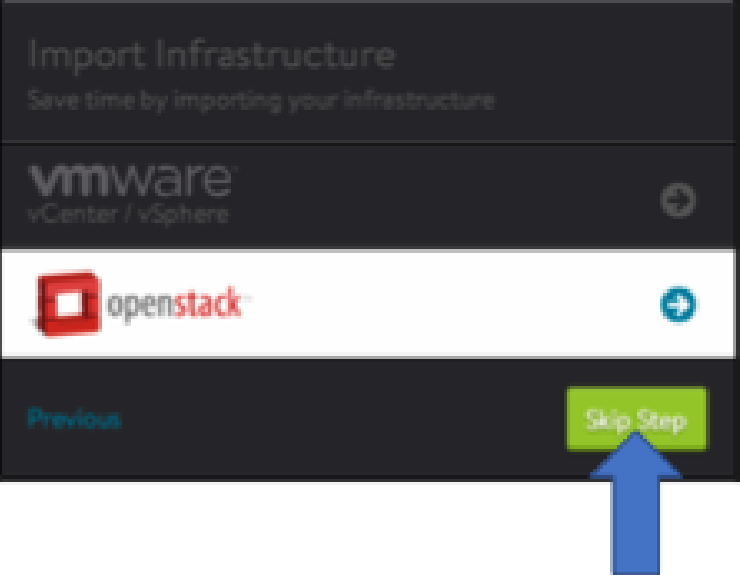
Connect to the Avi UI via a web browser. Follow the instructions of the initial setup wizard.
a) Specify the user name, password and email ID.
b) Create an administrator account by specifying DNS Address, DNS Search Domain and NTP Address.
c) Skip the infrastructure choice menu.
The system confirms if the installation is complete by displaying the confirmation message.